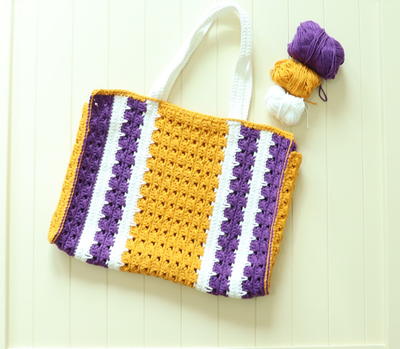
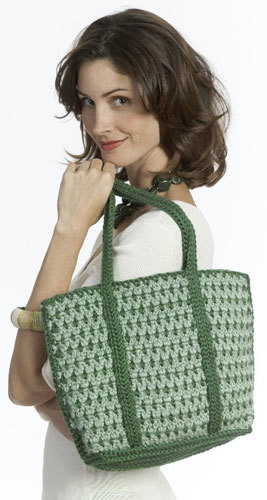
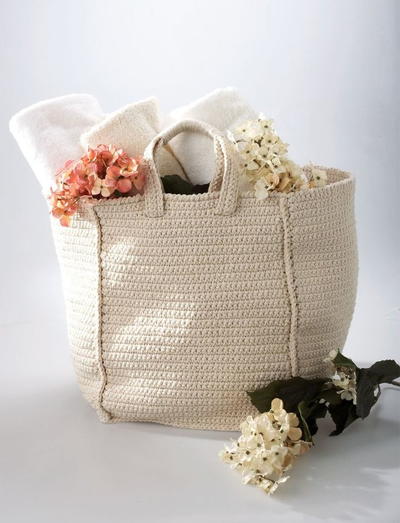
2 Tone Tote
Crochet a lovely tote bag in two complimentary yarn colors with this intermediate bag crochet pattern from Caron International Yarns. The comfortable crochet straps run to the bottom of the tote bag and felt lining completes the project.

Materials:
- Caron International's Simply Soft Heather (100% Acrylic; 5 oz/141.8 g, 250 yds/228 m skein): 2 skeins MC
- Caron International's Simply Soft (100% acrylic; 6 oz/170 g, 315 yds/288 m skein): 2 skeins CC. Shown in: #9503 Woodland Heather (MC); #9707 Dk Sage (CC).
- One size US H-8 (5mm) crochet hook, or size to obtain gauge.
- Craft felt to match yarn—1/2 yd/0.5m (for lining)
- Yarn needle
Finished Size: Tote measures approximately 14"/35.5 cm wide x 10"/25.5 cm high x 4"/10 cm deep
Gauge: In pattern (Front), with two strands held together, 13 sts and 10 rows = 4"/10cm.
In single crochet, with two strands held together, 13 sts and 14 rows = 4"/10cm.
Notes:
- Tote is worked holding two strands of yarn together throughout.
- To change color, work last st of old color to last yarn over; yarn over with new color and draw through all loops on hook to complete st. Do not cut old color; carry colors not in use up side of work.
Instructions:
FRONT
With 2 strands of MC held together, chain 47.
Row 1 (RS): 2 dc in fifth ch from hook (beginning ch counts as 1 ch of foundation ch and first dc), *skip next ch, 2 dc in next ch; repeat from * across to last 2 ch, skip next ch, dc in last ch, do not turn—44 dc. Drop, but do not cut, MC.
Row 2 (RS): Join CC with sc in first dc of Row 1 (top of beginning ch), *ch 1, skip next 2 dc, sc in space before next dc (between 2-dc groups); repeat from * across to last 3 dc, ch 1, skip next 2 dc, sc in last dc; change to MC in last sc, turn—22 sc, and 21 ch-1 spaces. Drop, but do not cut, CC.
Row 3 (WS): With MC, ch 3 (counts as first dc here and throughout), 2 dc in each ch-1 space across, dc in last sc, do not turn. Drop, but do not cut, MC.
Row 4 (WS): Pick up CC at opposite end of row by drawing up a loop in the first dc (top of beginning ch), ch 1, sc in same dc, *ch 1, skip next 2 dc, sc in space before next dc (between 2-dc groups); repeat from * across to last 3 dc, ch 1, skip next 2 dc, sc in last dc; change to MC in last sc, turn. Drop, but do not cut, CC.
Rows 5–24: Repeat Rows 3 and 4.
Fasten off both MC and CC.
BACK
Work as for Front.
BOTTOM
With 2 strands of MC held together, chain 33.
Row 1: Sc in second ch from hook and in each remaining ch across, turn—32 sc.
Rows 2–12: Ch 1, sc in each st across, turn.
Note: Work now proceeds in rounds.
Round 13: Ch 1, 2 sc in first st, sc in each remaining st across to last st, 2 sc in last st; pivot to work in ends of rows along side, sc in end of each row along side; pivot to work in free loops on opposite side of foundation ch, 2 sc in first ch, sc in each ch across to last ch, 2 sc in last ch; pivot to work in ends of rows along opposite side, sc in end of each row along side; join with slip st in first st—92 sc.
Round 14 (RS): Ch 1, working in front loops only, slip st in each st around. Fasten off.
STRAP (make 2)
With 2 strands of CC held together, chain 150.
Row 1: Working in back loops only, slip st in second ch from hook and in each remaining ch across, turn—149 sts.
Rows 2 and 3: Ch 1, slip st in each st across, turn.
Fasten off.
FINISHING
Cut three linings from craft felt, one each for Front, Back and Bottom. The linings should be about 1/4"/0.5 cm smaller than the crochet pieces along all edges. Tack linings into place on WS of pieces, leaving room in stitch work to crochet Front, Back and Bottom together. Note: Bottom lining should be on opposite side from slip st rim (Round 14).
Hold WS of Front and Back together. Working through both thicknesses, join CC with slip st in top corner, sc in end of each row along one side. Fasten off. Repeat to join opposite side. Hold joined Front and Back section and Bottom with WS together. Center short ends of Bottom against side seams of Front and Back. Arrange lower edges of Front and Back around edges of Bottom. Working through two thicknesses throughout, join CC with slip st in side seam, work sc evenly spaced around Bottom to join to Front and Back section; join with slip st in first sc. Fasten off.
Arrange one Strap on Front. Curve strap in half so that ends are centered along lower edge of Front, spaced about 5"/12.5 cm apart. Arrange remainder of Strap, each half extending straight up to top edge of Front, and curved section forming shoulder loops above top edge. Sew Strap in place. Repeat to attach other Strap to Back.
Using yarn needle, weave in ends.
If you're looking for other easy tote bag patterns, check out 26 Fashionable Free Bag Patterns


Thanks for your comment. Don't forget to share!
Linda
Feb 13, 2017
Vintage crocheted tote is simple design and easy to make. You can always use totes! Beginner projects are quick.
lpalmer59 7490208
Mar 06, 2016
Love this pattern. This will make a great little tote to take to the farmers market this summer for all my veggies. I re-enforced the inside with material instead of using felt, and also used the handles to make the sides a little firmer. This worked up so nicely, might make a few more for my friends. Thanks for sharing.
love 2 learn
Apr 19, 2013
Great pattern! Enjoyed watching it come together as I was making it. I used matching fabric as opposed to felt for the lining! Loved the piece once it was completed!
catherinewanderpoo l 2041484
Feb 10, 2012
BEAUTIFUL!!! I cant wait to crochet it :) Thanks for this pattern!
gmamadea
Feb 09, 2012
Diffinetly like this one better, I can see it in a medium beige and an off white.
joyewhitney 344266 5
Feb 09, 2012
I like them both, but if I was going to make one it would be this one. It looks simpler to make and is more my style anyway. The other one is nice, but just a little bit too girly for me.
Debbie Jones
Feb 09, 2012
Not crazy about green, but love the pattern. Any colors would work with this one!
mamad51 4524637
Feb 09, 2012
I like this one better because it's more versatile and the pattern is more attractive.
crafter8
Feb 09, 2012
I really like this one. I'm not into small purses, like the bigger ones! Really like it and the colors.
love 2 learn
Mar 18, 2011
Definitely makes sense now that I've read ShelleyJ's explanation. Thank you! I'm new to crocheting and am looking forward to working on this project and hopefully many more.
CSum
Jun 23, 2010
ShelleyJ, No, not 2 rows because not only do you not cut the yarn, you do not turn either. Drop the main color (pull a long loop or put a pin in the last loop so the stitches don't come out) then go back to your beginning and join your 2nd color with a single crochet into the first double crochet of row 1. You have to notice which rows tell you to turn and which do not. Hope this helps.
shelleyj3
Jun 17, 2010
Can someone please help me? The early rows of this pattern seem wrong to me. In row one you 'drop' the main color. Row 2 has you using the contrasting color, but at the end of that row, they want you to use the MC, which is at the opposite end. Shouldn't there be 2 rows with the contrasting color so you can get back to the end of the row to pick up the main color. thanks for your help! Shelley
Report Inappropriate Comment
Are you sure you would like to report this comment? It will be flagged for our moderators to take action.
Thank you for taking the time to improve the content on our site.

![Battenberg Crochet Granny Square Bag Pattern [Free]](http://irepo.primecp.com/2022/08/532101/Battenberg-Bag-02_Category-CategoryPageDefault_ID-4857588.png?v=4857588)