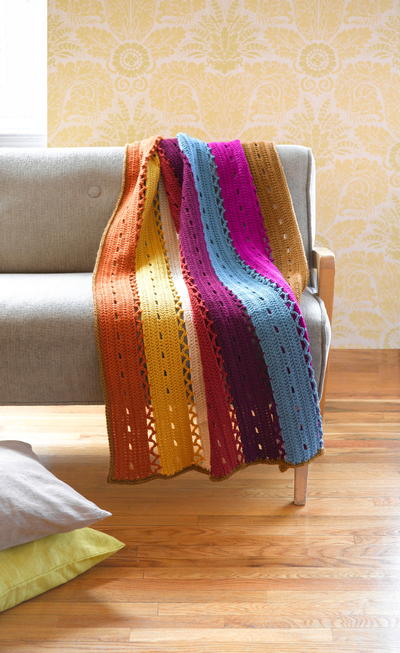
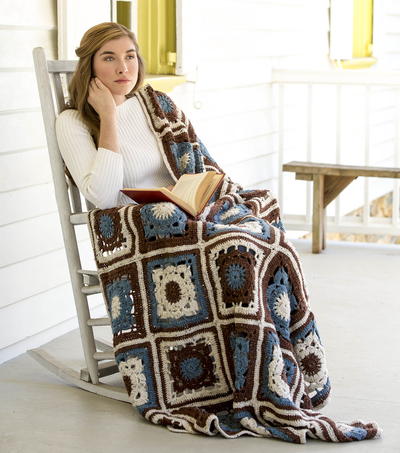
Roman Inspired Throw
Go back a few hundred years with this Roman Inspired Throw that is patterned to look like an old Aqueduct. This easy crochet pattern will inspire your home with a vintage feel and it's great for decorating either your living room or bedroom. Perfect for curling up with by a fire or using to keep warm as you sit outside, this Roman Inspired Throw is a decorative afghan that you're sure to use again and again.

Materials:
- 4 skeins Red Heart® Super Saver® yarn in Real Teal (A)
- 3 skeins Red Heart® Super Saver® yarn in Frosty Green (B)
- 5.5mm [US I-9] crochet hook
- Stitch markers
- Tapestry needle
Gauge: 13 sts = 4"; and 9 rows = 4" in pattern. CHECK YOUR GAUGE. Use any size needles/hook to obtain the gauge given.
Abbreviations:
- FPhdc – front post half double crochet – yo, insert hook from the front, around behind the post and out again to the front; yo, and draw through all 3 loops on hook.
- BPhdc – back post half double crochet – yo, insert hook from the back, around the post and out again to the back; yo, and draw through all 3 loops on hook.
Notes:
- Pay close attention when to turn work; turn every other row, not every row. Do not cut unused color; carry it along side edge. Beginning ch 3 counts as a st.
- To change to A in final st: With final 2 loops of B sc remaining on hook, remove A loop from st holder and place on end of hook, draw A through final 2 loops of sc, completing the st.
Instructions:
Throw measures 46" x 59".
- With A, ch 144.
- Row 1 (Right Side) : Dc in 4th ch from hook, dc in next ch; * skip next 2 chs, dc in next ch, 3 dc in next ch, dc in next ch; repeat from * across, ending skip next 2 chs, dc in next ch, 2 dc in final ch, drop loop from hook and place on st marker. Do NOT turn – 141 sts.
- Row 2 (Right Side): – Join B with sc in top of turning ch- 3, sc in next st; *ch 3, skip next 2 sts, sc in next, FPhdc in next st, sc in next st; repeat from * across, ending ch 3, skip 2 sts, sc in each of last 2 sts, change to A in final st, drop B – 28 ch-3 spaces.
- Row 3: Turn, with A, ch 3; * 5 dc in ch-3 space; repeat from across ending, dc in final st, place A loop from hook to st marker. Do NOT turn – 142 sts.
- Row 4: Starting at beginning of previous row, draw B through top of ch-3, ch 1, sc in top of ch-3, ch 1, skip next dc, * sc in next dc, BPhdc in next dc, sc in next dc, ch 3, skip next 2 dc; repeat from * across, ending sc in next dc, BPhdc in next dc, sc in next dc, ch 1, skip next st, sc in final st, changing to A – 2 ch-1 spaces; 27 ch-3 spaces.
- Row 5: Turn, with A, ch 3, dc in first sc, dc in ch-1 space; *5 dc in next ch-3 space; repeat from * ending dc in ch-1 space, 2 dc in final sc, place A loop from hook to st marker. Do NOT turn – 141 sts.
- Row 6: Starting at beginning of previous row, draw B through top of ch-3, ch 1, sc in top of ch-3, sc in next st; *ch 3, skip next 2 sts, sc in next, FPhdc in next st, sc in next st; repeat from * across, ending ch 3, skip next 2 sts, sc in each of last 2 sts, change to A in final st, drop B – 28 ch-3 spaces.
- Rows 7- 125: Repeat Row 3-6 ending after a Row 5. Fasten off.
Edging:
- Rnd 1: Join A with sc in upper right hand corner; work an additional 138 sc across top; work 1 more sc in final st of top edge; working in ends of rows evenly work 157 sc along side edge; working in opposite side of foundation ch, 2 sc in first ch; work an additional 138 sc across bottom edge; work 1 more sc in opposite side of final ch; working in ends of rows evenly work 157 sc along second side edge; work 1 sc in same place as beginning sc – 596 sc.
- Rnd 2: Ch 1 for corner; sc in each st around, placing a ch 1 between the 2 sc in each corner; ending with sc in final sc of previous row – 596 sc; 4 ch-1 spaces.
- Rnd 3: (Sc, ch 1, sc) in first ch-1 space, sc in each sc around and (sc, ch 1, sc) in each ch-1 space–604 sc; 4 ch-1 spaces. Fasten off.
- Rnd 4: Join B with sc in any ch-1 space, ch 3, sc in same space; sc in next 2 sts, *ch 3, skip 1 st, sc in each of next 3 sts; repeat from * until 3 sts from next corner, ch 3, skip 1 st, sc in each of next 2 sts, (sc, ch 3, sc) in ch-1 space, sc in each of next 2 sts; repeat from * around, join with slip st in beginning sc – 462 sc; 154 ch-3 spaces.
- Rnd 5: Slip st in ch-3 space, (ch 3, dc, ch 2, 2 dc) in same space; * skip next sc, slip st in next sc, skip next sc, (2 dc, ch 2, 2 dc) in ch-3 space; repeat from * around, ending skip last sc, join with slip st in top of beginning ch 3. Fasten off.
- Finishing: Weave in yarn ends.
Read NextColors of the Wind Afghan
Your Recently Viewed Projects

Thanks for your comment. Don't forget to share!
pamdagram
Apr 12, 2010
I always read all the reviews on a piece they are super helpful They make or break what I will make I go over alot of sites and patterns and make a swatch first of something before I make a project out of it Some patterns are impossible to read or are so hard you just give up after a couple of rows Easy colorful neat are things I look for I dont want to hate the project I am doing I will make swatchs first always complete the pattern if it is rows do that at least or rows As you see the pattern emerge you might like it or not Stop if you dont And just forget about it every one is different some like bulky some like thin being from Cape town does it get cold there I like neat so if it is to sloppy I stop…Read More I make swatchs with about a chain There is nothing worse then getting a quarter of a way through and finding it is crooked I have a closet full of that But this pattern was easy to follow and looks cool I will make all the main color a light blue or green and the post stitch row some contrasting darker blue or green This will look great on the swing on the front porch It is a nice pattern TRY it I did rows up and I liked it Dont make to big It would make a nice shawl to Like the holes Good Luck Will try to post pic when it is done happy hookin- pam-da-gram
Elrine
Apr 12, 2010
Lovely-looking design - but I am intimidated by these tricky-looking stitches, as I am a very new crocheter. I'd like to put in a plea for a really VERY easy throw...please? Greetings from Elrine, in a sunny Cape Town, South Africa.
Report Inappropriate Comment
Are you sure you would like to report this comment? It will be flagged for our moderators to take action.
Thank you for taking the time to improve the content on our site.