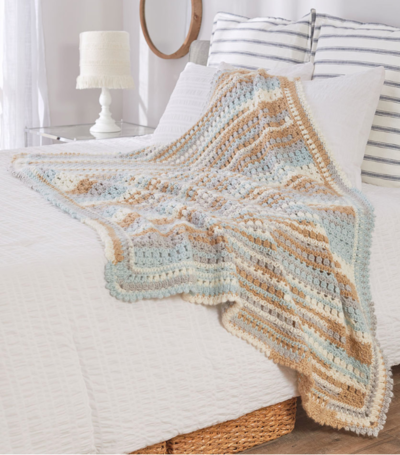
Passion Star Flower Block Crochet Throw
Watch passion star flowers emerge with each crocheted block from Red Heart Yarn. These dimensional flowers are worked in teal, orchid, and purple on a foundation of tea-leaf green. The black borders frame each block, making the crocheted flowers stand out visually. Check out this pattern and more in our We've Got You Covered: 25 Crochet and Knit Throws free eBook from Red Heart Yarns.

Throw measures 45” x 55”
MATERIALS:
- Red Heart® “Super Saver®” (Art. E300) solid 7 oz (198 g), 364 yd (333 m); multicolor and print 5 oz (141 g), 244 yd (223 m), flecks 5 oz (141 g) 260 yds (238 m) skeins:
- 1 skein 776 Dark Orchid A, 2 skeins 656 Real Teal B, 2 skeins 528 Medium Purple C, 5 skeins 624 Tea Leaf D, 3 skeins 312 Black E
- Crochet Hook: 5.5 mm [US I-9]
- Yarn Needle
GAUGE: Motif = 5” square. CHECK YOUR GAUGE.
Use any size needles/hook to obtain the gauge.
SPECIAL ABBREVIATIONS:
cluster: Insert hook in next st or space, yo, draw yarn through st, yo, insert hook through same st,
yo, draw yarn through st, yo, pull through all loops on hook.
BPdc (Back Post double crochet): Yarn over, insert hook from back to front to back around post of next st, yarn over and draw up a loop, [yarn over and draw through 2 loops on hook] twice.
FPdc (Front Post double crochet): Yarn over, insert hook from front to back to front around post of next st, yarn over and draw up a loop, [yarn over and draw through 2 loops on hook] twice.
INSTRUCTIONS:
BLOCK
Center Cone
With A, ch 3, join with slip st to form a ring.
Round 1 (right side): Ch 1, 8 sc in ring, slip st in first sc to join – 8 sc.
Rounds 2-3: Ch 1, sc in each sc around, slip st in first sc to join – 8 sc. Fasten off.
First Petal Ring
Round 1: With right side facing, join B in front loop of first sc in last round of center cone, ch 1, *ch 8, slip st in 2nd ch from hook, sc in next ch, hdc in next ch, dc in next 4 ch, skip next sc, slip st in front loop of next sc; repeat from * around, ending the repeat with slip st in sc at base of first petal, slip st around first ch of first petal – 4 petals. Fasten off.
Second Petal Ring
Round 1: Working behind first petal ring, with right side facing, join C in front loop of first skipped sc in round 3 of center cone, *ch 8, slip st in 2nd ch from hook, sc in next ch, hdc in next ch, dc in next 4 ch, skip next sc, slip st in front loop of next sc; repeat from * around, ending the repeat with slip st in sc at base of first petal, slip st around first ch of first petal – 4 petals. Fasten off.
BACKING SQUARE
Round 1 (right side): With right side facing, join D in remaining back loop of any sc at base of any B petal in last round of cone. Working in back loops only, ch 1, sc in first st, ch 2, skip next st, *sc in next sc, ch 2, skip next st; repeat from * around, slip st in first sc to join – 4 ch-2 spaces.
Round 2: Ch 1, (sc, ch 1,sc) in first sc, *2 sc in ch- 2 space**, (sc, ch 1, sc) in next sc; repeat from * around, ending last repeat at **, slip st in first sc to join – 16 sc.
Round 3: Ch 3 (counts as dc here and throughout), *(dc, ch 1, dc) in next ch-1 space, dc in next 4 sts; repeat from * around, ending last repeat at **, dc in next 3 sts, slip st in top of beginning ch-3 to join – 24 dc.
Round 4: Ch 3, dc in next dc, *dc in next ch-1 space, drop loop, insert hook through loop at tip of B petal, pick up dropped D loop and draw through petal tip, ch 1, dc in same ch-1 space, dc in next 3 dc, attach tip of next C petal as before**, dc in next 3 dc; repeat from * around, ending last repeat at **, dc in next st, join with a slip st to top of beginning ch-3 – 32 dc.
Round 5: Ch 3 (counts as BPdc), FPdc in next st, BPdc in next st, (2 dc, ch 1, 2 dc) in next ch-1 space, *[FPdc in next st, BPdc in next st] 4 times, (2 dc, ch 1, 2 dc) in next ch-1 corner sp; repeat from * around, [FPdc in next st, BPdc in next st] twice, FPdc in next st, slip st in top of beginning ch-3 to join.
Round 6: Ch 3 (counts as BPdc), [FPdc in next st, BPdc in next st] twice, (2 dc, ch 1, 2 dc) in next ch-1 space, *[FPdc in next st, BPdc in next st] 6 times, (2 dc, ch 1, 2 dc) in next ch-1 corner sp; repeat from * around, [FPdc in next st, BPdc in next st] 3 times, FPdc in next st, slip st in top of beginning ch-3 to join. Fasten off D, join E.
Round 7: With E, cluster in first st, ch 1, skip next st, ** *cluster in next st, ch 1, skip next st*; repeat from * to * across to next corner, (cluster, ch 1, cluster) in next ch-1 space; repeat from ** around, repeat from * to * across to beginning, join with slip st in first cluster. Fasten off.
NOTE: Each cluster should be worked in a BPdc.
FINISHING: With wrong sides of 2 blocks together, join E in any corner ch-1 space, working through double thickness, and through back loops only, sc in each st across one side blocks to next corner, do not finish off.
Pick up two more blocks and repeat 7 times.
Fasten off.
Building upon these two rows, continue adding blocks so that you have 9 rows of 7 blocks.
Fasten off at the end of each 7-block row. Twist and stuff tails into cone holes, then with yarn needle and D, weave a short piece around edge of each cone hole, gather tightly and sew opening closed, weave in end (this will allow tails to keep cone somewhat firm, and hides tails completely).
BORDER
Round 1: With right side facing, join E in any corner ch-1 space, ch 1, *(cluster, ch 1, cluster) in corner ch-1 space, ch 1, (cluster, ch 1) in each
ch-1 space across to next corner; repeat from * around, slip st in beginning ch-1 to join.
Rounds 2-4: Slip st to next corner ch-1 space, ch 1, *(cluster, ch 1, cluster) in corner ch-1 space, ch 1, (cluster, ch 1) in each ch-1 space across to next corner; repeat from * around, slip st in beginning ch-1 to join. Fasten off E.
Round 4: With A, repeat round 1. Fasten off.
Weave in ends.
Read NextArrow Stitch Crochet Afghan