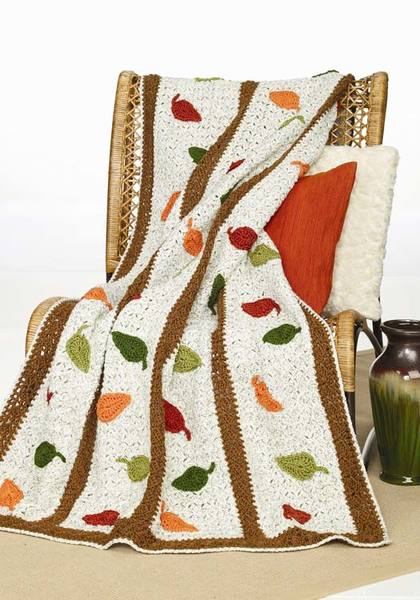
Falling Leaves Afghan
Crochet a beautiful afghan for autumn with colorful falling leaves. This intermediate afghan crochet pattern is worked from side to side beginning at right hand edge. Great for wrapping up with on a brisk fall evening, this Falling Leaves Afghan can be out on display all season long, and it makes a wonderful housewarming gift or wedding present for a fall bride.

Materials:
- 6 skeins Red Heart® Fiesta™ yarn in Horizon (MC)
- 3 skeins Red Heart® Soft Yarn in Toast (A)
- 1 skein Red Heart® Yarn in Tangerine (B)
- 1 skein Red Heart® Yarn in Leaf (C)
- 1 skein Red Heart® Yarn in Grass Green (D)
- 1 skein Red Heart® Yarn in Paprika (E)
- 6mm [US J-10] crochet hook
- Yarn needle
Gauge: 16 sts = 4"; 6 rows = 4"
Instructions:
Size: 48" x 70"
To change color: Work last st with color in use until there are 2 loops left on hook, drop color in use, draw next color through 2 loops and continue with new color.
With A, ch 251.
-
Border-Row 1 (Wrong Side): Dc in 4th ch from hook, dc in next ch, * ch 1, skip next ch, dc in next ch; repeat from * to last ch; dc in last ch; turn – 123 ch-1 spaces.
-
Row 2 (Right Side): Ch 3, skip first dc, dc in next dc, * skip next ch-1 space, skip next dc, dc in next ch-1 space, ch 3, 3 dc over the last dc made, skip next dc, skip next ch-1 space, dc in next dc; repeat from * to last st; dc in top of ch-3; turn.
-
Row 3: Ch 3, skip first dc, dc in next dc, * ch 2, sc in top of next ch-3, ch 2, dc in next dc; repeat from * to last st; dc in top of ch-3; turn.
- Row 4: Ch 3, skip first dc, dc in next dc, * ch 1, [dc in next ch-2 space, ch 1] twice, dc in next dc; repeat from * to last st; dc in top of ch-3 changing to MC. Fasten off A.
** Panel-Row 1 (Wrong Side)
-
With MC, ch 1, sc in first 2 dc, * ch 1, skip ch-1 space, sc in dc; repeat from * to last st; sc in top of ch-3; turn.
-
Row 2 (Right Side): Ch 3, 2 dc in first sc, * skip next 3 sts (the sc, ch-1 space, and sc), work (sc, ch 3, 2 dc) all in next ch-1 space; repeat from * to last 2 sc; skip next sc, sc in last sc; turn.
-
Rows 3-16: Ch 3, 2 dc in first sc, * (sc, ch 3, 2 dc) all over next ch-3; repeat from * to last st; sc in top of ch-3; turn.
-
Row 17: Ch 3, * (sc, ch 1, hdc, dc) all over next ch-3; repeat from * to last 3 sts; skip next dc, sc in next dc and top of ch-3; turn.
- Row 18: Ch 1, sc in first 2 sc, * ch 1, skip next dc, sc in hdc, ch 1, skip ch-1 space, sc in next sc; repeat from * to last st; sc in top of ch-3 changing to A. Fasten off MC.
Border-Row 1
-
With A, ch 3, skip first sc, dc in next sc, * ch 1, dc in next sc; repeat from * to last sc; dc in last sc; turn.
-
Rows 2-4: Repeat Rows 2-4 of Border. **
- Repeat from ** to ** 3 more times – 4 panels and 5 border sections. Fasten off A.
Top and Bottom Borders-Row 1
-
With right side facing, attach A at corner; ch 1, work 2 sc in row end(s), [ch 1, skip a space equal to one sc, sc in row end] 90 times evenly across to next corner, work one more sc at corner; turn.
-
Note: Work evenly to keep work flat and to have a multiple of 3 ch-1 spaces across the edge.
-
Row 2: Ch 3, skip first sc, dc in next sc, * ch 1, dc in next sc; repeat from * to last sc; dc in last sc; turn.
-
Rows 3-5: Repeat Rows 2-4 of Border.
-
Fasten off.
- Repeat same at opposite edge.
Edging
-
Round 1: Working across top edge, with right side facing, attach A at corner of top edge; *** ch 1, (sc, ch 2, sc) all in corner, ch 1, * skip next st, sc in ch-1 space, ch 1; repeat from * to next corner; (sc, ch 2, sc) all in corner; working across side edge: [ch 1, sc] 4 times across edge of top border, ch 1, sc between next 2 dc at start of side border, ** ch 1, skip next st, sc in ch-1 space; repeat from ** to next corner; repeat from *** around; join with a slip st in first sc. Fasten off.
-
Round 2: With right side facing, attach MC in ch-2 space at any corner; ch 1, ** (sc, ch 2, sc) all in ch-2 space, ch 1, * skip next sc, sc in next ch-1 space, ch 1; repeat from * to next corner; repeat from ** around; join. Fasten off.
- Weave in ends.
Leaves (Make 13 for each Panel)
With B, C, D, and E make leaves as follows choosing colors for each panel
-
Round 1: With color chosen, ch 11; 4 tr in 5th ch from hook, dc in next 2 ch, hdc in next 2 ch, sc in next ch, work (sc, ch 2, sc) in last ch, working along opposite side of ch, sc in next ch, hdc in next 2 ch, dc in next 2 ch, 4 tr in same ch as first tr; join with a slip st in top of ch-4.
-
Round 2: Ch 1, sc in joining, 2 sc in each of next 4 tr, sc in next 6 sts, (sc, ch 2, slip st in 2nd ch from hook, sc) all in next ch-2 space, sc in next 6 sts, 2 sc in each of next 4 tr, sc in joining; ch 7 for stem, slip st in 2nd ch from hook and in next 5 ch, slip st in first sc. Fasten off.
- Sew 13 leaves to each panel of random colors as shown.
Read NextArrow Stitch Crochet Afghan
Your Recently Viewed Projects
Thanks for your comment. Don't forget to share!
zoom22334 2374680
Apr 08, 2024
Please help with Row 2 3dc over the last dc madeplease tell me how to do that. Ive asked and Im not able to get it to work. Thx
weedwitch1 7685189
Jan 09, 2022
I am almost finished with this afghan, it's been fun to make and pretty easy to follow and it will be beautiful. But I've used 13 skeins of the mc not 6. Same size hook. Just saying
khasierah 3187474
Oct 28, 2016
Just wanted you to see my completed project. Thank you for the pattern Read more at http//www.favecrafts.com/Crochet-Afghans/Falling-L == eaves-Afghan-Crochet-Pattern-from-Red-Heart#yF3xFt == T1odAHThUp.99
khasierah 3187474
Oct 05, 2016
Tried to get hel to complete border was told to ask someone else. So don't know if I will be able to complete this gift as seen in photo. What a waste of time
Editor Dana
Oct 07, 2016
Hi there! I found the link to the pattern on Red Heart's website. Take a look and let us know if you still have questions! -Editors of FaveCrafts http://www.redheart.com/free-patterns/falling-leaves-throw
khasierah 3187474
Oct 04, 2016
Hi, I am trying to start the border on top and bottom, having problem can you help me?
khasierah 3187474
Oct 05, 2016
Please can you respond with help on this pattern it is a gift and I would like to complete it as soon as possible
weedwitch1 7685189
Jan 21, 2022
It means to crochet back over the db that you just made creating an X
weedwitch1 7685189
Jan 21, 2022
It means to crochet back over the db that you just made creating an X
weedwitch1 7685189
Jan 21, 2022
It means to crochet back over the db that you just made creating an X
weedwitch1 7685189
Jan 21, 2022
It means to crochet back over the db that you just made creating an X
deborahltruman 464 9873
Jun 19, 2015
Could you help me with sewing the leaves on, I don't want the colour to show on the backside, what did you use?
Kaylee
Nov 16, 2015
Hi deborahltruman 464 9873! If you use a thread that is the same color as your afghan, you should avoid unsightly stitches. Hope that helps! Kaylee, Editor of FaveCrafts.com
mommymiller 405736 2
Dec 08, 2013
i need help!!!! please, at the beginning of the border row2 it say 3DC OVER THE LAST DC MADE could you help me under stand this part or reword it better...thankyou tammy
brueck99 0740622
Aug 26, 2013
I would love to know how to do the second row too Crafter 8703674. It's a bit confusing on where the DC should go "over" the last DC. Does this mean the next one over the one that you previous created?
mommymiller 405736 2
Dec 08, 2013
im stuck on the border row 2 also ( 3dc over the last dc made) did u get any help? if so could u help me out.thankyou
WendyD
Feb 15, 2014
In row 2, the dc over the last dc - here's what I did ---- if you read row 2, it states "Skip next ch-1 sp, skip next dc, dc in next ch-1 sp, ch 3, 3 dc over the last dc made"... When you do the 3 dc over the last dc made - that is referring to the "dc in the next ch-1 sp" - you make the 3 dc on that stitch, so the 3 dc will be ON it, and will make a nice little pattern. It is so pretty when it's done and it is the main stitch for this afghan.
Amifan
Jul 02, 2011
jessiCAN, thank you so much for that. I understand now. I will definitely attempt this afghan, it's so pretty. Bless you :)
JessiCAN
Jul 01, 2011
Amifan You will start out this blanket crocheting from side to side beginning with the right side border and ending with the left side border This will leave you with no borders on the top and bottom of the blanket This is where you begin the instructions titled Top and Bottom Borders Remember that you will need to turn your work at this point so that all the panels are oriented vertically instead of horizontally You will then begin crocheting in the top right corner of the blanket You will want the front side or the right side of the blanket to be facing you Attach A refers to the yarn color you will be using This means that you will begin crocheting with the Toast color listed as A in the materials list You will be crocheting along the sides of the panels and borders you created earlier Hope this…Read More helps -- Editor of FaveCrafts
Amifan
Jul 01, 2011
I'd love to make this, but I don't understand the pattern. Where it says "top and bottom borders" and it starts with "with right side facing attach A at corner..." I don't know what it is that you supposed to be attaching A to? Right sides of what facing? What are you actually crocheting into? I don't get it. Please help someone!
suzysewer
Feb 08, 2010
I made this afghan for my daughter and it is beautiful. She gets many compliments on it. It was not a hard pattern to follow and is very unique compared to other afghans. I love it.
Holidaycrafter
Jan 31, 2010
Hi Crafter 8703674, The border will be as follows chain 3 (equals a post that is the same as a double crochet (dc). Then skip the next space with a chain 1 and double crochet in the next space. So it is double crochet, skip 1 space (chain 1), double crochet, skip 1 space (chain 1), double crochet, skip 1 space (chain 1), double crochet, skip 1 space (chain 1) to the end of the row. End with a double crochet. I hope that helps you.
Crafter 5666948
Dec 29, 2009
I crocheted this afghan last year for my sister and she loved it! It was beautiful! I might even make myself one.
Crafter 8703674
Dec 22, 2009
I am trying to work on this afghan now and would like to know if there is anyone out there that can tell me how to do Row 2 on the Border. May be they can even show me a diagram of that row so I can see how it is worked. If there was a way for me to contact Suzy Sewer or the Rhyme Time Blue it would be greatly appreciated. This is the first time that I worked on this kind of blanket.
suzysewer
Dec 08, 2009
I am working on this pattern and it is so easy and so beautiful. I am half way through it and friends are telling me how pretty it is. I highly recommend it to the intermediate crocheters.
Report Inappropriate Comment
Are you sure you would like to report this comment? It will be flagged for our moderators to take action.
Thank you for taking the time to improve the content on our site.