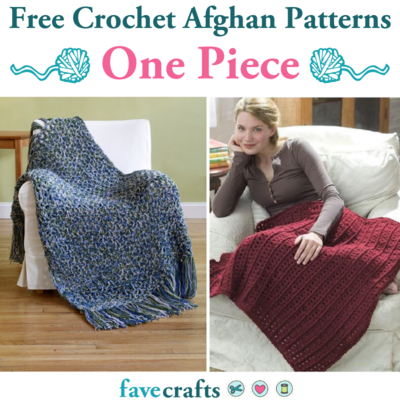
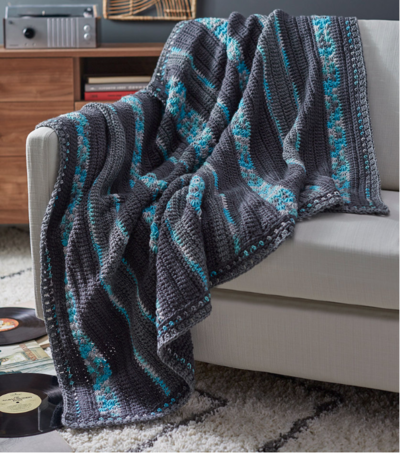
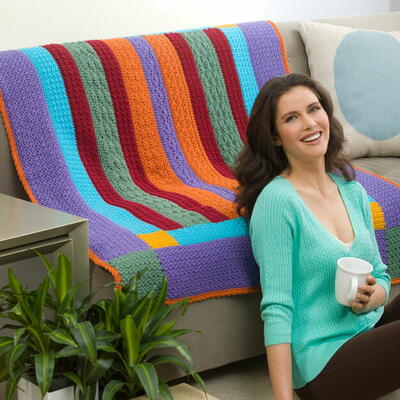
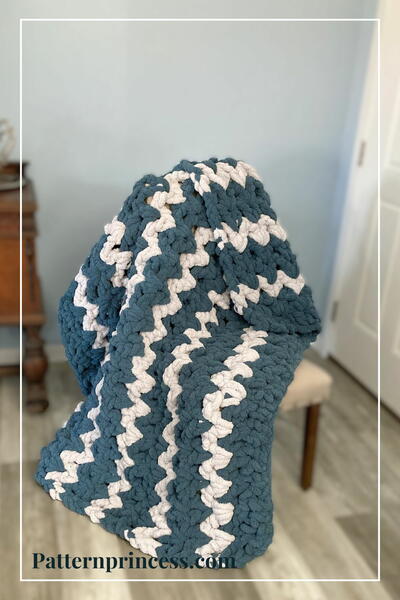
Crochet Corner to Corner Throw
This crochet afghan will keep you warm and make cold weather so much more enjoyable!

Check out this Crochet Corner-to-Corner Throw Pattern from Red Heart Yarn! This makes a great free crochet afghan pattern for the intermediate crocheter.
One of the biggest advantage of C2C patterns is that you start in a corner, increase until you like the size of the blanket, and then begin decreasing. This is a recipe for mindless crochet you can do while listening to an audiobook or your favorite TV show.
The C2C method also means your project size is totally customizeable. You can make a coaster, dishcloth, baby blanket, throw, or a king sized blanket! It's a fantyastic method for using up scrap yarn, too.
I'd also suggest it's easier to maintain gauge with C2C patterns. Inconsistencies are less obvious.
Enjoy learning this method and creating beautiful new projects! It's addictive!
PLUS: Get free crochet patterns delivered straight to your inbox!
Sign up for the FaveCrafts newsletter
Check out the video below to show you how to get started on working a corner to corner crochet pattern! Great for all you visual learners!

Crochet HookH/8 or 5 mm hook
Yarn Weight(4) Medium Weight/Worsted Weight and Aran (16-20 stitches to 4 inches)
Crochet GaugeGAUGE: 6 blocks = 4"; 6 rows = 4" in pattern. CHECK YOUR GAUGE. Use any size hook to obtain the gauge.
Finished SizeThrow measures approximately 67" x 67" square (including edging).
Materials List
- RED HEART® "Super Saver®": 4 Skeins 316 Soft White CA
- RED HEART® "Super Saver®": 5 skeins 885 Delft Blue CB
- RED HEART® "Super Saver®": 7 skeins 310 Monet Print CC
- Crochet Hook: 5mm [US H-8]
- Yarn Needle
Crochet Corner to Corner Throw Pattern
Note: To change color in dc: Work last dc before color change until 2 loops are left on hook, drop color in use, with next color to be used draw through 2 loops on hook and continue with new color.
Instructions:
-
With CA, ch 6.
-
Row 1 (Right Side): Dc in 4th ch from hook and in next 2 ch; turn – 1 block made.
-
Row 2: Ch 6, dc in 4th ch from hook and in next 2 ch, (slip st, ch 3, 3 dc) all in ch-3 space of previous row changing to CB in last dc; turn – 2 blocks made.
-
Row 3: With CB, ch 6, dc in 4th ch from hook and in next 2 ch, [(slip st, ch 3, 3 dc) all in next ch-3 space of previous row] twice; turn – 3 blocks made.
-
Row 4: Ch 6, dc in 4th ch from hook and in next 2 ch, [(slip st, ch 3, 3 dc) all in next ch-3 space of previous row] 3 times; turn – 4 blocks made.
-
Continue in in this manner, increasing 1 block on each row until there are 96 blocks across AND working Stripe pattern as follows: 2 more rows CB, 2 rows CA, [7 rows CC, 2 rows CA, 2 rows CB, 2 rows CA, 7 rows CC, 2 rows CA, 4 rows CB, 2 rows CA] 3 times, 4 rows CC.
-
Now work in decreasing rows as follows:
Row 97: With CC, slip st across first 3 dc, * (slip st, ch 3, 3 dc) all in next ch-3 space of previous row; repeat from * to last ch-3 space; slip st in last space; turn, do NOT make a block in last space – 95 blocks. -
Repeat Row 97 for decreasing block pattern and work 2 more rows with CC, [2 rows CA, 2 rows CB, 2 rows CA, 7 rows CC, 2 rows, CA, 4 rows CB, 2 rows CA, 7 rows CC] 3 times, 2 rows CA, 2 rows CB, 2 rows CA, 2 rows CC –1 block remains.
-
Fasten off.
-
Edging: With right side facing, attach CA in same ch-3 space as last slip st; ch 3, 4 dc in same space, * sc in center dc of next block, 3 dc in next ch-3 space or over dc; ch 3, slip st in top of last dc –picot made; 2 dc in same space, sc in center dc of next block, 5 dc in next space; repeat from * to corner; (4 dc, picot, 3 dc) all in corner space; repeat from * around, adjusting if necessary at corners and end of rnd; join with a slip st in top of ch-3.
-
Fasten off. Weave in ends.
Up Next:
Waves Of Grains C2C Blanket
What do you think of corner to corner patterns versus traditional ones?
Read NextArrow Stitch Crochet Afghan
Your Recently Viewed Projects
Thanks for your comment. Don't forget to share!
SassaYarns
Dec 22, 2016
Corner to corner throw is one of my favorite blankets to make. I enjoy the versatility of sizing this blanket to fit from baby to adult. I discovered the corner to corner many years ago and found it is a bit hard to start, but once I got the past the first few stitches I was able to find the rhythm of the pattern, it flowed thereafter. I have since made blankets in many sizes and colors. Not always following the color pattern as stated.
Zeemer
Oct 27, 2016
I give this Crochet Corner to Corner Throw a 5-star rating for its color combination, for the kind of yarn used, and for the novelty of the corner to corner design. One thing I like is that it used a multicolored yarn to alternate with the white and the solid blue. Also a 5-star rating for the clear and organized pattern which makes you want to start this project right away.
lpalmer59 7490208
Mar 07, 2016
I absolutely love this pattern. A girlfriend showed me this pattern and I have done several baby blankets and I have done a full size blanket for my daughter. You just keep repeating the pattern until you have it the size you want, then you stop increasing, and continue to follow the pattern. I would recommend this pattern for any beginner, it is that easy.
Meemo
Sep 28, 2015
This is one of my favorite blanket patterns because it makes such a stunning finished product. It seems a little complicated for some beginners, but if you just go step-by-step or get someone to show you how to start, it is really super easy and really quick. I've made several recently with Bernat Blanket Yarn (bulky, use L hook, about 3 - 4 skeins per blanket), and am very happy with the results. It makes a stunning baby blanket/gift. I prefer to make in a solid color or main color with a few contrasting stripes/trim. It is absolutely gorgeous in white or cream. You control how big you make it. Just repeat pattern until it is the width you want. Then start your decrease rows. If you use regular worsted weight yarn and I hook, you will have a great, textured fabric.
cntrygirllp 117744 8
Sep 08, 2015
I have a client that wants a 3 colored C2C made. How many Rolls of each color would I need. He's wanting a Queen sized Afghan
dlrmg 4063289
Mar 21, 2014
This is a keeper BUT.... to follow the pattern makes this afghan HUGE. I have a queen bed and it could easily cover a king sized bed. It also takes twice the yarn. Next time I make this, I won't follow the repeat pattern as many times and leave off a few rows. Otherwise, a very easy pattern to follow.
S Bear
Mar 19, 2013
I have made many of these over the past 30 or 40 years When you get one side the size you want, just don't go up the next row and slip stitch over the block you just made. Turn and continue . This makes a beautiful baby afghan.
prodgers15 0627209
Jul 14, 2012
Absolutely in love with this pattern, but would like to see a picture of it laid out. Can anyone help me with this?
Stueysmom
Mar 21, 2012
I've finished the blanket and I'm ready to start the edging. However, I'm finding the instructions alittle confusing. It starts off ok but then it says, " ...sc in center dc of next block, 3 dc in next ch-3 space or over dc;..." What do they mean by "over dc"? That phrase is confusing to me. Can anyone clarify these instructions please?
Stueysmom
Mar 07, 2012
I'm making this for my niece. It's a beautiful afghan and will be nice and warm, too!! I love the colors and this stitch is a nice change from the other afghans I've made.
bina55 9505762
Aug 11, 2011
I learned this stitch in the 70's and have made dozens of blankets. different sizes and different weight yarns. all turn out great and warm.
beholloway53 72672 76
Feb 28, 2013
I remember a friend using this pattern alot but she modified it into a rectangle instead of a square. Do you know what to do after the afghan reaches the width you want how to continue?
jlwilder327 204123 3
May 06, 2015
I would love to know the same thing! I think I'm going to try just not increasing OR decreasing for a few rows then picking back up with the pattern and see what happens. You posted in 2013, maybe you found your answer somewhere and would like to share it???
hubcher
Aug 10, 2011
I made this afghan for my sister for christmas 2 years ago. It cam out so pretty and was very easy to make. Loved this pattern. I will make it again for my self.
Report Inappropriate Comment
Are you sure you would like to report this comment? It will be flagged for our moderators to take action.
Thank you for taking the time to improve the content on our site.