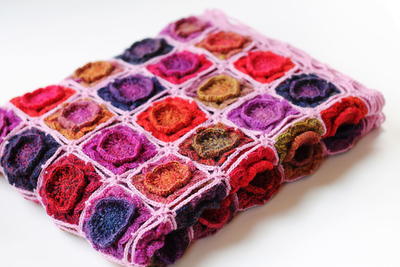
Crochet Circles Throw
This crochet pattern from Lily Sugar n' Cream has the effect of tie-dyed circles when crocheted with Bernat Handicrafter Cotton. Snuggle up and keep warm on those cold nights with your handmade blanket.

Materials:
- Lily® Sugar'n Cream (Ombres: 56.7 g/2 oz; 86 m/95 yds)
- Contrast A (02135 Moondance) 9 balls
- Contrast B (02710 Peace) 10 balls
- Contrast C (02707 Love) 9 balls
- Lily® Sugar'n Cream (Solids: 70.9 g/2.5 oz; 109 m/120 yds)
- Contrast D (00001 White) 6 balls
- Size 5.5 mm (U.S. I or 9) crochet hook or size needed to obtain gauge.
- 12 sc and 13 rows = 4 ins [10 cm] gauge
Instructions:
Note: Join all rnds with sl st to first sc.
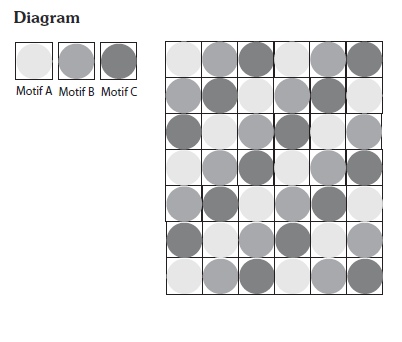
Motif (Make 14 each with A, B and C as Color 1)
- With Color 1, ch 2.
- 1st rnd: 8 sc in 2nd ch from hook. Join. 8 sc.
- 2nd rnd: Ch 1. 2 sc in each sc around. Join. 16 sc.
- 3rd rnd: Ch 1. *2 sc in next sc. 1 sc in next sc. Rep from * around. Join. 24 sc.
- 4th rnd: Ch 1. *2 sc in next sc. 1 sc in each of next 2 sc. Rep from * around. Join. 32 sc.
- 5th rnd: Ch 1. *2 sc in next sc. 1 sc in each of next 3 sc. Rep from * around. Join. 40 sc.
- 6th rnd: Ch 1. *2 sc in next sc. 1 sc in each of next 4 sc. Rep from * around. Join. 48 sc.
- 7th rnd: Ch 1. *2 sc in next sc. 1 sc in each of next 5 sc. Rep from * around. Join. 56 sc.
- 8th rnd: Ch 1. *2 sc in next sc. 1 sc in each of next 6 sc. Rep from * around. Join. 64 sc.
- 9th rnd: Ch 1. *2 sc in next sc. 1 sc in each of next 7 sc. Rep from * around. Join. 72 sc.
- 10th rnd: Ch 1. *2 sc in next sc. 1 sc in each of next 8 sc. Rep from * around. Join D. 80 sc.
- 11th rnd: With D, ch 1. 1 sc in same sp as sl st. *Ch 1. Miss next sc. 1 sc in next sc. Ch 1. Miss next sc. 1 hdc in next sc. Ch 1. Miss next 4 sc. [(1 tr. Ch 2. 1 dc. Ch 2) twice. 1 tr] all in next sc. Ch 1. Miss next 4 sc. 1 hdc in next sc. (Ch 1. Miss next sc. 1 sc in next sc) 3 times. Rep from * around, ending with: (Ch 1. Miss next sc. 1 sc in next sc) twice. Ch 1. Join.
- Fasten off.
Finishing:
- With D, sew Motifs tog following assembly Diagram.
Edging:
- With RS facing, join D with sl st to any corner tr.
- 1st rnd: Ch 1. 3 sc in same sp as sl st. *(2 sc in next ch-2 sp. 1 sc in next st) twice. (1 sc in next ch-1 sp. 1 sc in next st) 6 times. 1 sc in next ch-1 sp. (1 sc in next st. 2 sc in next ch-2 sp) twice.** 1 sc in each of next 2 sts. Rep from * across all Motifs to next corner tr, ending last rep at **. 3 sc in next tr.
- Rep from * around, ending last rep at **. Join with sl st to first sc.
- 2nd rnd: Ch 2 (does not count as st). 1 hdc in each sc around, working 3 hdc in each corner sc. Join A with sl st to first hdc.
- 3rd rnd: With A, ch 1. Working from left to right instead of from right to left as usual, work 1 reverse sc in each sc across.
- Fasten off.
Read NextTropical Explosion Crocheted Afghan
Your Recently Viewed Projects

Thanks for your comment. Don't forget to share!
aprilwilson1980 45 32843
Mar 20, 2014
I recently made this throw and I love it! I even made a pillow to match! You should hide your ends on each circle/square as you work because once you've sewn it all together it will be much harder to hide the ends. I just love the look of this throw it's so cute:)
Ccolagirl2 0876558
Oct 29, 2013
I just have one question? Where do I hide my tails? I can do the motifs, but I'm at a loss as to how to put them where no one can see them. Seems impossible to me.
Ccolagirl2 0876558
Sep 12, 2014
I was hoping someone could tell me weather or not I need to block the squares. I did a test on one of them, and it doesn't seem to wash/dry very well.
FaveCrafts Editor JL
Sep 12, 2014
Hi there - In both cases, I would contact the pattern designer (Lily Sugar n' Cream) directly via their designer profile. Simply click on the byline at the top of this page - thanks! - Julia from FaveCrafts
Ccolagirl2 0876558
Sep 24, 2014
I have finally figured this pattern out (with no help) and where to put my tails. I am now working on two of them. Will be rating this sometime in 2015...lol
Report Inappropriate Comment
Are you sure you would like to report this comment? It will be flagged for our moderators to take action.
Thank you for taking the time to improve the content on our site.