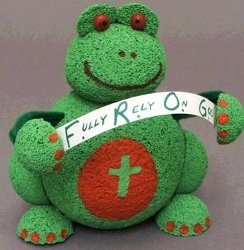
Mr. Ribbit the Frog
Ribbit..Ribbit..goes the froggie! Don't just walk, hop to this project and start making this kid craft from FloraCraft. Everyone will love this frog so much that they'll be green with envy!

Materials:
- STYROFOAM™ Brand Foam:
- 2 - 1.25” - balls
- 4”, 2.5”, 2”, 1.5”,– balls
- Plaid® Apple Barrel® acrylic paints:
- Bright Red, Spring Green, Brown Oxide, Pumpkin Orange
- Green chenille stems
- Paint brushes
- 10mm black half round eyes
- Green marker
- Strip of paper
- Foam Cutter or serrated knife
- Low temp glue gun or tacky glue
- Candle stub/wax
Instructions:
- Wax the blade of the cutter or knife for easier cutting. For the body; slice about a ¼ off the side of the 4” ball, this flat side is the back of the frog. Use the scrap piece you cut off as a sanding block to sand the cut edges smooth. Cut a small flat spot on the bottom of the body so it stands up. Cut a small flat spot at the top of the body where the head will attach, sand edges smooth.
- For the head; cut about a ¼ off the side of the 2.5” ball, this flat side is the bottom of the head. Cut a small flat spot at the back of the head so that it is flush with the back of the body. Sand the cut edges smooth to create the oval shaped head.
- For the front feet, back legs and feet; cut the 2”ball, (back legs) and 1.5” ball, (back feet) and the 1.25” ball (front feet) in half. Roll opposite sides of the 2” ball halves on the table to create ovals for the back legs.
- For the eyelids; cut a 1.25” ball in half and one half in half again, these two quarters and the eyelids. Paint all body parts spring green and let dry.
- Assembly; Glue the head to the body. Glue the two eyelids to the top of the head cut side down. Glue the back legs to either side about ¼” up from the bottom of the body. Glue the two back feet tucked under the back legs toward the front of the body. Fold two chenille stems in thirds, twist the ends together, and glue one end into the side of each front foot and the other into either side of the body to create the arms.
- Paint orange toes and belly on the frog, paint a green cross on his belly. Paint brown nostrils and smile on his face. Paint the black eyes red leaving a small black center for the pupil, let dry and glue to front of eyelids. Create a paper sign and glue to the frog’s hands.
Read NextStar Suncatchers