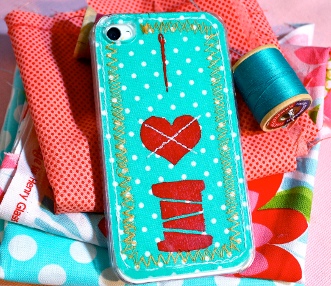
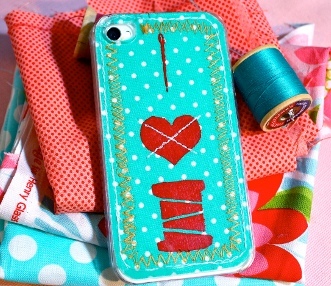
Custom iPhone Case
In this video from Maureen Wilson, you'll learn how to make freezer paper stencils the easy way! You can make this "I heart sewing" iPhone case using the free template, or just learn about freezer paper stenciling and make a stencil from your own design.
Materials:
- Freezer paper
- X-acto knife
- Cutting mat
- Paint and brush
- Fabric
- Iron
- Fusible interfacing
- Fray check
- Clear phone case
- I Heart Sewing free printable (click to download PDF)
Video:
Instructions:
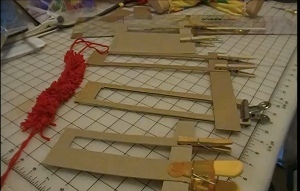
- To make the stencil, you’ll need freezer paper. This is different from wax paper, wax paper will NOT work for this project. If you trim a piece of freezer paper to 8.5 x 11 inches, you can print on it directly using your home printer. Be sure that you’re printing on the dull side, not the shiny side. (If you are printing words, remember to print them backwards by selecting mirror image.)
- I bought this clear case for my iPhone from a seller on Amazon for only $3. I want to be able to change the case often, so I’m making inserts to slide between the case and my phone. If you would like to use the same design as me, you can download it here: I Heart Sewing.
- Use an X-acto knife and a self-healing cutting mat to carefully remove the image. Only cut out the inked parts, do not cut the white. When you’re done, you will have a silhouette of your image. If you have pieces that belong in the center– like the eye of this needle, or the middle of a letter– save them, because you’ll need them.
- Lay the cut freezer-paper shiny-side down on your fabric. Iron on medium heat without steam. The heat will temporarily adhere the paper to your fabric. Add the centers and iron in place.
- Now we can paint. You have two choices: fabric paint or acrylic paint. Fabric paint will hold up in the wash better. Acrylic paint tends to fade after 10 washes or so. If your item will be washed frequently, I recommend using fabric paint… otherwise, you can just use acrylic paint, which is cheaper.
- Use a paint brush to cover the cut areas in paint. Don’t worry about staying inside the lines, the freezer paper creates a nice seal so your paint won’t seep through.
- Allow the paint to dry, then add a second coat. Once that’s dry, gently peel the paper from the fabric. Remove the centers as well.
- Because I’d like to sew on my project, I’m adding a piece of fusible interfacing to the back of the stenciled fabric. I traced the paper insert that came with the case, then ironed the interfacing to the back of my fabric. Even if you’re not adding interfacing, it’s a good idea to iron your project now, because the heat helps to set the paint. Lay a piece of scrap fabric on top to protect your iron.
- Finally, I’m trimming the hole for my camera, then adding decorative stitches around the edges of the insert. This is a fun project to try out your fancier stitches on. I’m also adding fray check to the edges.
- Slide into the case and you’re done! Change it as often as you like, using different fabrics and stenciled images.
Your Recently Viewed Projects
Thanks for your comment. Don't forget to share!
evanmorgan
Mar 07, 2013
Wow, this is cool, have you pasted this one in the external case? Is this also possible to include ipad smart cover? Just thinking to make something new with the same inspiration. Thanks.
Report Inappropriate Comment
Are you sure you would like to report this comment? It will be flagged for our moderators to take action.
Thank you for taking the time to improve the content on our site.