Woven Edge Cardigan
Turn a boring crew-neck sweatshirt into a fashionable cardigan with woven edge and matching cuffs. Colorful strips of fabric are woven with metallic threads and various yarns for the cardigan edge. Find this great sewing pattern from Sulky of America in the Sewing for Beginners eBook with 19 other great sewing patterns.

Materials:
- 1 1/4 yds. of Sulky Tear-Easy Stabilizer
- Sulky Decorative Sliver Metallic Threads that coordinate or contrast with fabric strips
- Sulky Polyester Bobbin Thread
- Premier Sulky Clear Invisible Thread
- June Tailor Pin-Weaving Express Board
- I yd. Tricot Knit Iron-on Interfacing
- A crew-neck Sweatshirt
- 50 yards of yarn for Warp
- 1 yd. fabric for lining
- 1/4 yd. each of miscellaneous fabric to embellish for weavers
- Assorted Yarns of various weights
- Rotary Cutter, Mat and Quilter's Ruler
- Scissors
- White Chalk Marker
- Quilter's Straight Pins
- Spinster - Twisting Tool for combining and twisting yarns and threads
- Serger - Optional
- Pin-Weaving Shuttle - Optional
Getting Started
- Cut 2 pieces of fusible interfacing 13 1/2" x 26". If you do not have a pin- weaving board, you can make one by taping or gluing 1/4" graph paper onto core board (used in framing).
- Pin the first interfacing piece, FUSIBLE SIDE UP, in the center of your pin weaving board. Pin interfacing at the same 1/2" intervals across the top and bottom. Because you will have to press over these pins as well as the Warp yarn, angle the pins away from the interfacing while catching the edge of the interfacing.
Warp and Weft
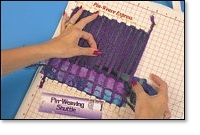
- First, place the Warp yarns on the pin-weaving board. There are many possible variations of Warp placement. For more ideas, see Donna Rhodes' and Kathy Stachowitz's book, THE FINE ART OF PIN WEAVING --- CREATIVE VARIATIONS. To start end, make a loop with the Warp and wrap it over an extra pin or two.
- Cut 25 to 30 (depending on the size of the sweatshirt) fabric strips 1" x 45". Cut the same number of Sulky Tear-Easy Stabilizer 1 1/2" x 45" strips with the grain so it will tear away in long strips instead of little pieces.
- Choose satin type decorative stitches. With Sliver Thread in the needle and Sulky Bobbin or Invisible Thread in the bobbin, lower the top tension until no bobbin thread is brought to the top of the fabric. Place Tear-Easy under the strips and stitch down the center. Remove stabilizer and press, if necessary.
- Spin some custom yarns by spinning Sulky Sliver in with color groups of different textured yarns or leftovers from a favorite knitting or crochet project. You can spin any length of yarn using the "Spinster" ™. Knot together yarn and a couple of lengths of Sliver and put it over anything like a chair knob, vertical spool pin on your machine, third-hand, etc.

- Twist the yarns and Sulky Sliver until they are wound very tight. Take the end off the Spinster and bring that end back to the other end while still holding the yarn tight. Allow the two to twist together. Run yarn through your hand to smooth it until it is relaxed. Knot cut ends together. Prepare a variety of these twisted yarns. If you don't have a Spinster, tie the yarns onto a machine bobbin so the yarns come out of the top and let the bobbin winder twist them.

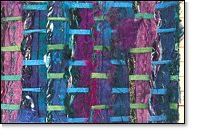
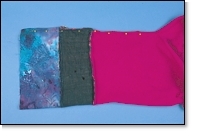
- Patti wove two different methods for strikingly different results on the finished sweatshirts. The weave shown here was done so the Warp yarns show alternately. In this piece, the yarn and the fabric strip (Weft) were both woven as one unit through the same Warp yarns. Pin the Weft ends as you weave.
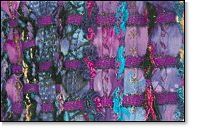
- In the second sample, the Warp seems to show in continuous rows, not alternating. This is because the fabric and yarn strips were woven independently. When weaving, keep the strips as level as possible. You can leave fabric strips smooth or you can scrunch them up. By leaving them smooth, more of the embellishing stitches will show and you will use less materials.
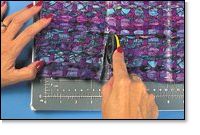
- It is important to completely cover the fusible interfacing. You can weave from the top down or from the bottom of the piece up, whichever is more comfortable for you. After weaving is completed, press the weaving to fuse it to the interfacing while it is still pinned to the board. If you are concerned about melting some fibers, use a damp press cloth. Starting in the center, steam heavily with only a pressing motion (do not slide iron); take pins out as you fuse edges. Turn project over and steam it well again from the wrong side.
- Because this is a heavy, densely woven piece, stitch around all four edges about 1/4" in from the edge to hold all Warp and Weft securely in place.
- Measure the width of the piece and mark it into thirds. Stay stitch on each side of the marked lines, making the two lines in each set of stitching 1/4" apart. Cut between the 1/4" stitching lines. With a 1/4" seam allowance, sew these three long pieces together lengthwise to make one long piece (approximately 75" long). The length required will be determined by the size and length of your sweatshirt. Our sweatshirts were Large and X-Large.
- Cut and seam lining piece into the length of the long panel and 1/2" wider. With right sides together, sew the lining to the woven piece along one long side using a 1/4" seam allowance. Understitch seam allowance and lining only.
Sweatshirt Preparation
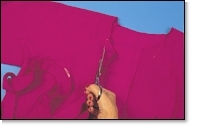
- Mark center front. Cut up the center front of sweatshirt through the neckline and bottom band.
- Cut away 1" to 2" from one side of sweatshirt, around the neck, and down the other side. (Cutting away a lesser amount gives you a stand-up collar.)
- Trim away corners (a triangle about 1" wide at upper center front).
- With right sides together, sew the pin-woven panel to the sweatshirt, leaving 1/4" extending at each bottom center front edge. Do not attach lining. With pin-woven panel and lining right sides together, sew across bottom sides even with sweatshirt. Turn and press.
- Understitch seam allowance to lining to reduce bulk and keep lapel flat. Press inside seam allowance toward center front.
- On the inside, fold lining seam allowance in and handstitch it to the sweatshirt.
Sleeves
- Cut off sweatshirt sleeves to desired length (approximately 11" to 14" for a rolled-up sleeve look).
- Open up sleeve seam about 6" from the cut end.
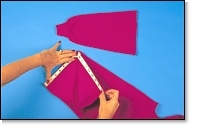
- Measure sleeve opening.
- Cut two pieces of the pin-woven panel to accomodate sleeve opening (approximately 18" by 5"). Be sure to include a seam allowance at each end.
- Cut a piece of lining fabric the size of the pin-woven sleeve pieces, but add 1" to the width, making it approximately 18" x 6".
- With right sides together, sew the pin-woven fabric to the lining fabric along one long edge.
- Understitch the seam allowance to the lining. Press well.
- With right sides together, stitch the pin-woven panel to the sleeve seam, leaving the lining free. Fold and press 1/2" of each long edge.
- Sew sleeve seam closed from opening to edge of lining.
- Turn the lining to the inside, fold the seam allowance under and hand stitch it; or adjust the seam allowance to be slightly longer than the woven piece and, from the right side, stitch in the ditch with Sulky Invisible Thread on the top and in the bobbin.
Read NextDIY Upcycled Crochet Jean Shorts