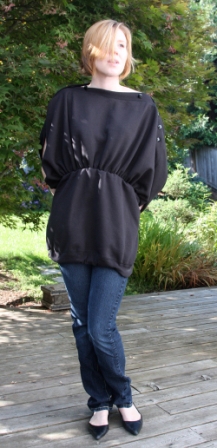
Reborn Convertible Blouson Tunic
If you like this project, then you'll love the free sewing patterns featured in the eBook, 21 Easy Sewing Projects: DIY Designs and Sewing Craft Ideas. Download a copy today - it's free!
Take a few frumpy and boxy men's sweatshirts and turn them into a cute one-size-fits-all convertible tunic. This tutorial shows you how to turn 3 XL sweatshirts, elastic and buttons into an adorable tunic with basic sewing tools.
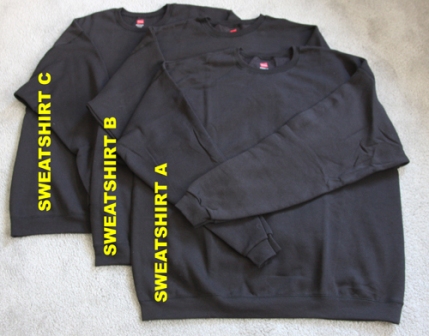
Materials:
- 3 men's XL sweatshirts (we will call them Sweatshirts A, B, and C)**
- 10 buttons 3/4" diameter (shanked, not the kind with holes on the face)
- 104" of round cord elastic, any color (will be trimmed to around 54" in Step 8)
- 3/8" wide elastic, any color (see Step 11) for length)Sewing Machine
- Sewing machine needle (Med. Weight Knits)
- All-purpose thread matching your sweatshirts
- Zigzag foot
- Straight stitch foot
- Buttonhole foot (optional)
- Fabric scissors
- Hand sewing needle
- Safety pin/bodkin
-
Iron & ironing board (optional)
Instructions:
-
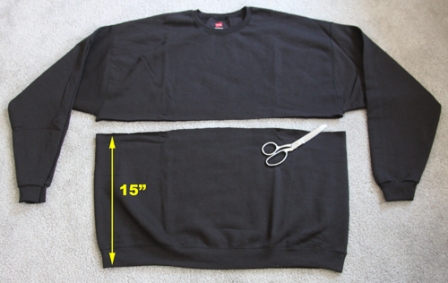
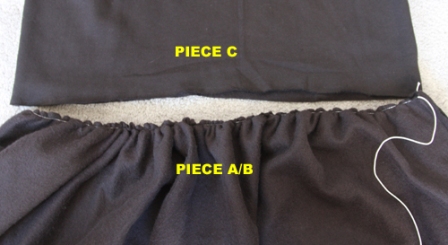
Cut Sweatshirts A, B, and C as above, straight across under the arms. Set aside the neck/sleeve areas (we won't be using them).
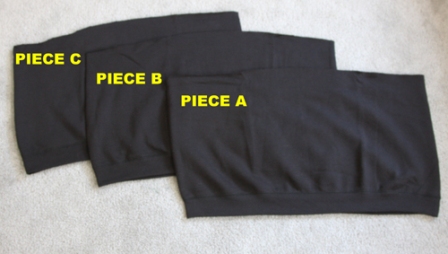
Now we will call each piece we just cut Piece A, Piece B, and Piece C.
-
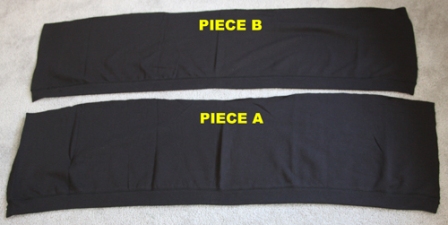
Cut down one side of Piece A and Piece B, and open each piece flat. These will be both the front and the back of your garment. (Piece C we'll deal with later.)
-
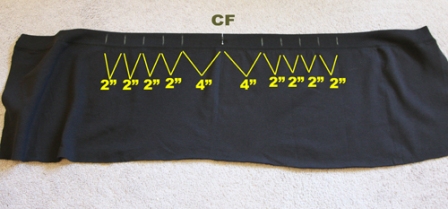
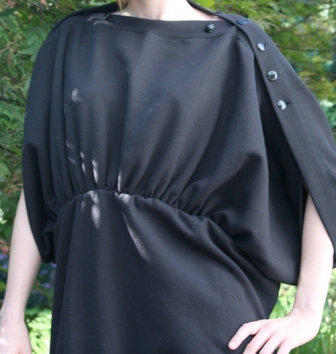
(Optional: You may want to iron Piece A and Piece B at this point in order to flatten any creases that occurred along their sides - we want the center front of the garment to be as crease-free as possible.) Locate the center of Piece A (Center Front - referred to as CF from here on). At 4" on EITHER side Piece A's CF, mark two vertical buttonholes (large enough to accommodate your buttons), centered vertically in the ribbing area. Mark more buttonholes further outwards, spacing them 2" apart, until you have marked 10 buttonholes (5 on either side of CF). Mark Piece B in exactly the same manner for your buttons.
-
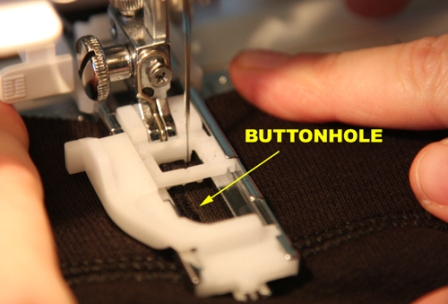
Sew the buttonholes on Piece A using your sewing machine (you will not need stabilizer on the wrong side of the fabric as long as you choose a wide enough setting for stitch width). You can determine the length of your buttonholes by measuring the diameter of your button, adding the height of your shank, and adding 1/8". (Tip: Make a practice buttonhole on some scrap fabric - or in the sleeve ribbing of one of the sweatshirts you cut up in Step 1). Test to see if your button will go through the hole and sit properly; if not, adjust accordingly.) Cut buttonholes open. (Tip: If you're not sure how to sew a buttonhole, check out this tutorial here.)
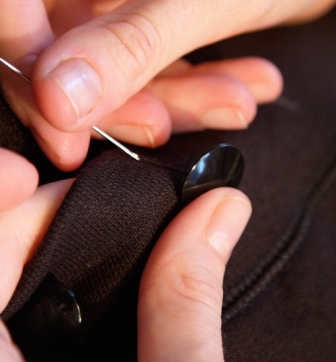
Hand-sew on your buttons onto Piece B at the marks you made in Step 3). Sew on all 10 buttons, and shank them several times by winding the thread around your stitches.
-
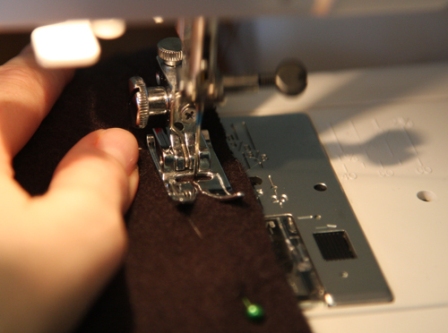
Place Piece A and Piece B right sides together, and sew side seams together with a 3/8" seam allowance. We will call this Piece A/B from here.
-
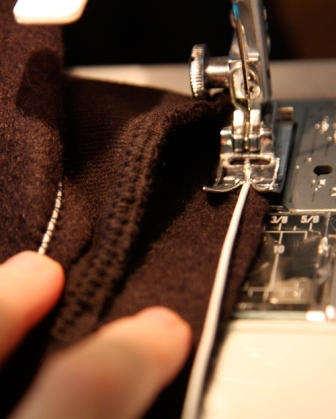
Make a double knot in the end of your round cord elastic. Place on top of the side seam on the wrong side of Piece A/B, approximately 3/8" from cut edge of the Piece. Using a zigzag stitch on your machine, zigzag over the cord elastic, sewing it all the way around the cut edge of Piece A/B. (Start sewing just below the knot you made in the elastic, and backstitch several times to secure.) DO NOT SEW THROUGH THE CORD ELASTIC; the elastic must remain moveable underneath the zigzagging stitches.
-
When you get all the way around the edge of Piece A/B, backstitch a few times over the cord elastic, and remove from your machine. Trim thread ends.
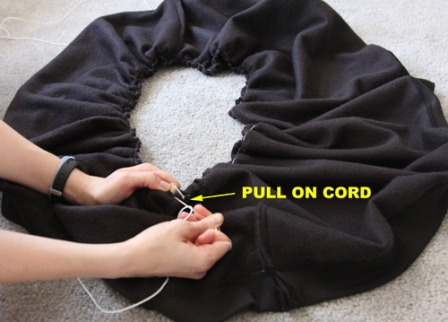
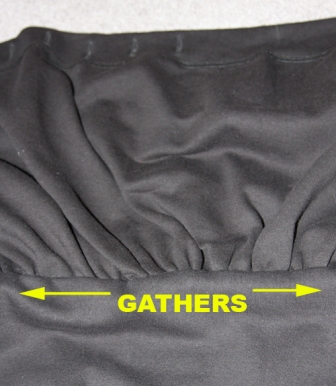
Pull on the elastic firmly and pull the fabric in the opposite direction - this will create a gathered effect. Keep gathering your fabric by pulling on the cord elastic until cut edge of Piece A/B is the same size as cut edge of Piece C.
-
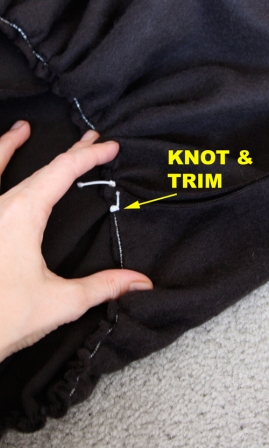
Double-knot cord elastic and trim end.
-
Insert Piece C inside Piece A/B, matching cut edges, right sides together. Pin together.
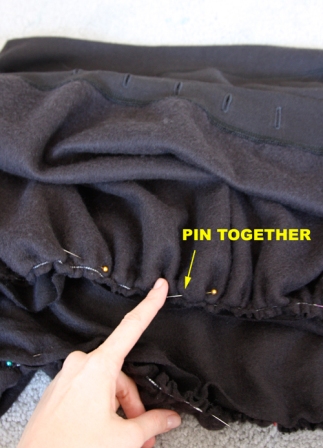
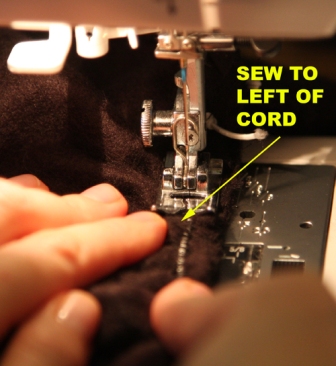
Sew top of C to gathered bottom of A/B, sewing to the left of the line of zigzag stitches so that none will be visible on the right side of the garment.
-
Determine length of bottom elastic. Button all buttons on your garment, and try it on. Wrap a measuring tape around your body at the point where the bottom ribbing hits on you. Add 1" - this will be your 3/8" wide elastic length, so cut elastic accordingly.
-
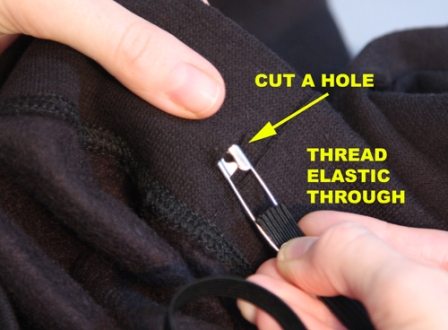
Cut a small hole in bottom ribbing of Piece C on the wrong side of the garment. Attach a bodkin or safety pin to the end of the 3/8" wide elastic, and thread it through the ribbing, all the way around. Pull the other end all out the hole- and stitch the ends together overlapping about 1/2". Feed back into the hole you made - and if you're a perfectionist, hand-stitch that hole closed.
You're finished!
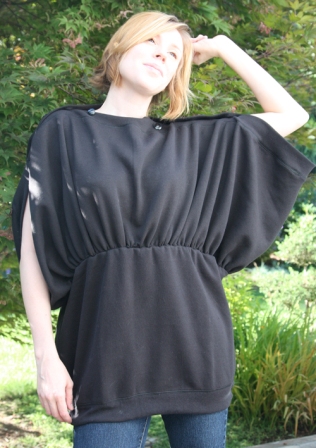
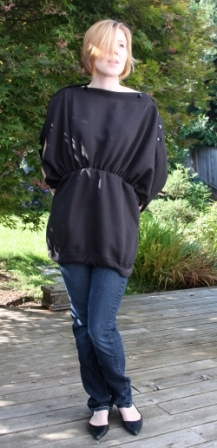
This is a convertible piece - you can wear as a blouson tunic (shown above), or in the configurations below:
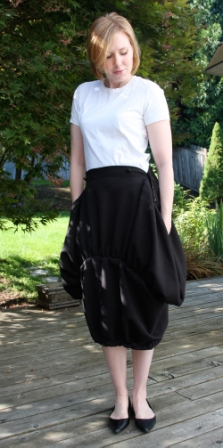
Button-Waisted Skirt
Undo one or two buttons on either side of the neckhole of your tunic, step into the neckhole and pull up to your waist, fastening buttons as necessary to keep it from falling down. Tuck each sleeve into itself to create drippy pockets (though you won't want to put anything in them since the sleeves are still open!). If you like, safety-pin the sleeves closed on the insides so you you don't have gaping holes in your skirt.
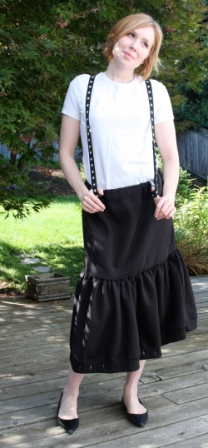
Ruffle-Bottom Skirt
Turn tunic upside-down and undo all buttons. Wear with the tunic's bottom elastic as a waistband.
It seems a huge waste of 3 sweatshirts, but if your SO has extra unworn ones or you score at the Goodwill, it gives them another great life. Can you imagine this done in cream, with gold anchor-embossed buttons for a sailor look? Or seafoam green, with pearl buttons? Or two-toned: heather gray on top with black at the waist? The options are endless...and only limited by your imagination!
Notes:
-
For reference purposes: I am a Misses' Small/Medium, 4/6 - I am 5'6" tall and my measurements are 33.5 - 27 - 34.5. I used two Men's XL sweatshirts for Part A/B - and for Part C I used an Men's L sweatshirt.
-
A Men's XL sweatshirt measures approximately 26" from side to side, and 30" long from side of neck to hem.
-
Do not use sweatshirts with front kangaroo pocket - this will have to be removed. Style of neck does not matter (crewneck, v-neck).
-
Medium-weight fleeced sweatshirts are used for this project.
-
Sweatshirts can be printed on the front/back as long as you can salvage a piece of fabric 15" high, measured from hem upwards. Therefore, if there is writing on the chest or sleeves, it won't matter because we won't be using those parts. Or, if the design extends below that 15" high measurement, you will have to incorporate it into the finished project.
-
Sweatshirts A and B must be exactly the same size, shape, style, and color - or else the front and back of your finished tunic will be different - which could be an interesting harlequin effect, if you will.
-
Sweatshirt A MUST have no side seams unless you want a seam running down the center front of your finished tunic.
-
Sweatshirt C may be smaller than XL.
-
You can use women's sweatshirts instead of men's for all 3 sweatshirts as long as you have garments that are approximately the same measurements as the men's below…and the sides of the sweatshirts are not tapered or "fitted" to the body. The sweatshirts need to be boxy in order to create the ruching in the finished garment.
- This is a "one-size-fits all" loose garment - on Misses' small or petite sizes it will appear oversized (so you may want to use L sweatshirts instead), and on Misses' L sizes it will appear closer to body measurements (there will still be at least several inches of ease). Women's sizes: use XXL or larger - and adjust required elastic lengths accordingly (you may want to add two or more extra buttons and buttonholes for stability at the neck).
Read NextAsymmetrical Autumn Poncho
Your Recently Viewed Projects
Thanks for your comment. Don't forget to share!
MomOf2ArmyBrats
Aug 18, 2010
I bookmarked this! I can not wait to make this! I am going to make some for Christmas gifts this year! And I am going to make my 2 year old daughter a Version on her own! I cant wait!
lookinlikeafoolwur pantzondagrund
May 10, 2010
I AM MAKING THIS! TOTALLY FAB! thx sooooooooooooo much!
Lutie82
Dec 11, 2009
This is one of the freshest recycling ideas I've seen in a while. I'd like to try it, though I'm a bit larger than the measurements you give. No need to waste anything - sweatshirts can be found at secondhand stores for a few dollars each! And the fabric should definitely be kept, for patching, motifs for quilt applique, lots of uses.
Report Inappropriate Comment
Are you sure you would like to report this comment? It will be flagged for our moderators to take action.
Thank you for taking the time to improve the content on our site.