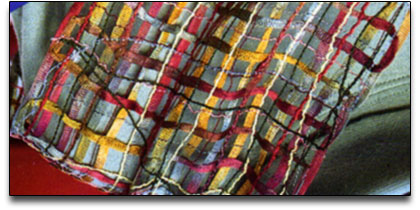
Faux Weave Scarf or Vest
Easier than pin weaving, this technique from Sulky of America uses water-soluble stabilizer to layer ribbons, cord and strips of fabric. Materials listed below will make the scarf pictured. Sew up this scarf in around 3 hours for a great gift.
Materials:
- Zig-Zag Sewing Machine with one or more of the following attachments, depending on type of fiber used:
Wide and/or Narrow Braiding Foot
5 or 7 Hole Cording Foot if you want to make your own cord
Ribbon Foot
Piping Foot
Open-toe Appliqué Foot
Felt Pad for Spool Pins - Machine needle, size 80/12 or 90/14
- Sulky 30 wt. Rayon - 1192 Fuchsia
- Sulky Sliver™ Metallic - 8007 Gold
- Sulky Clear Invisible Polyester Thread - in the needle and bobbin
- 1 package or 8" roll of either Sulky Heat-Away™ or Sulky Ultra Solvy™
- ON THE SURFACE™ Decorative Yarns for weavers: 5 yds. of #1 from card #SGT116, 10 yds. each of #3, #5, and #6 from card #DGT115, or yarn or ribbon of your choice
- Rayon Flat Braid in a Hand Dyed Multi-Color, 30-35 yds. Yard steps color - Sunset Blvd Or yarn or ribbon of your choice
- Teflon and Cloth Pressing Sheets
- Iron & Pressing Pad
- Pinking Shears or Pinking Rotary Cutter and Mat
- Scissors
- Sewer's Aid™ or Silicone Spray
Instructions:
Step one: Prepare Heat-Away or Ultra Solvy
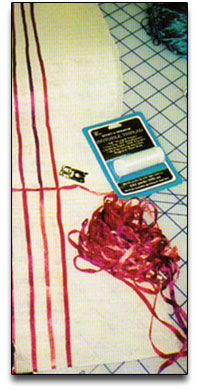 To make a scarf the size of our sample (17-1/2" x 43-1/2 " flat), from the one-yard package of either Heat-Away or Ultra Solvy, cut two 8" x 22" pieces. To make this into a circular scarf, overlap two 8" edges about 1/4" and straight stitch them together at both short ends with Sulky Polyester Invisible Thread in the needle and bobbin. Or, just cut a 44" length from either 8" stabilizer roll and join as suggested above.
Note: Sulky Polyester Invisible Thread is very heat tolerant and will not melt away like nylon invisible thread when the Heat-Away is disintegrated with a hot iron.
Step Two: Apply the Flat Braid or Wide Yarn

Starting at one of the overlapping seams and 1/4" in from the long edge, straight stitch down a flat decorative braid or cord ledgthwise all the way around the edge of the Heat-Away until you get back to the starting point. Angle the braid 90 degrees and stitch down another long row. Don't worry about twists in the braid or uneven rows. They will add texture and interest to the finished scarf. Simply overlap the cut ends and continue sewing.
Proceed in this manner until you get to 1/4" from the other outer long edge. The number of rows you will have completed will vary, depending on the type of braid and the width of the Heat-Away used.
Note: If you plan to have more than 12 rows (like sample) you will need more that 30 yds. of flat yarn or braid.
Turn the Heat-Away 90 degrees, and continue adding the same braid in the smae manner crossing previously stitched lengthwise braid. Angle the braid 90 degrees at the end of each row, stitch about 3/4", then turn another 90 degrees, and stitch another row back across the Heat-Away. Proceed in this manner until you get to 1/4" from the point of beginning.
Step Three: Apply the Faux-Weaver Yarn

Once rows of flat braid have been put all over the Heat-Away lengthwise and widthwise, change to a Sulky Decorative Thread in the needle and bobbin and add rows of straight stitching in between the rows of braid. You can make some of your own combinations of yarn/Sulky Sliver Thread by twisting them together using the SPINSTER™ Twisting Tool. You may also want to add other, thinner, decorative yarns as well. To attach these yarns, use a zig-zag stitch that is no wider than whatever you are attaching. If it is a lot wider, when the Heat-Away is removed, the thread will be loose.
Note: If you are going to add a thick yarn or braid, put it on last since it will be difficult to stitch back over it.
Step Four: Remove the Heat-Away or Ultra Solvy following package directions.
Try exanding this idea, perhaps by making your own fabric this way, then using it to make either a vest, an insert for a teddy, a collar or a lapel; or place it under a suit jacket or as an overly where net or another sheer may have been the suggested fabric.
Alternate Method Using Solvy or Super Solvy Water Soluble Stabilizers
Instead of using Heat-Away as a foundation, the Solvy method is recommended when using yards that have a low tolerance to heat. You can use the lighter weight Sulky Solvy products instead of the heavier Ultra Solvy, although they will not be as stable as the Ultra Solvy, they will work when pressed together.
- If using ORIGINAL SULKY SOLVY, cut 3 to 4 pieces 8" x 45"; if using SULKY SUPER SOLVY, 2 layers should be enough. fuse them together (use a press cloth to protect your iron unless it has a non-stick finish) by pressing with a dry iron at a cotton setting for only several seconds. Short ends will not have to be sewn together to form a circle becasue you can simply overlap them and press them together.
- Follow direction for applying yarns in previous sections above.
- To remove the Solvy, fill your wash machine with warm water, place the scarf in a lingerie bag if desired, and agitate the scarf for 5 or 10 minutes on a delicate setting. Remove and check to see that all of the Solvy has dissolved. If not repeat. THEN, put a load of laundry into the water and add detergent and there is no wasted water. Or you can do this process in a sink with warm, running water, too. If scarf seems stiff when it is dry, repeat Solvy removal process. If needed, press scarf with appropriate temperature for yarns used.
Read NextDIY Upcycled Crochet Jean Shorts