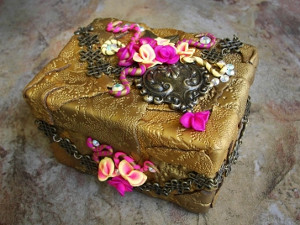
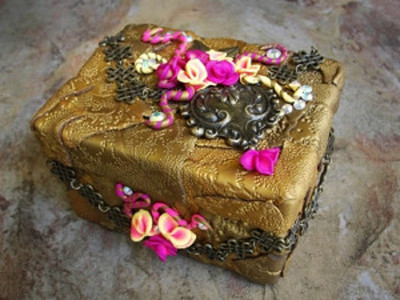
Bleeding Heart Steampunk Trunk
This Bleeding Heart Steampunk Trunk from Polyform Products is great for storing jewelry, makeup, or other mementos you keep close to your heart. Inspired by the Victorian era and a subgenre of science fiction, this steampunk craft represents a huge style phenomenon. Steampunk is both elegant and edgy. This trunk combines delicate elements like flowers and bulky embellishments like metal gears. Steampunk is especially popular with teens, so this trunk is a fun and original piece of decor that your trendsetter will be sure to show off to her friends.
Materials:
- Premo! Accents: Gold - 2 oz-- 2 blocks
- Premo! Sculpey®: Black - 2 oz-- 1 block
- Sculpey® III: Candy Pink - 2 oz-- 1 block
- Sculpey® III: Lemonade - 2 oz-- 1 block
- Sculpey® III: Fuschia Pearl - 2 oz-- 1 block
- Clay Conditioning Machine
- Sculpey® Clay Mat
- Sculpey® Super Slicer
- Chipboard box – appox 5" x 4"
- Blue Moon Madame Delphine's metal pendant
- Blue Moon Royal Boheme chain, small round nose pliers for jewelry
- Crystazzi rhinestones, in small and large size
- White glue
- Any background texture stamp
- Tim Holtz Idea-ology Foliage leaf charm
- Small foam craft brush
- Spray bottle of water
Instructions:
Note: Do not use unbaked clay on unprotected furniture or finished surfaces. Start with clean hands and work surface area. Good work surfaces include wax paper, metal baking sheet, or disposable foil. Knead clay until soft and smooth. For best results, clean your hands in between colors. Shape clay, pressing pieces together firmly. Bake on oven-proof glass or metal surface at 275 °F (130 °C) for 30 minutes per 1/4” (6 mm) thickness. For best baking results, use an oven thermometer. DO NOT USE MICROWAVE OVEN. DO NOT EXCEED THE ABOVE TEMPERATURE OR RECOMMENDED BAKING TIME. Wash hands after use. Baking should be completed by an adult.
-
Begin by preheating oven to 275 °F (130 °C). Test temperature with oven thermometer for perfectly cured clay. For best results, condition all clay by running it through the clay dedicated pasta machine several passes on the widest setting.Fold the clay in half after each pass and insert the fold side into the rollers first.
-
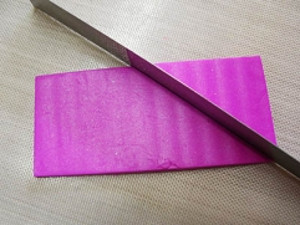
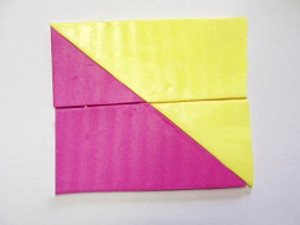
Roll the Lemonade clay out on the widest setting of the Clay Conditioning Machine. Cut a rectangle that is approximately 2x4 inches. Roll out the Fuchsia clay and lay the Lemonade rectangle on top. Trim the Fuchsia clay to the same size. Separate the two rectangles.
-
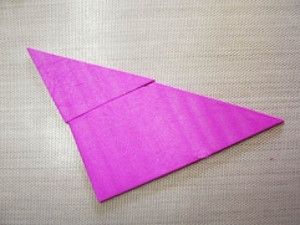
Use the Super Slicer to bisect the first rectangle from the bottom right corner to the top center.
-
Rotate the small triangle on the right 90 degrees to the left, so that it now sits on top of the larger piece of clay to create a large right angle triangle. It should fit together just like a jigsaw puzzle!
-
Repeat steps 2 and 3 with the Lemonade rectangle.
-
Put the two right angled triangles back together to create one large square by inverting one of the triangles. The edge that is mostly Lemonade will stay that color, as well as the edge that is mostly Fuchsia, while the middle with the diagonal line of colors will blend from one color to another.
-
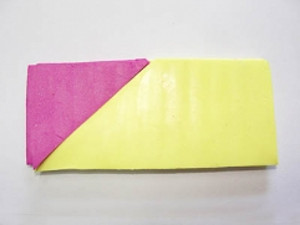
Fold the top half of the square down onto the bottom half. Now we have a double-stacked rectangle that is the same size as our original rectangles.
-
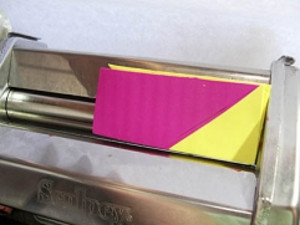
Put this folded rectangle into the Clay Conditioning Machine with the long Lemonade side first. Roll through the machine. Continue to fold and roll the clay through the machine several times, always folding the bottom up to meet the top and putting the folded edge into the machine first. DO NOT ROTATE THE CLAY. Keep the long edge in the machine. It takes about 8-14 times through the machine to see the smooth blend of colors emerge.
-
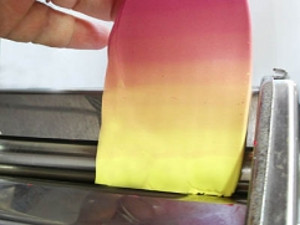
Once you are satisfied with the blend of colors, lay it on your work surface and trim the edges to make it neat and even. Then set the Clay Conditioning Machine on #5 and roll it through, this time with the NARROW edge into the machine. For some reason, tradition dictates that we always put the lighter colored edge in first. This is going to give you a very long, thin piece of clay with a smooth blend of one color to the other.
-
Lay the strip of blended clay on your work surface and cut off the very end of the Lemonade clay to even it out again. Roll this cutoff portion into a small cylinder and place it at the edge of the strip on the lemonade end. Begin to slowly roll up the strip around this cylinder until you reach the other end (the fuchsia portion).
-
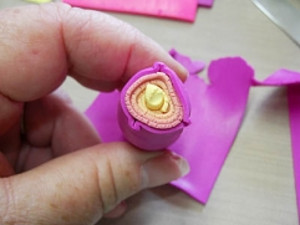
Once you have the clay rolled up, you can look at the end and see how the layers have created a blend from the Lemonade to the Fuchsia.
-
I prefer to make a #5 long thin strip of just the outside color, in this case, the Fuchsia to put a single layer around the outside of the rolled up clay. You can do this by setting the rolled clay onto the sheet of Fuchsia and trimming the edges of the sheet to the same length as the rolled clay. Roll up the clay and the sheet until the edges of the sheet meet each other. Trim the edges so that they just touch.
-
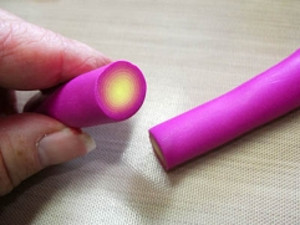
Place the rolled clay on your work surface and start to roll the clay back and forth from the tip of your fingers to the heel of your hands, pressing with a medium pressure. This will cause the clay to get longer and smaller. Make sure to move your hands out to the ends of the clay roll to keep the entire length an even diameter. STOP when the cane is about 3/8 inches in diameter.
-
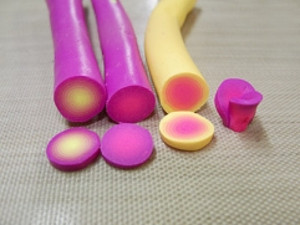
Cut the cane in the middle and you will see the smooth blend from the Lemonade center to the Fuchsia outer portion. Set this aside and repeat steps 1-12 with Candy Pink to Lemonade and Candy Pink to Fuchsia.
-
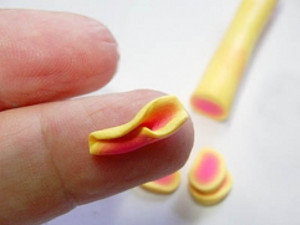
Cut 6 thin slices from one of your canes. Gently flatten the outer edge of the slice and roll the first slice tightly at the bottom for the center of the flower.
-
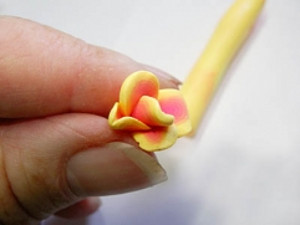
Gently flatten the outer edge of the remaining slices and wrap them around that center roll so that they slightly overlap. Use your finger to push the outer portion of the “petal” out and away from the flower's center.
-
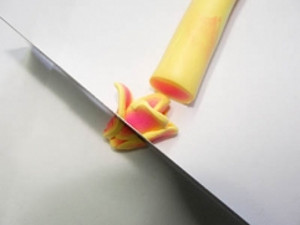
Use the Super Slicer blade to cut off the bottom of the assembled flower so that it will sit upright on the box.
-
Mix some of the Premo! Sculpey Black into the Premo! Sculpey Gold to create an antique gold. Mix about 1:4 (black to gold) to get a rich color.
-
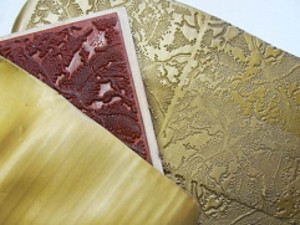
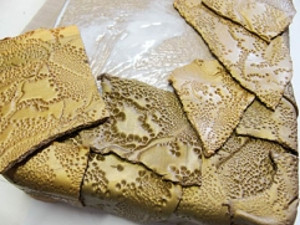
Roll the clay out on the widest setting (#1) on the Sculpey Clay Conditioning Machine. Place the clay on a sheet of plain white paper. Lightly spray your background texture stamp with water (which acts as mold release) and stamp the clay. I prefer to do this by putting the sheet of paper with the clay on the hard floor, placing the stamp into position and stepping on the stamp. Remove the stamp, respray with water and stamp the next section of clay. When the entire sheet is stamped, lift the paper with the clay to your worktable and peel the paper away from the clay - NOT the other way around.
-
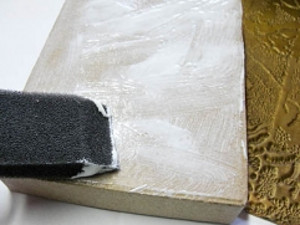
Using a foam brush, spread glue across the top surface of the lid and the 4 sides.
-
Tear small pieces of the stamped clay and collage them onto the top of the box, taking care to wrap pieces around the edge of the box. Look for interesting edges or areas of clay that didn't quite mix and incorporate them into the design.
-
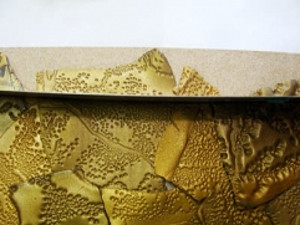
Use the Sculpey Super Slicer blade to slide along the edges of the lid and trim off an excess clay.

-
Set the lid onto the bottom of the box and use a pencil to mark where the box lid meets the box bottom. Remove the lid and use a straight edge to completely pencil in the line where the lid sits. Apply glue to the area BELOW this line.
-
Cover the bottom sides of the box (but NOT the actual bottom of the box!) as you did the box top, tearing pieces of textured clay and collaging them into place. Use the Super Slicer Blade to trim away any excess clay from the bottom of the box and also right at the penciled line for the lid.
-
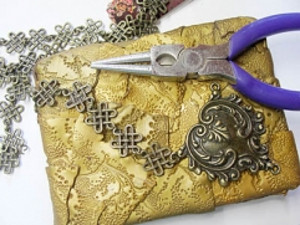
Set the pendant in place and attach the chain to the pendant with round-nose pliers. You can add a small amount of glue to the back of the pendant to hold it in place. Remove the excess chain once you have draped it the way you wish it to appear. Press the chain firmly into the clay. Again, a drop or two of glue won't hurt!
-
Add a small grouping of your flowers to the top of the pendant. Remember to trim the back of the flower if you want it to sit upright. The flowers on the sides can be trimmed at an angle or left as-is and tucked underneath the other flowers.

-
I just love the soft yellow that the Lemonade and Candy Pink creates, so mix a little more of this color by adding a tiny amount of the Candy Pink to the Lemonade. Roll a small “snake” of this color and a similar “snake” of the black/gold mixed clay. Place the two “snakes” side by side and hold one end. Gently roll the other end away from you and the two pieces of clay will twist together. Roll the twisted clays together on your work surface to smooth them. Taper the twisted clay to a point.
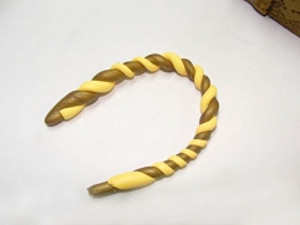
-
Repeat the twisted clay with the other two clays and the black/gold mix. Position them coiling away from the flowers. I also tucked some metal leaves into the top of the design. Add a small drop of glue to the back of the Crystazzie rhinestones and press them into place, using the larger ones for the center of the twisted clay coils and the smaller for outline the outside curve of the coils. Add one more small flower at the bottom tip of the pendant if you wish.

-
Drape the remaining chain across the front, bringing it up to the top of the side edges and pressing firmly into place.Drape it along each of the sides and position it at the top of the sides again, removing any remaining links. If you can, position the chain so that it matches the chain coming on the lid. Add some flowers, twisted coils, and rhinestones to the front of the box.
- Remove the lid of the box before baking, and bake both the lid and bottom of the box according to the clay package directions. Paint the inside of the box after it has cooled.
Read NextCalla Lily - Cold Porcelain Clay
Your Recently Viewed Projects
Thanks for your comment. Don't forget to share!
Report Inappropriate Comment
Are you sure you would like to report this comment? It will be flagged for our moderators to take action.
Thank you for taking the time to improve the content on our site.