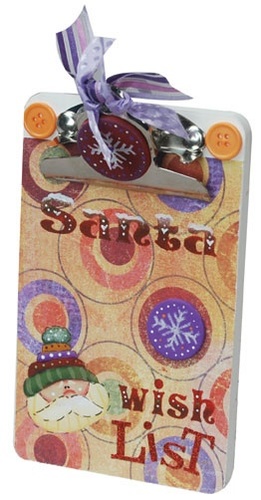
Santa's Wish List
Create your Christmas Wish List and leave it for Santa to find on this adorable Santa's Wish List clipboard. This fun and easy craft is also a great way to display a letter from Santa or showcase a collection of fun holiday photos. You can easily decorate your clipboard however you'd like, and you can make one for any season or occasion. Great for hanging on the wall or propping up against the mantel, this Santa's Wish List clipboard is a fun and simple way to get your home in the holiday spirit in no time.

Materials:
- Santa & Company Journal Template (purchase at a craft store)
- 1/4 in. Duo Tool
- 3/8 in. Duo Tool
- #1 Short Liner Brush
- #4 Flat Brush
- Flat Brush
- Laurie Speltz's Instant Images (purchase at a craft store)
- Americana Acrylics in Snow (Titanium) White
- Americana Acrylics in Buttermilk
- Americana Acrylics in Lavender
- Americana Acrylics in Burnt Umber
- Americana Acrylics in Flesh Tone
- Americana Acrylics in Deep Burgundy
- Americana Acrylics in Hauser Medium Green
- Americana Acrylics in Camel
- Americana Acrylics in Bright Orange
- Americana Acrylics in Foliage Green
- Scrapbook paper
- Chipboard shapes
- Buttons
- Ribbons
- Glitter alphabet stickers
- Adhesives
- Permanent ink pens
- Wooden or chipboard mini clipboard with bulldog clip
Instructions:
Refer to template and tool packages for additional information on template and tool usage and techniques.
-
Cut paper to fit clipboard.
-
Base red chipboard circle with Deep Burgundy and purple one with Lavender.
-
Add snowflakes with Snow White. Add dots of Lavender, Snow White, and Bright Orange as desired. Add Lavender heart on snowflake.
-
Words are based with Deep Burgundy. Pounce bottom of letters with Burnt Umber. Pounce top of "Santa" with Snow White. Add snow drifts on top of letters with liner brush. Dot letters with Snow White and Hauser Medium Green.
-
Add stickers to paper.
-
Base Santa beard with Buttermilk. Shade edge of beard with Camel and add lines on beard with liner brush. Face is based with Flesh Tone. Shade edge of face and add nose with Deep Burgundy. Add mustache, eyebrows, and dots with Snow White. Eyes are Lamp Black.
-
Green sections of hat are Hauser Medium Green. Add lines on hatband with Buttermilk. Pounce Snow White on top of hat and add dots.
-
Red section is Deep Burgundy with Foliage Green dots.
-
Purple section is Lavender with Snow White dots. Orange section is based with Bright Orange; dots are Deep Burgundy.
-
Add details with permanent ink pens.
-
Adhere paper to clipboard.
- Glue chipboard shapes and buttons; tie ribbons as desired.