Decorative Snowman Cardholder
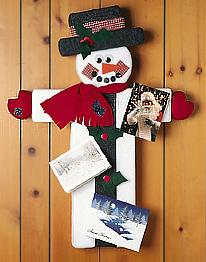
Display all your pretty Christmas cards on a decorative snowman cardholder. It's great for the kitchen or dining room. Even if you don't have any cards to display you can still have the decoration up.
Tips:
Cutting: STYROFOAM Brand Products cuts easily with a serrated knife, hacksaw, floral knife or Xacto®7 knife. Wax the knife blade with an old candle for easier, smoother cuts.
Gluing: For a fast, sure bond, use a low-temperature glue gun. Hot glue guns can be used but might melt a small portion of the foam. (Please follow manufacturer's safety instructions when operating a glue gun.) White craft glue is a tried and true favorite for STYROFOAM Brand Products; use floral picks or toothpicks to hold pieces together while drying.
Materials:
- STYROFOAM Brand Products:
- 1- 2" x 12" x 36" sheet
- 1- 7-3/8 x 1-3/16" discs
- 1- 4" ball
Felt:
- 1- 2" x 4" orange strip
- 2- yds. white
- 1- 1/2 yd. charcoal
- 1- 1/2 yd. red
- 1- 12" square kelly green
- 1- 1/6 yd. gingham fabric for cheeks and hatband
- Fabric scraps for patches
Buttons:
- 1-"1 black, 1- 1" red
Other Materials:
- 1- 2" x 24" x 3" strip of lathe or plank wood
- 1- pair 28 mm wiggle eyes
- White chenille stem
- White acrylic paint
- 7- stems 26-gauge wire
- 7- stems 16-gauge wire
- Paint brush
- Scissors
- Wire cutters
- Craft glue or glue gun and glue sticks
- Pins
- Pattern
Steps:
- From sheet of STYROFOAM, cut the following pieces: 8 1/2" x 17" for body, 4" x 18" for arms, 2" x 11" for hat brim and 3" x 6 1/2" for hat top.
- Cut ball of STYROFOAM in half. Use Pattern A on flat side of half ball to cut hand; reverse pattern and cut second hand.
- Insert (4) 2" lengths of wire halfway into face of 1 disc; place drops of glue on disc face. Secure second disc to first. Use Pattern B to cut head from doubled discs.
- Cut the following pieces from felt: Charcoal gray felt - 17" x 8" (hat brim); 9" x 12 1/2" (hat top, front); 2 1/2" x 6" (hat top, back) White felt - 14 1/2" x 23" (body, front); 8" x 16 1/2" (body, back); 10" x 24" (arms, front); 3 1/2" x 17 1/2" (arms, back); 13" square (head); 7" circle (head, back) Red felt - Two 10" squares (hands, front); two 3 1/2" circles (hands, back)
- Wrap hat brim in felt like a package, gluing long edges to back. Cover fronts of hat top, body and arms in similar fashion; cover backs with corresponding back pieces. If necessary, use straight pins to help hold felt in place.
- Using wire and glue (see Step 3), attach top of hat to brim. Glue a 1 1/2" x 20" strip of gingham fabric around hat, right above brim.
- Center head on 13" square of white felt. Tightly pull felt to back and glue. Trim excess felt from back and cover with 7" circle of white felt.
- Cover hands with red felt, following instructions in Step 6 (curved half of ball is the front of the hand).
- Assemble snowman with wire and glue: attach arms to body, head to arms, hat to head, and hands to arms.
- Paint wood strip white; let dry. Glue to back of snowman from hat to bottom of body. Glue 2" x 7" strip of charcoal felt across end of wood to back of hat. Repeat at bottom of wood with white strip of felt. Attach 4 more white strips on wood to securely hold wood to snowman.
- Insert chenille stem behind wood at neck. Twist tightly to wood and shape small loop for hanging; trim excess stem.
- Glue 3" x 26" strip of charcoal felt from chin of snowman to bottom of body, overlapping to back. Cut 9 holly leaves (Pattern C) from green felt. Glue 3 leaves to hat and 3 pairs of leaves to charcoal strip as pictured. Glue 3 red buttons to center of 3 leaves on hat and 1 button on center of each leaf pair.
- Cut carrot nose from Pattern D. Glue (2) 12" gingham fabric patches to face for cheeks. Glue on carrot nose, wiggle eyes and button mouth (5 black buttons) as pictured.
- Tie 6" x 36" strip of red felt around snowman's neck. Cut ends of scarf into 3" strips. Glue 2 small patches of scrap fabric to end of scarf. Glue remaining black buttons onto patches. Glue 1 small patch to a mitten as pictured. Attach holiday cards to snowman with pins.
®™ Trademark of The Dow Chemical Company ("Dow") or an affiliated company of Dow. For more project ideas, please see styrofoamstyle.com.
If you like this project, we also suggest:
Teacup Recipe Cardholder
Hanging Snowman Canvas

