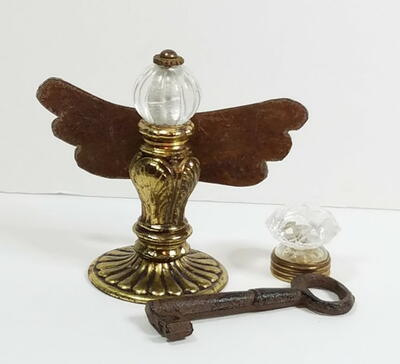
Unexpected Angel Door Hanger
When you think of simple angel crafts, you probably imagine white or cream colors with delicate embellishments. The Unexpected Angel Door Hanger from Lisa Fulmer provides a fun alternative to traditional holiday projects by incorporating steampunk design elements.

Materials:
- Unfinished wood door hanger
- Sandpaper
- White gesso
- Silver metallic paint
- Sand texture medium
- Pink glitter paint
- Paint brush and palette knife
- Fabric and ribbon
- Beads to match
- Aleene’s Clear Gel Tacky Glue
- Tulip Glitter Fabric Spray Paint – Glistening Gold
- Tim Holtz metal charms – crown and wings
- Mini washers and corner accents
- Self-adhesive rhinestones
- 2-3 feet of thin gauge wire, coiled into circles
- Wire snippers and round-nose beading pliers
Instructions:
- Gently sand any rough edges and front of the doorhanger. Paint one coat of white gesso on the front and allow to dry.
- Paint one coat of metallic silver and allow to dry.
- Blend a little silver paint into some sand texture medium and spread all over the front with a palette knife to give the doorhanger surface a nice texture and allow to dry.
- Brush a thin coat of pink glitter paint on top and allow to dry.
- Trim a diamond shape from your fabric, spritz with the glitter fabric spray paint and allow to dry.
- Glue the fabric diamond, metal charms, corner accents, mini washers, and rhinestones in position on the doorhanger – the hole for the doorknob is the angel’s “head.”
- Take your coiled circles of wire, with the two ends of the wire together at the top, and pull the coil into a football shape. Twist each end of wire around the coils to secure. Spread the coils apart like petals of a flower to create the angels tutu skirt.
- Snip one wire petal in half and thread a few beads on to each end. Use a pair of round-nose pliers to wrap the ends of each wire into little spirals to keep the beads in place.
- Tie a small length of ribbon around the wire ends to hide them, then tie another longer length of ribbon around that into a bow. Glue the tutu to the doorhanger and wrap the ends of the longer ribbon like a belt around the angel’s “waist” and glue the ends to the back of the doorhanger.
- If desired, trace the shape of the doorhanger on to a piece of cardstock and cut out inside the lines, then glue the cardstock to the back side of the doorhanger to finish it off.
- Cut your favorite face into a circle (a rubber stamp, a picture of yourself or your child) to fit your doorknob and tape it on, then hang your angel on the door.
For a comprehensive video tutorial of this project, check out How to Make a Steampunk Angel Door Hanger.
Read NextRepurposed Lighting Antique Angel