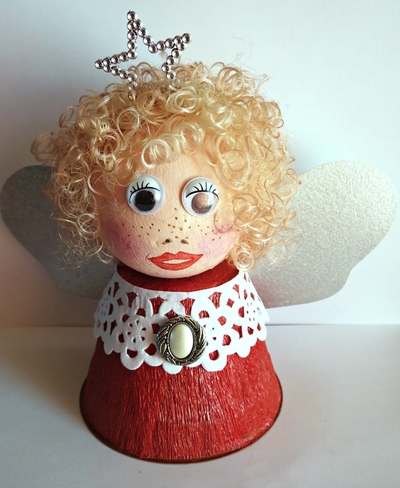
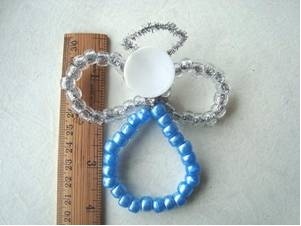
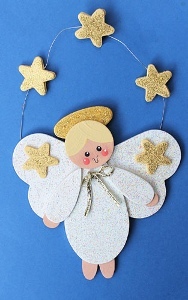
Gold Star Angel Ornament
Looking for Christmas angel craft patterns? Try this gold star angel ornament! This handpainted angel Christmas ornament is simple to make, and it'll look great on your tree.

Materials:
- Craft Twinkles
- DCT1 - Crystal
- DCT3 - Gold
- Americana Acrylics
- DAO1 - Snow (Titanium) White
- DAO67 - Lamp (Ebony) Black
- DAO78 - Flesh Tone (semi-opaque)
- DA184 - French Vanilla
- DA292 - Coral Blush
- Dazzling Metallics
- DA263 - Splendid Gold
- Aleene's Fast Grab Tacky Glue
- Black extra fine tip marker
- 1/2" flat brush
- Emery board
- Water container
- Wax paper
- Paper towel
- Toothpicks
- 6" of narrow gold ribbon
- 8" of wire
- Two extra extra large wood hearts, Woodsies
- Two extra extra large and two medium wood teardrops, Woodsies
- Two large and two small wood circles, Woodsies
- One large and two small wood ovals, Woodsies
- Ten small wood stars, Woodsies
Instructions:
- Paint wood pieces as follows: Extra large teardrops, medium teardrops, and extra large hearts, Snow White; large oval and stars, French Vanilla; small ovals, one large circle, and two small circles, Flesh Tone.
- Let all dry. Re-paint front of large oval Splendid Gold, Snow White pieces with Crystal Craft Twinkles, and stars with Gold Craft Twinkles.
- Paint hair French Vanilla on large circle. Using end of brush handle, make two Coral Blush dots for cheeks and two Lamp Black dots for eyes. Let dry. Use toothpick to make small Snow White dots on eyes and cheeks. Draw mouth with marker.
- Glue heart wings and small oval feet onto back of one large teardrop. Glue second large teardrop on top. (Wings and feet will be sandwiched between two teardrops.)
- Glue head at top of teardrop body. Glue Splendid Gold oval behind head at top for halo.
- Glue small teardrop arms to front. Glue one small circle behind end of each arm for hands.
- Curve wire; glue two stars together on either side of wire, sandwiching wire between. Glue ends of the wire to back of angel wings.
- Glue remaining two stars to front.
Helpful Hints:
- Paint edges of wood pieces first, then place on wax paper.
- Paint both sides of each piece before assembling.
Read NextGrandma's Angel Garland
Your Recently Viewed Projects
Thanks for your comment. Don't forget to share!
Daughter of Light
Nov 19, 2018
This Gold Star Angel Ornament is 100% pure sweetness!!! I have a group of twenty women that I get together with once a month. For the month of December we have a Christmas party that includes an ornament exchange. I think this angel is going as my contribution this year! I've been looking for something to create to soothe my holiday stress and this will fit the bill. Thanks sooooo much for the inspiration!!!
Marilyn B
Nov 18, 2017
Cute little project that kids would love to make! I have seen these little wooden shapes at buck and hobby stores and they are pretty reasonably priced! You can have these adorable little angels painted with different hair and skin tones and even add some tinsel sparkle garland to the halo and stars for some extra bling and sparkle! Great creative idea!
helenmoon 4278672
Mar 13, 2014
I, too would like dimensions for the hearts and teardrops and circles. thanks, Helen Moon
genie2358
Oct 15, 2013
I have been wanting to make this since I found it last fall. Where can I buy the woodsie without having to buy a package with a bunch of different shapes and sizes that I don't need or want for that matter? Any help would be greatly appreciated. Also maybe it would be easier if the dimensions of the woodsies were included instead of small/ large/x-large.
Report Inappropriate Comment
Are you sure you would like to report this comment? It will be flagged for our moderators to take action.
Thank you for taking the time to improve the content on our site.