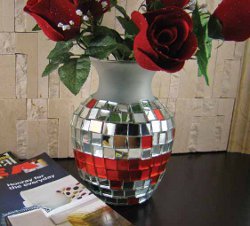
Sweet Reflections Vase

Materials:
- 1 Clear Glass Vase
- Jennifer’s Mosaics™ – Mirror Glass Tiles Red 3 pkgs.
- Jennifer’s Mosaics™ – Plain Mirror Assortment Bulk
- Fine Grit Sandpaper
- Masking Tape
- Krylon® Frosted Glass Finish Spray Paint
- Mosaic Adhesive or Clear Silicone
- Jennifer’s Mosaics™ – Wheeled Glass Nippers
- Latex gloves
- Paper Towels and Newspaper
Instructions:
- To protect work area, cover with newspaper.
- Choose the vase you want to mosaic.
- Lightly sand the vase with fine grit sandpaper. Use a soft cloth or paper towel to remove surface dust or dirt from the surface.
- Next, mask off an area close to the top of the vase where you will apply the frosted finish.
- Following the direction on the Krylon® Frosted Glass Finish spray, apply a coat of paint to the top of the vase. Allow to dry and apply a second coat.
- Once the second coat is dry, place the vase on its side across a bean bag or bag of rice so it does not roll.
- Apply a thin layer of glue to the back of your mirror tile. We used the whole tile but you could nip your mirror tile with Jennifer’s Mosaic Wheeled Glass Nippers for a smaller tile. Start from the top or bottom in a straight vertical line apply the mirror tiles. Use image above for tile placement. Firmly press each piece onto the vase surface and try not to allow gaps. Allow glue to dry.
- Repeat step 7 until the vase is covered in tiles. You may need to nip the tiles to fit in any areas there are gaps.
- Allow glue to dry for 24 hours before handling.
- Use the soft cloth; buff the tiles to a clean shine.
Read NextFirefly Mason Jar Lanterns