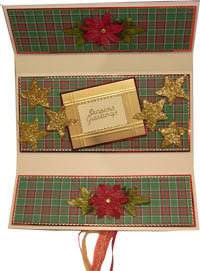
3D Christmas Wallet
This decorative card is perfect as a stocking stuffer or to dress up a gift card for the holiday season! It is festive and Christmas-colorful, making the perfect winter present.

Materials:
- Top Score Board & Scoring Tool
- One sheet of gold card
- One sheet of red Mirri card
- ‘ Paper Pizzaz’ green Plaid paper
- 3D foam pads
- Some red Pointsettia flowers & glitter stars from the Prima ‘Floral Embellishments’ bubble
- 2 gold brads
- Gold peel off sticker borders
- A selection of red ribbons
- Double sided tape
- Paper trimmer
- Craft knife
Step 1
To start with, place one of the short edges of the card against the Top Score and score along the lines that read both Tri-Fold US letter and also Gatefold US letter. Rotate the card and score the same two lines on the other end. Using the wavy line on the Top Score, make two decorative score lines along one of the edges.
Step 2
Cut away the outer edge and stick a piece of red Mirri card behind it to make it back up to the original length.
Step 3
With a craft knife, cut two slits in the centre section so that the ribbon can be fed through. The ribbon should be long enough to reach around the card and tie in a bow at the front.
Step 4
To decorate the inside of the card, cut three panels of the plaid paper, matted onto some of the red Mirri card. Edge with peel off borders and stick to the inside of the card using 3D foam pads.
Step 5
Cut an oblong of gold card approx. 9.5 x 7.5 cms. Make a decorative score line all around the edge using the first line of the box scorer. Trim away about ½ a centimetre all around and repeat the score line again. This will leave a double score line close together, which fits well with the plaid design on the paper.
Step 6
Cut an oblong of plain card to mat into the centre of this for a Christmas message. Mat this onto some of the red Mirri card and mount this on the centre panel of the card using 3D foam pads.
Step 7
Add some of the glitter stars around the edge.
Step 8
Finally, place two layers of the pointsettia flowers on top of each other and hold them together with a gold brad. Stick these in the centre of the two outer panels and stick some leaves behind it.
This type of card would be ideal for dressing up a gift card. Simply add an envelope to the centre section instead of the greeting as shown in the picture. The card has a deep recess, so it can hold several layers of foam pads. A deep decoupage design would also sit well in the centre.
Thanks for your comment. Don't forget to share!
Report Inappropriate Comment
Are you sure you would like to report this comment? It will be flagged for our moderators to take action.
Thank you for taking the time to improve the content on our site.