Brown Paper Bag Beads and Pendant
Reduce, reuse and recycle with this jewelry making craft. Try something new and make Brown Paper Bay Beads and Pendant from Cynthia Gagen. It's a fun project that's totally green.
Materials:
- Brown paper
- Acrylic craft paint
- Liquitex gel medium
- Skewer
- Aleene’s Quick Dry Tacky Glue
- Cord, thread or ribbon
- Paint, optional
- Stamps, optional
Instructions:
-
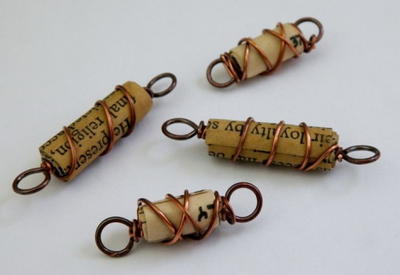
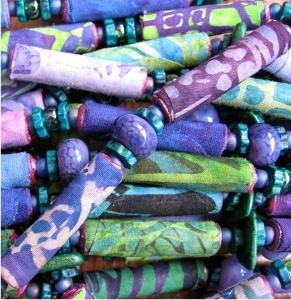
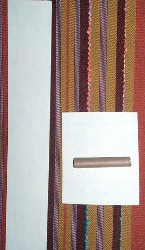
The bead and pendant picturedwere made from brown paper (like the kind they make brown paper grocery sacks or brown paper lunch bags out of – you can use the brown Kraft paper that is sometimes used for wrapping packages for mailing too) but any paper that will roll nicely without creasing will work – some scrapbooking papers, magazine pages, some wallpaper samples, and even newspaper and book pages. In the sample, I used acrylic craft paints to paint them, added some touches of metallic embossing powder (I used a Qtip or cotton swab to have more controlled application of the embossing ink but you can just press an embossing ink pad randomly against the paper as well), and several layers of Liquitex gel medium to stiffen and protect the surfaces. For the center of the pendant, I glued several squares of brown paper together to make it thicker and added some strands of metallic thread wrapped around it.
-
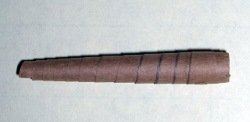
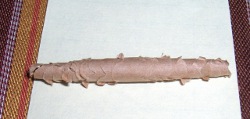
I showed three different types of beads. The one pictured above is simply made from cutting straight strips of paper. You then take the strip and roll it around something to create the hole in the middle. I use the bamboo skewers from the dollar store that are sold for making shish kabobs. If you have trouble starting the bead on the skewer because the paper slips, I just slightly dampen the end of the strip and that will hold it to the skewer much better. When you have rolled the paper almost all the way around the skewer, secure it with a dab of glue (I use Aleene’s Quick Dry Tacky Glue). Remove it from the skewer right away or sometimes the glue will seep out and your bead will get stuck to the skewer. Using a straight strip of paper results in a basic tube shape.
-
You can vary the size and thickness of them by experimenting with different widths and lengths of strips.
-
I’ve started with the basic straight strip of paper. Then, I measured along one of the short edges and marked the halfway point. I drew a line from that center point to each of the corners at the other end. This shape, wide at one end and moving into a centered point at the other end, creates a bead that is thicker in the middle than it is on either end. (Note: I use the strips that are cut away at each side of this center strip too in creating beads).
-
If you start with a much narrower strip, the bead will be more of a round shape.
-
In the example pictured above, I drew a line from the corner at one short end of my strip diagonally across to the opposite corner on the other short end. When cut, this gives you two of the same bead that is thicker on one end than the other (almost like a cone shape).
-
If you go with a much narrower strip to start with, the bead will be squatter – more like a triangle than a cone.

-
To add a different look to your beads, you can cut them out with specialty scissors (like pinking shears or others that create shaped edges).
-
This results in a kind of “tattered” look to your beads.
-
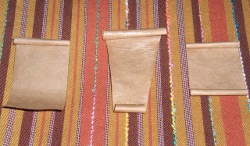
To create the pendants, you again start with a strip of paper. Roll one end around the skewer partway and secure with glue. This will create an opening for you to run your cord, thread, or ribbon through. You can leave it as is or roll up the opposite end partway as well to create a scroll like pendant. You can see with the one in the middle that I started with a tapered shape for a different effect. Be sure to use several coats of gel medium (or a similar product) to help the pendant hold its shape.
-
From there, the possibilities are endless! This one was decorated with paint and an image.
-
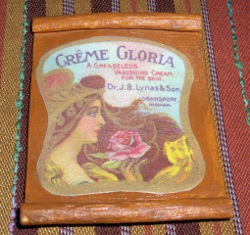
On this one, paint, stamp pads, and rubber stamps were used.

-
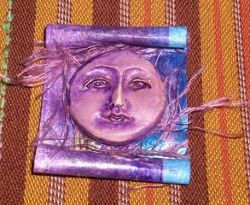
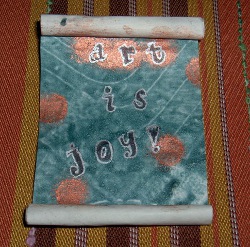
On the one pictured above, paints (acrylic and Lumiere) and alcohol inks were used to create the background. Some fibres were glued on along with a small painted plaster face.
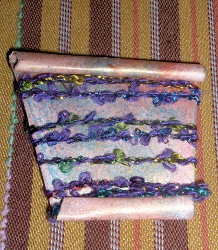
- And finally for this one, acrylic and Lumiere paints were used along with stamp pads, a little embossing powder and some pretty thread wrapped around it.
If you like this project, check out others like it in our 17 Recycled Handmade Paper Crafts collection.
Read Next101+ Free Beading Patterns
Your Recently Viewed Projects

Thanks for your comment. Don't forget to share!
Marilyn B
Mar 02, 2017
It is hard to believe these beautiful works of art are made from brown paper and painted beads! I am wondering if you could make this really large for a stunning wall hanging, in addition to being jewelry pendants! The shimmer technique in these is incredibly pretty and would make such a thoughtful and unique gift! Thanks for sharing such great instructions! Love it!
lewisladies 063292 6
Jul 12, 2013
remember using layers of brown paper and glue to make a stiff shape and burning it to give the effect of wrought iron? my young daughter asked me what use pretend wrought iron could have as it would not be very stable
jayero48 5350860
Sep 19, 2012
Kind of nice. I like using brown paper bags for crafting ideas. Haven't thought of jewelry until now.
Cree8tively Crafty
Jul 07, 2012
I love crafts that you make everything yourself, it adds more of yourself to it!!
Mixed Kreations
Nov 04, 2011
I love the pendants. Neat idea. Your right the possibilities are endless. Thanks
RokIDo
Sep 09, 2011
Cute, though one must wonder about the eco-friendly value of the project when so many added paints and other products are used...
Report Inappropriate Comment
Are you sure you would like to report this comment? It will be flagged for our moderators to take action.
Thank you for taking the time to improve the content on our site.