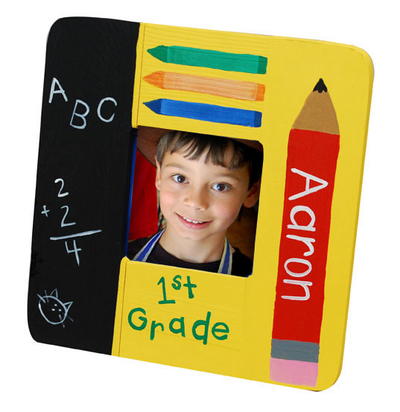
Personalized Back-To-School Frame
Get your son or daughter excited to go back to school by creating a Personalized Back-To-School Frame. Take a picture on your child's first day of school, put it in the DIY photo frame, and place it on the living room coffee table or someplace else where they're sure to see it. They'll be so proud of themselves for being such a grown-up! This back-to-school craft would also make a great gift for the child's grandparents, so that they can see their little angel's face every day.

Materials:
- Americana Acrylics
- DAO1 - Snow (Titanium) White
- DAO10 - Cadmium Yellow (transparent)
- DAO14 - Cadmium Orange
- DAO36 - True Blue
- DAO55 - Kelly Green
- DAO67 - Lamp (Ebony) Black
- DA129 - True Red
- DA250 - Bubblegum Pink
- DA259 - Cocoa
- Americana Brushes
- DBL1000-B - Liner #0
- DBR2002-B - Round #2
- Americana Multi-Purpose Sealer
- DS17 - Multi-Purpose Sealer
- Michaels unfinished wood frame (3.5" x 3.5" opening)
- 1/4" and 1" flat brushes
- Foam plate
- 1" painter's tape
- Ruler
Instructions:
- Use painter's tape to mask off 2 1/4" area at left side of frame, securing edges well to avoid seepage. Paint top and sides of that area with Lamp Black; let dry and remove tape.
- Place tape over Lamp Black area with edges aligned with right edge of paint, securing well.
- Use Cadmium Yellow to paint remaining section of frame; let dry after each coat.
- Referring to photo for placement, use 1" flat brush and True Red to paint line for pencil over center of right side of frame. Let dry.
- Mix one part Lamp Black to two parts Snow White to make gray. Use 1/4" flat brush and mix to paint strip at bottom of pencil for metal piece; let dry.
- Use 1" flat brush and Bubblegum Pink to paint eraser tip on pencil.
- Use #2 round brush and Cocoa to paint wood point on pencil; let dry.
- Use #0 liner brush and Lamp Black to paint lead tip on pencil point; let dry.
- Refer to photo for placement and use flat brush and Cadmium Orange to paint stripe with one pointed end for crayon at center over frame opening. Mix equal parts of Cadmium Orange and Snow White and paint over crayon shape for paper wrapper, leaving ends uncovered on each crayon shape. Let dry.
- Repeat above step with Kelly Green and True Blue, painting crayon above and below Cadmium Orange/Snow White one.
- Use liner brush and Snow White to paint items ("ABC", cat drawing, and math problem) on Lamp Black area for chalkboard; let dry.
- Use round brush and Snow White to paint name on pencil; let dry.
- Use round brush and Kelly Green to paint grade below opening of frame; let dry.
- Use 1" flat brush to apply Multi-Purpose Sealer to frame. Let dry.

Get more ideas for going back to school with our free ebook:
11 Teacher-Approved Crafts for School.
Read NextTeacher Gift Tin Can Crafts