Pumpkin and Candle Centerpiece
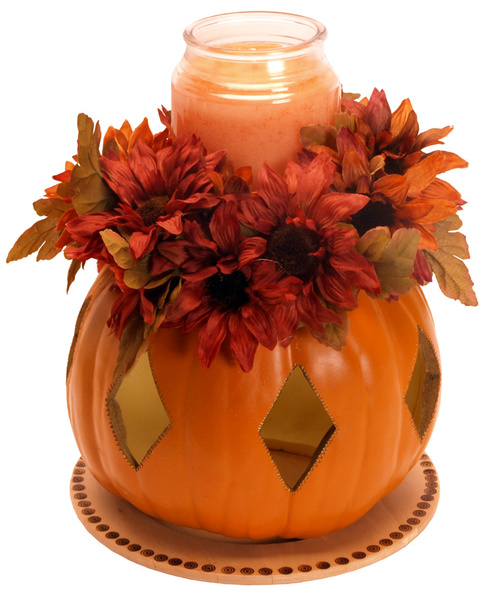
Create a beautiful centerpiece for your autumn gathering or Thanksgiving with a diamond-cut pumpkin. The pumpkin becomes a stand for a glass-jar candle and floral ring. You can also place a light inside the pumpkin.

Materials:
- Walnut Hollow® #23906 Creative Versa-Tool™
- Walnut Hollow® #3523 8” Round Plate
- Craft Pumpkin
- Other Supplies: Flat Paint Brush, Floral Candle Wreath or Flowers and Floral Wire, Jar Candle, Pencil, Pliers, Pumpkin Light (optional), Satin Varnish, Wire Cutters
Instructions:
- Before using the Creative Versa-Tool™, read all instructions and follow all safety precautions. Attach the Hot Knife Point to Creative Versa-Tool™ and tighten with pliers. Use tape to secure stand to hard surface. Place Creative Versa-Tool™ on stand. Plug into electric outlet, press switch “ON”, and let heat 4 -5 minutes.
- Using pencil, trace 7 – 3 ½” diamond shapes onto pumpkin, referring to picture for placement.
- Using the Hot Knife Point, cut along traced lines. Also cut a 4 ½” hole at the top of the pumpkin, removing stem. Remove cut pumpkin scraps through hole. Remove Hot Knife Point with pliers.
- Attach Tapered Point with pliers and create a dot design around each diamond shape by touching the Point onto the pumpkin. Remove Tapered Point with pliers.
- Attach Circle Point with pliers and hot stamp design around the perimeter of the Round Plate. Unplug tool and allow to cool. When completely cool, remove the Point.
- Apply one coat of varnish to plate. Let dry completely.
- Turn pumpkin upside down so that the cut hole is resting on the plate. Place jar candle inside floral wreath and place onto the flat surface of pumpkin.
- If desired, place a battery operated pumpkin light inside the pumpkin.
Read NextRustic Ribbon Crochet Pumpkin Stack

