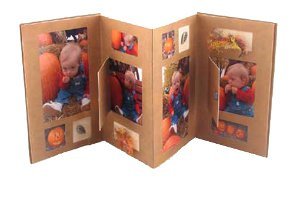
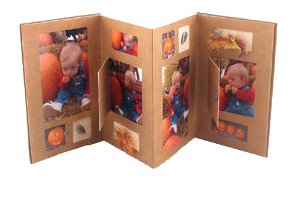
Pumpkin Patch Accordion Album
Share your family's fall photos with the Pumpkin Patch Accordion Album. This homemade photo album is a wonderful way to store your family's favorite photos from the fall season. This is the perfect project to display pictures from your baby's first visit to the pumpkin patch or the first time your kids carve their pumpkins. The fun festive decorations around the photos add an extra special touch to your album. Share your memories in a unique way with this adorable DIY photo album.
Materials:
- Craft bond™fabric & paper glue
- Craft bond™ extra strength glue stick
- X-ACTO® gripster® knife
- X-ACTO® rotary trimmer
- X-ACTO® self-healing cutting mat
- Light-weight cardboard (poster board): Two 5 1/2" x 8 1/2" pieces; one 8 3/8" x 21 1/4" piece; two 3" square pieces
- Modern metals metallic decor spray: metallic taupe (Design Master®)
- 12” x 12” Scrapbook paper: two westchester walnut embossed suede paper; three antiquity tan parchment; two Engraved fruit brown parchment(K&Company)
- 8 1/2" x 11" scrapbook paper, tan
- Making Memories®: details™ square rope charmed frames™;three details™ leaf eyelet shapes™;two Details™ mini square ribbon charms™
- Two pewter round decorative brads
- Eleven silver mini brads (paper fasteners)
- Metal bookplate
- Two 3/4" x 5/8" metal hinges
- 12” length of brown/orange variegated eyelash yarn
- 1 1/4" length of black round elastic cord
- Photos
- Misc.: scissors, bone folder or scoring tool, fine-line permanent marker
Instructions:
-
For front cover, use X-ACTO® Rotary Paper Trimmer to cut a 6 1/2" x 9 1/2" piece from embossed suede paper. Place a 5 1/2" x 8 1/2" piece of cardboard onto center back of paper. Fold corners and edges of paper up onto cardboard (similar to wrapping a package) and glue paper edges to cardboard with Craft Bond™Fabric & Paper Glue. Repeat to make back cover.
-
To form inside of album, score the 8 3/8" x 21 1/4" piece of cardboard vertically to form four equal panels. Bend ends of cardboard back along center scored line and ends forward along other two scored lines. Use Fabric & Paper Glue to attach Antiquity Tan paper to cover folded cardboard on both front and back sides, piecing paper as needed. Tip: Glue paper to cardboard with cardboard standing vertical and folded so that paper will not be so tight against cardboard that it can no longer bend.
-
To form a mat for the first two panels, use X-ACTO® Gripster® Knife and X-ACTO® Self-Healing Cutting Mat to cut an 8 3/8" x 12" strip from Brown Parchment Paper. Align left edges of paper and folded cardboard. Fold paper to match folds of cardboard. Measure and use X-ACTO® Knife and Cutting Mat to cut a 3 3/8" x 5 3/8" opening and two 1 1/2" square openings from first panel. From second panel cut two 1 1/8" x 2 3/4" openings. For the center opening make a 3 3/8" square flap by cutting along the top right and bottom edges and folding along the left edge. Use Craft Bond™ Extra Strength Glue Stick to attach mat to cardboard panels only applying glue along the front edge and along the folds, keeping the top and bottoms unglued to insert photos.
-
Repeat to cover third and fourth panels, this time aligning paper with right edge of cardboard and trimming left edge of paper along center fold of cardboard. Referring to photo, cut similar sized openings as first panels, alternating placement. Use Glue Stick to attach front and back covers to backside of first and last panel.
-
To decorate inside, trim and insert photos into desired openings. Attach a round brad to flap. Finish flap by gluing a 3 3/8" piece of brown parchment paper to backside of flap. Glue metal leaves in desired openings. Thread 2-3 pieces of yarn through ribbon charm and glue inside of openings.
-
To decorate front cover, use Antiquity Tan paper to similarly cover 3" square pieces of cardboard.
-
In a well-ventilated area, spray hinges, bookplate and mini brads with Metallic Taupe paint and let dry. Use mini brads to attach hinges to front and back cover of small covers. For closure, insert mini brad along edge of front cover and glue ends of elastic cord to inside of back cover, forming a loop. Use Glue Stick to attach metal frame and a leaf to front cover.
- Insert two mini brads into bookplate holes and bend prongs to one side. Use Glue Stick to attach bookplate to cover. Print desired words on tan paper and slide into bookplate. For inside of small book, use X-ACTO® Knife and Cutting Mat to cut frames from brown parchment paper and use glue stick to attach frames inside along right and left edges. Slide photo or desired journaling into frames.
Read NextVintage Doily Pumpkins