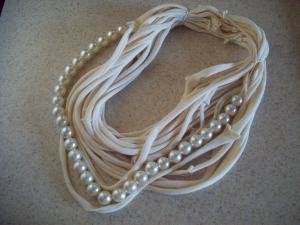
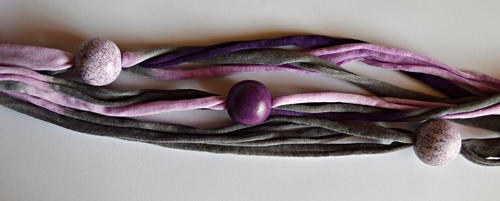
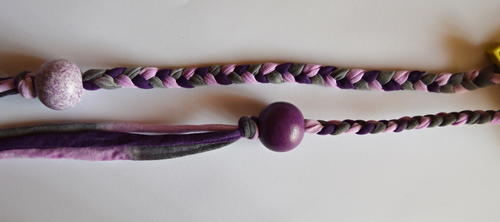
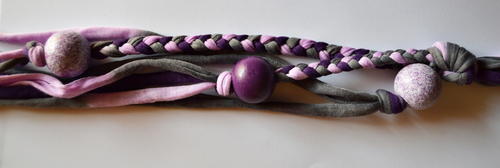
Royal Purple T-Shirt Yarn Necklace
Make T-shirt jewelry you'll obsess over with this tutorial.

From the Designer: "Make a fashion statement with this modern T-shirt yarn necklace. This accessory will look well with a simple shirt, or wear it when you glam up for a night on the town. Use the rich purple color as in the example, or use lighter colors to fit with a summer theme."
If you've always wanted to delve into crafting with T-shirt yarn, this is the perfect project to start with! Braiding the yarns is almost like making friendship bracelets on a larger scale, and the finished effect is so lovely! This is the perfect accessory to celebrate summer.
Materials List
- Printout of the provided diagram ~ click here to download
- Roll of pink, gray and purple mix-a-match t-shirt yarn
- Two purple marble wooden beads, each with a diameter of 1”
- Royal purple wooden bead with a diameter of 1”
- Darning needle (to thread yarn through the bead)
- Needle and 100% nylon invisible colorless thread
- Standard scissors
Instructions:
-
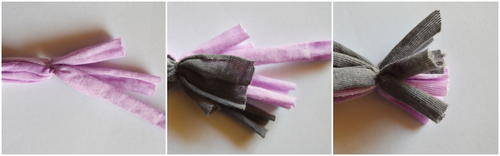
Cut 9 strings of T-shirt yarn, each with a length of approximately 36”.
-
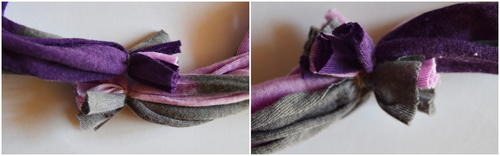
Thread three strings through a purple marble bead (bead 1 in the diagram). Depending on the size of the hole in the bead, you may need to thread one string at a time. Decide where to place the bead and use all three strings to make a knot above the bead. Braid the three strings below the bead ~ the braid should be about 7.4” long. Use a clothing peg to temporarily secure the braid until the big knot in step 4 is made.
-
Thread three other strings through the purple bead (bead 2 in the diagram). Again use all three strings to make a knot above the bead. Braid the three strings below the bead ~ this braid should be about 3.6” long. Use a clothing peg to temporarily secure the braid.
-
Thread the last three strings through the second purple marble bead (bead 3 in the diagram). Gather all 9 strings together to make a big knot below bead 3.
-
Gather the ends of the three strings above bead 1 together and use a backstitch to sew them together. Do the same with the three strings above bead 2, and the three above bead 3. Now sew all 9 strings together, again using a backstitch and neatly cut the ends behind the stitches shorter.
-
Gather the ends of the 9 strings below bead 3 together and use a backstitch to neatly sew them together. Neatly cut the ends behind the stitches shorter.
-
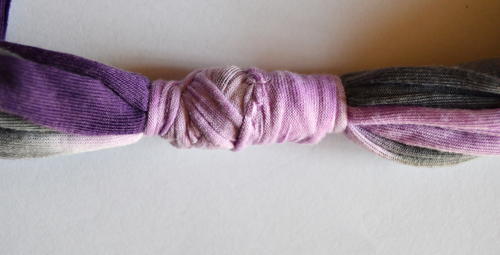
Place the two ends of the necklace, i.e. the end above the beads, and the end below the beads, over one another and use a backstitch to neatly sew everything together.
-
Cut a short piece of T-shirt yarn from the roll. Wind this piece tightly around the area where the two ends were connected and use a backstitch to secure.
Up Next:
Read NextVenetian Nights DIY Necklace