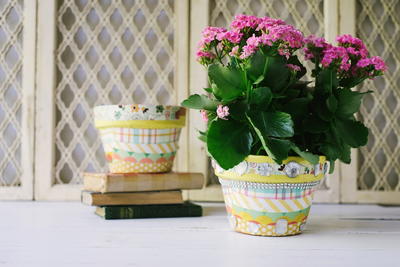
Kids' Clay Flower Pot
This flower pot is a great crafting with kids project. They can help put on the flowers and their name. This is a great clay pot for a tiny little plant. Your child can have their own plant to take care of. Use your imagination and put on your own designs and shapes.

Materials:
- Cernit Phthalate free clay- 1- 2.2 ounce package of each, neon yellow, neon pink, and neon green
- Ceramic Tile 6"X6" or a smooth work surface to put your flowers and leaves on
- Cylinder glass jar-thick, I used a salt shaker jar from the store.
- Makin's cutter sets -alphabet and flowers/leaves cutter set
- Crafter's Pick Ultimate glue
- Bamboo skewer
- 2 popsicle sticks
- Clay Pot from a garden store or hardware store
Instructions:
-
Condition the yellow clay a little at a time; start with a 1/4 or 1/8th block.
-
Roll the clay between your palms until it is warm and pliable and then fold and roll again. Do this until the clay is creamy in consistancy.
-
Flatten in to a little pancake about 1/4" to 1/8" thick.
-
Place one popsicle stick on each side of the little pancake of clay and roll the glass jar over the popsicle sticks and clay like a rolling pin.
-
The popsicle sticks form a little bridge for the jar and will stop you from rolling the clay out too thin and keep it uniform for cutting with cutters.

-
Cut out letters to form your name or a saying you have picked out. "Smile" is always a good one if you don't want to put your name on it. Adults love that.

-
I spelled Madisyn, which is my grand daughter's name. I am making this for her Mom to take a plant to work in to remind her of Madisyn all day long. I am also making it to show you how to do this. This is how I taught my children when they where little and how I will teach Madi when she is a little older. I also learned best by watching others do something and trying to work it out after myself.
-
Cut out all of the letters, conditioning clay and rolling it out as you need it.
-
Place a small amount of glue on the back of each letter, one at a time and add one at a time to the rim of the flower pot. Press each letter on to the pot but do not smash the clay down. Just make sure the back of the letter is completely attached to the pot, gently now, you can do this, I know you can. Kids are very smart.

-
See all of the letters are on the pot rim and you can even see some glue, but that is ok, it will dry clear and bake in the oven too.

-
We are going to make some flowers and cut out some leaves with the cutters.
-
First condition some green clay the way you did the yellow clay in the beginning.
-
Then flatten the green clay and roll it out the way you did the yellow clay.

-
Cut out some leaves, I cut out 10 leaves, but for your design you may need more or you might like less, it is your pot and your design. Cut out 10 to start.
-
Use the side of your popsicle stick to gently mark a vein down the center of each leaf and set those aside. You can see how I have set the leaves and flowers I have made on to a ceramic tile till I glue them on my pot.

-
Now let us make some flowers. I first off mixed some pink and yellow together to get a couple of shades of orange. I used 1 part pink to 2 parts yellow for one orange color. I also used 1 part pink to 4 parts yellow for another orange clay. I condition the clay like I did above until it is one color and flatten in to a pancake again. Cut out 1 of the large flowers in a color and then cut out a medium one and place on top of the large one. Here you can see I used pink and cut out a large flower with the cutter and then I cut out 5 small individual petals.

-
I then cut out one of the medium flowers with a cutter out of an orange color of clay and placed it on top of the large pink one.

-
Then I used the small petals and placed them on the medium orange clay flower one at a time with the bamboo skewer. Place the skewer right on the point of the petal and fold the edges around the skewer. Place the petals in a circle in the middle of the flower. I added a 1/4" ball of yellow to the center. Press it gently in to the center but do not flatten, leave it kind of rounded.

-
These flowers would also make great magnets for your refridgerator, bake them the way you will bake the pot when you are finished and use the same glue you use to glue the flowers on the pot to glue magnets on the back of the flowers you make.
-
Now have some fun coming up with combinations of colors, flower cutters, and petals to make your flowers. If you need some inspiration look at the flowers I made above. I bet you can pick out the cutters I used and the colors just by looking at the flowers I made. You can also enlarge the pictures by clicking on them.
-
I am going to start placing things on my clay pot, and I am going to start with a couple of leaves first.
-
Place a bit of glue on the back of a leaf and place it some where on the pot, I usually start right under the letters.

-
Keep adding flowers and leaves.

-
Now let the glue dry completely. Then with your mom or an adult's help, bake in your home oven for 30 minutes at 275 degrees.
-
Shut off the oven and let cool in the oven.
-
Ask your mom or an adult to take it out for you.
- Plant a plant or a flower inside and give to someone you love. It will make them smile.
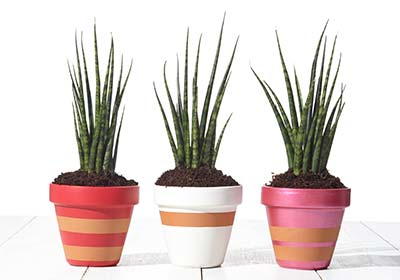
Read NextHow to Paint Terra Cotta Pots
Your Recently Viewed Projects

Thanks for your comment. Don't forget to share!
BeckySue
May 17, 2016
My grandkids come over once a week, and I like to have an activity for them to do. They are different ages, but the preschoolers can do this. I think I can get all the supplies at my local craft store.
Report Inappropriate Comment
Are you sure you would like to report this comment? It will be flagged for our moderators to take action.
Thank you for taking the time to improve the content on our site.