Gears Cottage Clock
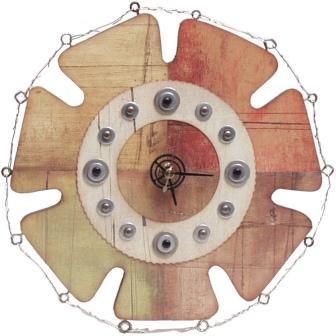
With gear clock hands, metal wire and metal washers in place of numerals, this crafted clock has a rustic, artistic feel. This homemade clock would make a great gift for Father's Day.

Materials:
- Walnut Hollow® #27632 Cottage Clock - medium
- Walnut Hollow® #27283 Clock Hands - Gears
- Walnut Hollow® #TQ500P Clock Movement with Hands
- Walnut Hollow® #26443 Creative Drill™ (use smallest drill bit)
- Distressed papers - four with a medium value & one light (Basic Grey)
- Metal washers - four 3/4” & twelve 1/2”
- Metal brads - four black & eight antique
- Metal eye screws - fourteen assorted small
- 20 Gauge silver wire - fourteen 4” pieces
- Zip Dry paper glue (Beacon Adhesives)
- Acrylic paint - Soft Black (DecoArt Americana)
- Other Supplies: AA battery, scissors, pinking edgers, brown inkpad, 1/8” circle punch, cellophane tape, pencil, fine sandpaper, paper towel
Instructions:
- Cut four 5” squares from medium distressed papers. Place papers on work surface so that wrong side faces up, butting edges together to form a 10” square. Place cellophane tape over edges of squares to join them.
- Place wood clock symmetrically on top of squares and draw around edge with pencil. Cut out shape along drawn line. Antique front edge of paper shape with brown ink, using a small piece of dry sponge or paper towel.
- Cut a 5” circle from light distressed paper with pinking edgers. Cut a 4” circle from center of 5” circle. Antique edges of paper ring with brown ink. Glue ring to center of paper clock shape.
- Glue large washers on ring, lining them up with edges of paper squares. Glue small washers on top of large washers and evenly spaced between large washers. Punch 1/8” holes in paper inside washers. Attach black brads to holes in large washers. Attach antique brads to holes in small washers.
- Lightly sand clock. Paint back and sides of clock with Soft Black. Let dry. Sand painted black surface to distress it. Glue assembled paper clock shape to wood shape.
- Drill starter holes close to ends of straight edges on sides of clock. Screw eyes into holes. Insert a piece of wire through each set of holes with ends even on both sides and then wrap wire ends back around wire to secure it.
- Attach clock movement to wood clock, following manufacturer’s instructions.
Read NextBeautiful Skandi Reindeer
Your Recently Viewed Projects
Weberme
May 31, 2017
This gear cottage clock is super cool and I do like the shape and love the screws and washers that give that pop. I can see this in a mechanic shop or even a garage that your favorite man fixes things in. This would be a great gift for fathers day for that special someone or even a great Christmas or Birthday gift. I do like the tutorial but would be even easier with pictures of steps for some to understand better.
dlclose5 7893610
Mar 17, 2012
Sorry. I need pictures to envision how this would work. Neat idea, though.
Report Inappropriate Comment
Are you sure you would like to report this comment? It will be flagged for our moderators to take action.
Thank you for taking the time to improve the content on our site.


![Decoupage Wooden Coat Hangers [3 Ways]](http://irepo.primecp.com/2017/07/338694/Decoupage-Wooden-Coat-Hangers-3-Ways-2_Large400_ID-2327997.jpg?v=2327997)
