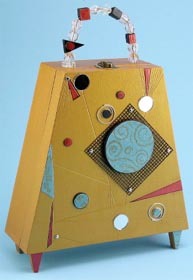
Art Deco Purse
Create a unique purse from AMACO with art deco style and flair all your own. Suede adds interesting texture to the finished project.

Materials:
- AMACO® WireForm® Woven Metal Mesh — Modeler’s Mesh –Black Aluminum 8 Mesh – 31/4" x 31/4" Piece
- AMACO® Rub ‘n Buff® — Antique Gold and Ebony
- AMACO® T-3 Double-Ended Stylus
- AMACO® All Purpose Sealer
- Judy’s Stone House Designs: Large Wedge Shaped Box Purse with Handle
- Metallic Russet and Gold Acrylic Paint
- Tandy Leather Co.: Velvet Pig Suede Remnant Piece (shown here in aqua)
- Forster® Woodsies® Wooden Circles — 1 Jumbo, 1 Medium and 5 Small
- Hampton Art Stamps: Swirls-H Rubber Stamp
- API: Crafter’s Pick™ The Ultimate Glue
- Paintbrushes: 1" Flat, #6 Shader and Fine Tipped
- Two 9" x 12" Pieces Red Felt
- Drill Equipped with 1/16" Drill Bit
- 6 Mini Silver Brads
- Fine Tipped (non-bleeding) Permanent Black Marker
- 2 Silver Spiral Shaped Paper Clips
- 3 Round Mirrors, 3/4" Diameter
- Screw Driver (small Phillips head needed)
- Scrap Paper and Cardstock
- Ruler
- Scissors
- Soft Cloths
- Disposable Gloves
- Cosmetic Sponge
- Sandpaper
- Tack Cloth
- Pencil
- Masking Tape
Note: Suede pieces add interesting texture to finished project. If unavailable, simply paint these sections of the project using turquoise acrylic paint. Circles can then be stamped same as is directed when using suede.
Steps:
- Remove latch, hinges and beaded handle from box. Lightly sand (if needed) then wipe with tack cloth. Trace box shape onto scrap pieces of paper to make two patterns. Allowing for wood thickness on all outside edges, use one of the patterns to cut two red felt pieces for inside lining of purse. Set felt aside.
- Referring to project photo as a guide, draw geometric lines on second paper pattern to create a design template with pencil and ruler. Position AMACO® Black WireForm® piece onto pattern to determine final placement on purse front. Make a dot on template to mark holes that will need to be drilled in wood to attach mesh later. At intersecting points on template, mark two additional dots to attach remaining brads used as accents (see photo).
- Place pattern template on top of purse front, taping at corners to hold in place. With ruler and template as guides, use largest end of stylus to press the design into the soft wood, making slight indentions. Drill holes at marked dots. Remove pattern template, lightly sand drilled holes (if needed) then trace lines again with stylus, pressing them deeper into the wood for better visibility.
- With gloved hand, use corner of soft cloth to apply AMACO® Antique Gold Rub ‘n Buff® to outside of box. Apply to corners and side edges only on inside of box as felt lining will cover the remaining surfaces. Buff with clean portions of cloth to remove excess and create a lustrous shine.
- Remove wood beads from handle wire and apply Ebony Rub ‘n Buff®. Apply the same color to top and side edges of all wooden circles. Buff with clean part of cloth as before.
- With the #6 shader and fine tipped paintbrushes, apply Metallic Russet acrylic paint to top side of four small wooden circles and random triangle shapes on purse front. For additional accent, portions of some wooden beads and wedge shapes at purse bottom can also be painted. Let dry. Use permanent black marker to outline triangle shapes on purse front. TIP: For best results, test marker on scrap piece of wood first; making sure that it doesn’t bleed when coated with sealer.
- Brush side edges only of jumbo, medium and one small wooden circle with one coat of AMACO® All Purpose Sealer. Apply 2-3 coats of the sealer to all remaining wood surfaces. Let dry completely.
- Use cosmetic sponge to apply Metallic Gold acrylic paint to rubber stamp image, then stamp onto suede remnant pieces that have been cut to fit top of jumbo, medium and one small wooden circle. For additional accent cut suede pieces to fit some wedge shapes at bottom of purse as well as random shapes on purse front. Portions of the original pattern template can be cut to use as patterns for creating exact size piece(s) needed. Spread a thin layer of glue onto back of suede pieces using a scrap piece of cardstock, then glue to wood.
- Attach WireForm® to purse front using four brads, and insert remaining 2 brads through prepared holes. For all, open brad wings on inside of box to secure. One at a time, use scrap cardstock piece as a spatula to spread a thin layer of glue over inside purse front and back. Press felt lining piece onto the glue-coated surface, smoothing with palms to remove any trapped air pockets and covering the brad wings.
- Reassemble purse, attaching hinges and latch. Slide beads back onto wire before reattaching. With purse lying flat, refer to photo to add remaining accents to front, gluing all pieces in place. For best results leave to lie flat overnight to allow glue to cure.
Read NextBeautiful Skandi Reindeer
Your Recently Viewed Projects
Thanks for your comment. Don't forget to share!
Report Inappropriate Comment
Are you sure you would like to report this comment? It will be flagged for our moderators to take action.
Thank you for taking the time to improve the content on our site.
![Decoupage Wooden Coat Hangers [3 Ways]](http://irepo.primecp.com/2017/07/338694/Decoupage-Wooden-Coat-Hangers-3-Ways-2_Large400_ID-2327997.jpg?v=2327997)