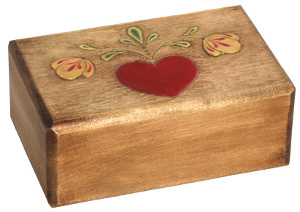
Carved Heart and Flower Box
Carve a delicate heart and flower design into the top of a wood box with the help of a pattern. This would make a beautiful place to keep jewelry or other items.

Materials:
- Walnut Hollow® #12530P Roomy Box
- Walnut Hollow® #4004 Carving Set – 4 Pieces
- Walnut Hollow® #1095 Graphite Transfer Paper
- Pattern [pdf]
- Wood Stain
- Paint: Red, yellow, (2) shades of green
- Other Supplies: brush, eraser, paper towel, sandpaper, spray varnish, stylus, tape
Instructions:
Practice on a scrap of wood to get used to the tools before starting the project. Try all the tools and determine which ones will work the best for this particular project. The instructions will make suggestions, but use the ones that best suit your needs.
- To prepare wood, use sandpaper to lightly sand entire box. Remove dust with paper towel.
- Center pattern on lid. Tape in place. Slide Graphite Paper under pattern (graphite side down). Use stylus to trace pattern. Remove pattern and Graphite Paper.
- Use Straight Square Chisel to make a stop cut around edge of design. Hold chisel in a straight position and press into the wood. Make short cuts in order to follow the lines of the pattern. If the cuts need to be deeper, go over the lines a second time. The stop cut will help keep the gouges from going past the line.
- Use Small Gouge to create flower stems and also define the stop lines around flowers, leaves and heart. Use large gouge to carve away wood on lid. Start at one edge and carve toward the pattern. Work in both directions horizontally across top of lid.
- When complete, use fine sandpaper to remove any rough spots.
- Use eraser to remove any visible graphite lines.
- Use wood stain to add color to box. Follow directions on container. Remove excess stain with paper towel. Let dry.
- Use brush to apply paint as shown in photo. Let dry.
- Apply 2-3 coats of spray varnish for a protective finish. resize as needed