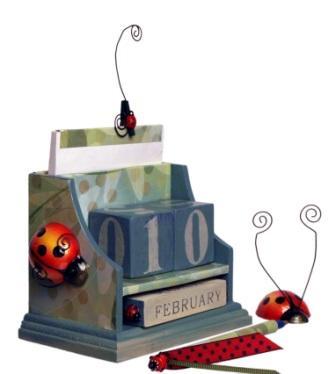
Ladybug Wood Calendar
This perpetual wood calendar uses wood blocks with the month and two blocks for the day. A ladybug theme ties into a matching ladybug notebook and pen. The perfect homemade desk set.

Materials:
- Walnut Hollow® #27208 Calendar/Desk Organizer
- Acrylic colors – Calendar: Heritage green, moss green Ladybug: Orange,
- black, bright red, barn red, straw, yellow
- Acrylic gel stain medium
- Decoupage medium
- Acrylic varnish, high gloss
- Decorative paper – to match green paint
- White plastic pen
- Matching red and black beads and 2” long head pin
- Ribbon – matching red and black and green
- Embellishments: 3 - ½” diameter wooden ladybugs, black craft wire, 7 - ½” diameter Novelty ladybugs, miniature green clothes peg
- Other supplies: paint brushes – ½” flat, #1 round, paper towel, 100 grit sandpaper, fine tip permanent black marker, white craft glue, scissors, hand drill with small 1/16” drill bit
Instructions:
Calendar/organizer
- Mix a 50/50 blend of the acrylic paint and gel stain medium. This makes the acrylic paint into a translucent stain.
- Paint the month and number block pieces with the stain. Brush it on the wood, one side at a time, and then wipe off the excess with a paper towel. If the numbers and letters do not show through the stain, add more gel stain medium to your blend. Let dry completely.
- Basecoat the base piece with the heritage green acrylic paint. Paint the ends of the month blocks with the heritage green acrylic paint.
- With the sandpaper, distress all the wooden pieces with a light sanding. If needed, darken the numbers and letters with a permanent black marker.
- Trim the decorative paper ½” larger than the sides, back and ‘bench’ areas of the organizer. Decoupage the paper pieces onto the organizer and let dry. Sand the edges to remove the excess paper and create a nice finished edge.
- Varnish all decoupaged and stained pieces with the decoupage medium. Let dry.
- Paint and varnish ladybugs (instructions follow)
- Add embellishments. With the white glue, glue the small ladybugs to the ends of the month blocks. Glue the large ladybugs to the sides of the base.
Variation: The number blocks can also be base coated with the heritage green paint and new numbers added on. The sample shows numbers stamped with moss green acrylic paint using 1 ½” number stamps.
Notebook
- Trim a piece of the decorative paper to fit over the top of the paper pad. Use a glue stick to adhere.Add a piece of curled black craft wire and the mini clothes peg to accent.
Matching Pen
- Cut a 2” x 5” piece of decorative paper. Tear off ½” along one long side. Brush on decoupage medium to the back of the paper panel and roll around the pen barrel starting with the straight edge. Brush on a coating of the decoupage medium and let dry.
- Drill a small hole into the top of the pen. Thread a few matching beads onto a head pin. Fold a 6” to 8” length of ribbon in half and thread on the head pin. Glue the beaded and beribboned head pin into the drilled hole with white glue.
Ladybugs
(Design courtesy Sharon March)
- Base coat the ladybugs with straw acrylic color.
- Paint the heads black and add a black line down the center of the back.
- Float the colors around each back segment starting with yellow, then orange, bright red and finally barn red.
- If needed, darken the head and line down the back with the black acrylic color and add the ladybug dots.
- Coat the ladybugs with a high gloss acrylic varnish.
- Using the drill, make two small holes in the top of the head. Curl two pieces of 2 ½” craft wire and glue into the holes to create the feelers. The note holding ladybug uses 4” long pieces of craft wire.
Read NextElegant Refurbished Entryway Cabinet
Thanks for your comment. Don't forget to share!
Report Inappropriate Comment
Are you sure you would like to report this comment? It will be flagged for our moderators to take action.
Thank you for taking the time to improve the content on our site.