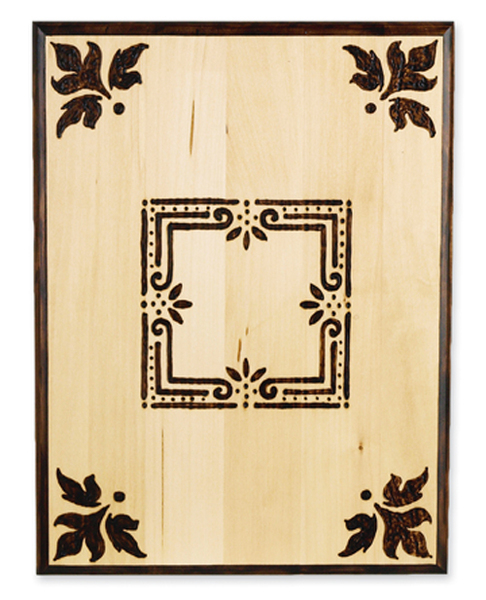
Elegant Wood Burned Plaque
 Create beautiful and elegant designs in a slab of wood with this Elegant Wood Burned Plaque. You can use these wooden decorations as wall art, trivets, or even engraved gifts for weddings or anniversaries. Create simple designs in the corners of the wood or engrave the names of a newly married couple and the date of their wedding for a beautiful gift that's sure to be appreciated.
You can find this project, as well as many others, in our new free eBook, The Ultimate Craft Guide: 25 Free Craft Projects for Every Crafter. Download your own free copy today!

Materials:
- Walnut Hollow® Creative Versa-Tool®
- Rectangle Basswood Plaque, 9"x12"
- DecoArt® American® Classic Stencil – Tin Ceiling
- Minwax® Spray Varnish, Satin
- Ceramic Dish
- Sandpaper, Fine
- Foam Brush
- Pencil
- Pliers
- Ruler
- Tape
- Wood Sealer
Instructions:
- After reading all manufacturer’s instructions found inside the Creative Versa-Tool®, attach Flow Point on Tool. Secure Tool Stand to work surface with tape. Place Tool on Stand. Plug into electric outlet, turn Versa-Temp control dial to the Red Zone, and heat for four to five minutes.
- Meanwhile, use the ruler to find the center of the plaque. Tape stencil in place to center tile design. Use pencil to trace stencil design onto wood surface. Trace corner elements with pencil also.
- Use Flow Point to burn each stencil design. Add dots by holding Creative Versa-Tool® perpendicular to the wood surface, touching the surface, then lifting the point off the surface. You can make smaller or larger dots by touching lightly or a little stronger. Once all elements are wood-burned, use pliers to remove Flow Point and drop it into the ceramic dish.
- Use pliers to attach the Shading Point. After wood-burning all edges of the plaque, turn Versa-Temp control dial to “O” – off.
- Use eraser to remove any remaining pencil lines.
- Use foam brush to seal entire plaque. Let dry.
- Lightly sand entire surface with fine sandpaper.
- For a protective finish, spray plaque with two or three coats of spray varnish.
Your Recently Viewed Projects
Thanks for your comment. Don't forget to share!
Report Inappropriate Comment
Are you sure you would like to report this comment? It will be flagged for our moderators to take action.
Thank you for taking the time to improve the content on our site.