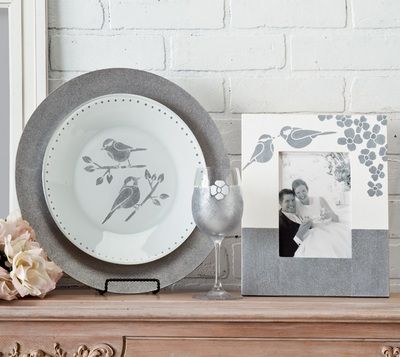
Silver Wedding Picture Frame
If you want to save a little money on your wedding and enjoy being creative, then consider some wedding craft ideas like this beautiful silver picture frame. Wedding or wedding shower crafts really show the individuality of your wedding and the love that you two share! Make it a ceremony to remember!

Materials:
DecoArt Products Required
- Dazzling Metallics
- DAO70 - Shimmering Silver
- Americana Multi-Purpose Sealer
- DS17 - Multi-Purpose Sealer
- Aleene's Quick-Dry Tacky Glue
- Scissors
- Foam plate
- 3/4" flat brush
- Scrapbook paper, DCWV 8" x 8" Luxury Stack & Pearlized Metallic #PS-006-00016
- One 12" and one 7" length of sheer ribbon with glitter (We used Casa Collection, Wrights #2160297137, celadon green.)
- Lo-temp glue gun and glue sticks
- 1 1/4" button, Glamour Gems #5223 by Blumenthal Lansing
- You & Me sticker, K & Co Glitter word stickers/silver #547667
- Just-A-Frame, white wash finish with 3.5" square opening, Woodline Works Corp.
Steps:
- Use flat brush and Shimmering Silver to paint frame; let dry.
- Tear 3" wide strip of scrapbook paper from sheet (We used green filigree pattern from pad.) Apply thin even coat of tacky glue to back of paper strip, covering all of surface, and attach to lower area on front of frame. Use fingers to smooth flat and remove any wrinkles and then turn face down on table and press to help adhere paper. Let glue dry. Use craft knife to trim paper to edges at frame sides and inside photo opening.
- Refer to photo for placement and attach "you & me" letters.
- Apply coat of Multi-Purpose Sealer to frame.
- Centering long ribbon over left border of frame, use glue gun to glue end of ribbon to back of frame at top. Stretch ribbon and glue remaining end to lower back of frame, trimming ends if necessary.
- Gather ribbon, to left at top of photo opening, and glue gathers to frame. Glue button over gathers.
- Tie knot in center of short ribbon piece to form bowtie shape; trim ends, if necessary; and glue knot of bow just above and behind top edge of button.
Tips:
- Choose ribbons, florals, and paper to match your wedding colors or home decor.
Read NextSplatter Paint Bridesmaid Tee Shirt