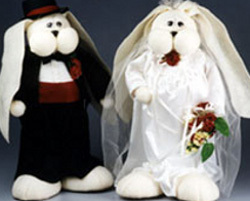
Bunny Bride and Groom
Dressed in tails and veils, this happy couple is ready to hop on down the wedding trail.

Materials:
- STYROFOAM Brand Products:
- Cones, two 12" x 5"
- Balls: one 5"; two 4"; three 2"; four 1 1/2"
- Eggs, two 5-7/8" x 3-7/8"
- Satin fabric, 1/2 yd. white
- Felt: 9" x 12" sheet each white and ruby; 1/2 yd. black; 1-1/4 yd. antique white
- Wire, 16-gauge and 25-gauge
- Pearl sprays, 6 stems
- 20mm wiggle eyes, two pairs
- 18mm animal noses, two black
- Animal whiskers
- Top hat, 4" black felt
- Pearl buttons, five 3/8"
- Battenburg lace doily, white 6" x 9"
- Tulle or netting, 18" x 24" white
- 1/4" satin ribbon, 3 yds. antique white
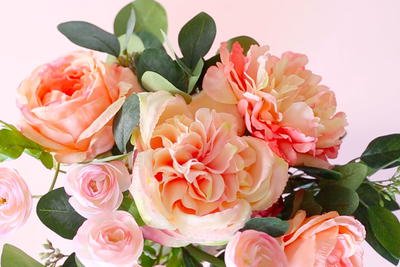
- Silk flowers: 14, 1" dia. roses; three stems small yellow; several leaves
- Floral tape, green
- Needle
- Thread, white and black
- Scissors
- Wire cutter
- Serrated knife
- Butter knife
- Straight pins
- Low temperature glue gun and glue sticks
For pattern, click here. (pdf)
Steps:
- Using serrated knife, cut the foam pieces as follows (hint: for smoother cuts, wax the knife blade first with an old candle):
a. Cut 2" off tips of cones (lower body)
b. Cut eggs in half lengthwise, and then cut 1" off pointed ends (feet)
c. Cut 5" ball in half (upper body)
d. Cut 2" balls in half (cheeks and tails)
e. Roll the 1-1/2" balls into cylinders (hands)
- Feet: Place foot, rounded side down, in center of 10" square of antique white felt; tightly pull felt around sides and pin and glue to the back. Glue a 6" felt square to the bottom of foot; trim excess felt. Repeat for other three feet. Using butter knife, make two indentations through felt and into foam on curved end of foot, forming toes.
- Body: Stand cone on its point. Bend both ends of a 4" length of 16-gauge wire; glue and inert folded ends into heel of foot (you may need to first poke a hole in felt using tip of serrated knife). Insert and glue other end of wire into point of cone. Repeat for other feet. Attach 5" half ball to the flat top of cone, using wire and glue as in feet (see Diagram 1).
- Head: Insert a 6" length of 16-gauge wire into 4" ball; this will be the neck. Tightly gather a 15" square of antique white felt around ball, securing with wire around the neck. Glue and insert wire neck into top of bunny body. Glue excess felt to cone.
- Arms: Bend both ends of an 18" length of 16-gauge wire. Glue and insert each end into hands. Wrap each hand in a 6" square of antique white felt, wiring tightly around the wrist; wrap wire around excess felt on the arm. Glue together long edges of a 7" x 9" piece of antique white felt, forming a 9" tube. Slip a hand 3" into tube and wire tightly around the wrist; pull hand through the tube. Repeat for other hand; overlap tubes in the center back and wire tightly.
- Repeat Steps 3 - 5 for remaining bunny.
- Sleeves: Glue a 1/4" hem along short sides of a 7" x 18" piece of satin fabric. With right sides together, glue 18" sides together, forming a tube. When dry, turn right side out. Insert arms into sleeves. Wire tightly in center of arms; securely glue and wire arms to back of bunny between the head and body. Repeat for Groom, using black felt.
Completing Groom
- Pants: Glue a 1" hem along long edge of 13" x 29" piece of black felt. Glue together 13" sides, forming a 13" tube. Using black thread, sew a running stitch in the side opposite the hem; this will be the waist. Slip tube onto body, positioning the seam in back; the waist should be 9" from the tabletop. Pull gathers tight and knot thread; glue waist to body. Using butter knife, push felt into center front of bunny, forming "pants" (see Diagram 2). Glue cuffs up and over feet.
- Shirt: Glue a 7" x 9" piece of white felt around top of body; glue a 1/2" x 6" strip of white felt down center of shirt for button placket. Glue 1/2" x 9" strip of white felt around the neck for a collar. Glue three buttons to front of shirt.
- Glue a 2" x 12" strip of ruby felt around bunny's wait for a cummerbund, overlapping ends in back.
- Jacket: Using Pattern A, cut out jacket from black felt. Gather neck edge using black thread. Slip jacket onto bunny and pull gathers tightly. Glue collar to secure. Fold back the lapels and glue to shirt. Glue a 3/4" x 12" black felt strip around neck for the tie band. To make bow tie, wire together the center of a 1" x 3" strip of black felt; glue a 1/2" felt strip around center of bow. Glue bow to neck.
- Face: Cover each cheek with a 5" square of antique white felt, pulling felt tightly and gluing to the back. Glue cheeks in place. Tie together several pieces of thread for whiskers; run whiskers through glue-covered fingers (to make them firmer). Glue whiskers in place under nose. Glue nose over center of whiskers; glue eyes to face and eyelids over eyes.
- Ears: Cut two, 4" x 15" pieces of antique white felt; round edges on one end to resemble an ear. Glue ends of ears to inside of top hat. Glue a 1/2" ruby felt strip around hat for a hatband. Glue hat to head.
- Glue a leaf and two roses to jacket lapel. Cover 2" half-ball with 5" square of antique white felt, pulling felt tightly and gluing to back. Glue tail in place between the tails of the jacket.
Completing Bride
- Glue a 1/2" hem along one edge of remaining satin fabric. Stitch a gathering stitch along opposite edge, 1/2" in from edge. Glue satin into a long tube and slip onto Bride, positioning the gathers at the neck and the seam at the back. Gather tightly and knot. Glue around neck, if needed. Cut a 4" slit in each side below the gathering stitches and pull through arms. Gather fabric above each foot to expose foot; whipstitch in place. Glue bottom of dress to top of each foot. Make a cut in doily to fit around neck; position cut edges in back and glue. Glue two white buttons to back of doily.
- Face: Follow Step 11 for the Groom.
- Ears: Follow Step 12 for the Groom. Wrap a 2" length of wire around ends of ears; twist tightly. Poke a hole in head and insert wired end; glue in place. Ears should be 1" apart.
- Veil: Gather 24" edge of tulle; pull gathers to create a 3" length. Glue to head just behind the ears, leaving a 2" tuft above ears. Make a loopy bow from 1-1/2 yds. ribbon. Glue to center of veil at the ears. Glue two stems of pearls and three small roses in and around the ribbon.
- Make a bow with 10" tails from 1 yd. ribbon; glue to neck of Bride. Glue two roses to bow. Make a bouquet from remaining leaves, ribbons and pearls; tape together. Glue bouquet to Bride's hand.
®™ Trademark of The Dow Chemical Company ("Dow") or an affiliated company of Dow. For more project ideas, please see styrofoamstyle.com.
Read NextPolka Dot Paradise Pinwheels