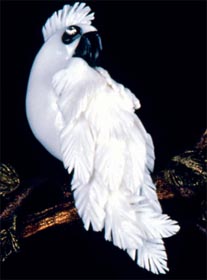
Paradise Bird Pin
If you have a fondness for tropical birds, you'll love making this pretty pin with realistic feathers from AMACO.
Materials:
- 1 ½" x 7" Friendly Plastic® Metallic Sticks: 3 Metallic Solid White/White 1 Metallic Solid Black/Black 2 Metallic Solid Brown/Black 1 Metallic Solid Avocado/Black
- Small Leaf Cutter
- AMACO® Push Mold — Roses
- E-6000 Glue
- 1 3mm Clear Austrian Crystal
- 2 1½" Pin Backs
- 1 Plastic Parrot Shape
- Electric Skillet
- Candy Thermometer
- Spatula
- Cooking Spray
- Small Sharp Scissors
- Toothpicks
- Paper Towels
- Cold Water
Instructions:
- Parrot: Warm one strip of White Friendly Plastic® until soft and pliable. Smooth over plastic parrot shape, leaving beak uncovered. If necessary, return to warm water to smooth. Clip away excess Friendly Plastic®, warm and fill in hollow back of parrot shape. Make sure back is smooth enough to attach pin back later. Cut a tiny strip of Black; soften in warm water, remove and form eye socket. Glue in place. Soften remaining Black piece and cover the beak area. Using a toothpick, gently press an indentation into the plastic to form the beak from underneath. If beak becomes too firm to shape, simply hold parrot by the tail, place beak into warm water to soften, remove and finish shaping.
- Feathers and Crest: One at a time, place White Friendly Plastic® pieces in warm water, remove and cut as many “leaf” shapes as you can (approx. 11). Warm one “leaf” at a time, place on parrot, starting with tail section (save one “leaf” for crest). Place so “leaf” shapes partially hang off body, pressing to conform with body of bird. Cool, pop off “leaf”, cut with small scissors to create feathers. Glue back into place. Continue until you have covered the parrot with “feathers”. Use last White “leaf” for the crest. Soften, press on top of head to shape then remove and let cool. “Feather” with scissors, glue back into place.
- Branch: Soften piece of Brown Friendly Plastic®, loosely roll into branch shape. Score branch with toothpick to create bark effect. Repeat with more Brown Friendly Plastic® to create smaller branches by rolling tighter, resoftening and hand rolling. Cut thinner roll into four smaller branches. Glue to large branch.
- Leaf Shapes: Cut at least 11 squares of Avocado Friendly Plastic®, soften in warm water, and press into the smallest leaf shape on Roses Push Mold. When cool, trim excess around leaf shape and “feather” with scissors. Glue into place on smaller branches.
- Glue crystal into eye socket and two pin backs on back of branch and bird. Glue bird to branch.
Read NextDIY Woven Tassel Keychain