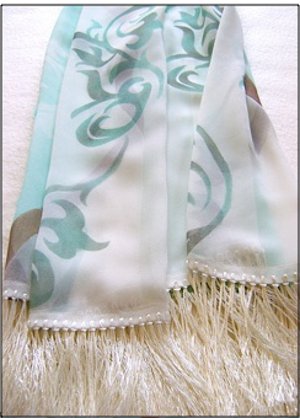
Elegant Sheer Painted Wrap
Take plan silk scarves to a new level with this Elegant Sheer Painted Wrap project from Gloria Uhler. This stunning and elegant scarf is perfect for an evening out...and you'll never believe how easy it is to make! Use soft colors for a sweet, beautiful look that everyone will love. This scarf also makes a great gift idea for moms, sisters, friends, and cousins!
Materials:
- Sewing notions
- 2.25 yards wrap fabric
- Stencil material
- 6 pkgs. rayon embroidery floss (8.7yards each)
- Painters tape
- Index card
- Rotary blade or craft knife
- Lumiere (by Jaquard) 549 Metallic Rust & 571 Pearl Turquoise paint
- #16 embroidery needle
- Repositionable stencil spray
- Aztek Airbrush
- Templates
Instructions:
- Cut your fabric 74” long by 26” wide. Hem the long sides first. Instead of measuring and pinning the entire length, baste .50” from the raw edge using a guide on your machine. Fold and press the edge on the basting lne. Turn the pressed edge .50” and sew in place close to the fold. Remove basting stitch.
- Hem the short ends by first pressing a one inch hem, then folding that hem in half. This will create a half inch hem.
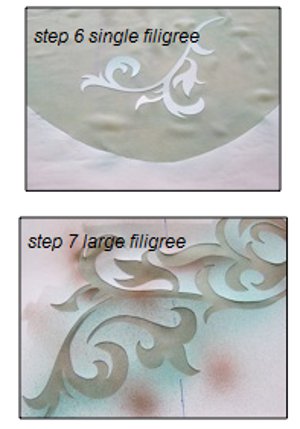
- Using the stencil material of your choice, print and cut out the three stencils provided - the large filigree, the single filigree, and the accent stencil. Keep all the die cut pieces in tact for use later. We used card stock stencils for the filigrees and sprayed the backsides with repositionable adhesive. The large and small filigree stencils will need to be reversed to create mirror images on one half of the wrap. If you use stencils that cannot be reversed, you will need to cut out two of each.
- Following our sketch, create one 72” long curved stencil or three 24” pieces that you can piece together. Because of it’s size, a curve stencil is not included with our instructions. We used freezer paper for this stencil because it comes in a long roll and can be cut in one piece. The opening for the curve should measure 1/2” wide. Save the 1/2” wide die cut piece and keep it in tact to use later.
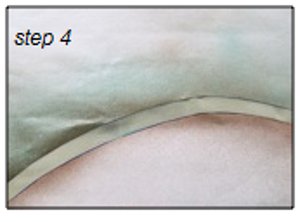
- Spray the curve with brown paint.
- When dry, stick the die cut 1/2” wide curve in place to cover the brown paint. Protect the right side of the curve from accidental overspray. Position the single die cut filigree piece (not the stencil) on the left side of the curve. Spray a generous area around it with turquoise. Move the die cut to the second and then third position, spraying each. Go back and fill in the entire remainder of the left side with turquoise paint. Avoid painting the white filigrees. Let dry completely.
- Protect the left side of the wrap. Position the filigree stencils as pictured in the sketch. Note that the top half of the wrap and bottom mirror each other so the stencils have to be flipped over to be reused. Spray the stencil with turquoise then dust it lightly in places with brown for accents. Be sure there is no wet paint on the stencil when you flip it. Complete all the filigrees in this way. Let dry completely.
- Position the small accent stencil so it straddles the first curve. Paint it turquoise followed by brown as you did the filigrees. Repeat on the other two curves.
FRINGE DIRECTIONS
- TIP - We placed a warm iron on one end of the embroidery floss and pulled the entire length slowly under the iron to get all the kinks out.
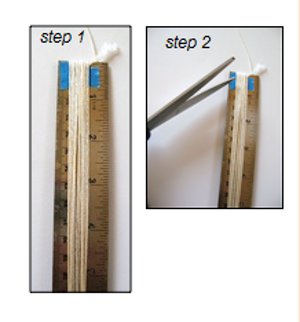
- Cut the floss into 12” pieces. An easy and quick way to do that is to tape one edge of the floss to the end of a ruler. Wrap the floss around vertically.
- Bend the ruler slightly to insert scissors under the floss. Cut both ends.
- Fold a length of floss in half. Slip it into a large eye needle (#16 embroidery needle).
- Pierce the fabric 1/4” from the edge and pull part way through.
- Remove the needle from the floss.
- Pull the cut ends through the loop, securing the floss to the hem.
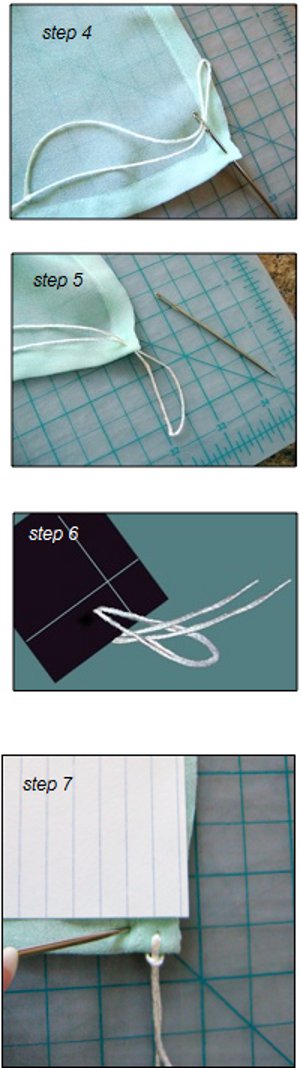
- Use the lines on a standard index card to help you space each fringe 1/4” apart. Continue adding fringe across the width of the wrap.
- To cut the fringe evenly, use painters tape to secure the hemmed edge of the wrap to a cutting surface. Place the tape just above the knotted floss. Avoid putting the tape on the knotted edges of the floss (like we mistakenly did in the photo) or when you remove it, you may pull out floss along with the tape. Smooth out the fringe so that the strands are all parallel. Place a second piece of tape four inches from the hem.

- Using a rotary cutter or a sharp craft knife cut on the four inch edge of the tape. Remove the tape and your wrap is complete.
Read NextBleach Tie Dye Shirt
Your Recently Viewed Projects

Thanks for your comment. Don't forget to share!
editorKS
Feb 27, 2012
To access the patterns, please click the link that says "Templates." It's the last item in the materials list. Please note that templates are available as a PDF document, so you will need Adobe to access them, if you do not already have it. Hope this helps! --Editors of FaveCrafts
lalaw8
Feb 27, 2012
Same problem...where are the stencil patterns? Otherwise, beautiful scarf I'm anxious to do...
jodiemartz 7240505
Feb 26, 2012
Where are the stencil patterns? They are great, but I can't find them. Thanks.
Report Inappropriate Comment
Are you sure you would like to report this comment? It will be flagged for our moderators to take action.
Thank you for taking the time to improve the content on our site.