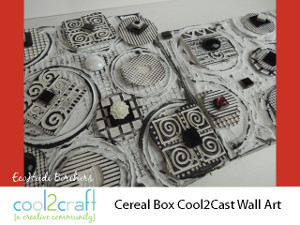
Transform Cereal Boxes into Wall Art
We have some excellent crafts to make if you have old cereal boxes that you want to get rid of. Transform Cereal Boxes into Wall Art with this DIY wall art craft from Heidi Borchers. You'll be amazed at the creativity behind this do-it-yourself wall decor design. The materials are varied and unique, and the final product looks like it came straight out of a catalog. Don't waste your money on a wall hanging that you don't love when you can create your own from these easy craft instructions.
Materials:
- Aleene's Original Tacky Glue.
- Cereal boxes (or other cardboard food boxes - shape and size similar to art canvas)
- Rubber bands (to fit around box)
- Sharp pointed tool (to punch hole into back of box for hanging)
- Matboard (cut to fit front of cereal box)
- Scissors
- Cardboard squeegee (cut along one edge with pinking shears)
- Cool2Cast
- Plastic zip top bags, measuring cup and water
- Plastic cups (different sizes depending on pattern designs desired)
- Texture plates - hard plastic, clear plastic or rubber
- White flat finish spray paint (Heidi uses Rustoleum)
- Black acrylic paint and cosmetic sponge
- Embellishments: plastic flexible mesh, flat back marbles, mirror tile pieces
Instructions:
-
Glue cereal box lid closed. Use rubber bands to hold closed while the glue dries.
-
Determine placement for hanging and punch hole in back of box. (This is how you will hang your art piece on the wall)
-
Mix batch of Cool2Cast according to package directions. (It is best to mix several small batches for this project)
-
Clip bottom corner of bag and drizzle Cool2Cast onto pre-cut matboard.
-
Use serrated edge squeegee to pull Cool2Cast across surface of matboard to create interesting patterning. If desired, press mesh pieces directly into Cool2Cast. NOTE: You will need to work quickly on this step as the Cool2Cast begins to dry quickly on a porous surface.
-
While the mixture is still wet, press rim of cups into Cool2Cast and lift directly up. This will give you a pattern to follow for the next step.
-
To create texture, pour remaining Cool2Cast in circles using pattern lines as guides and then press cups back into Cool2Cast. Set matboard aside to dry for at least one hour.
-
To create texture pieces, mix new batch of Cool2Cast (or if you still have mixture left over in bag that is still very wet) and pour in circles and squares on texture plates. Tap texture plate to slightly flatten Cool2Cast. Set aside to dry for one hour and then pop off from texture plates.
-
To "glue" the pieces onto the matboard, mix a small batch of Cool2Cast. Decide where you want to place your texture pieces, pour a small puddle of Cool2Cast onto matboard and press the texture pieces into the wet Cool2Cast. Continue to layer the pieces to achieve the look that you want. Let dry completely.
-
If you want to add texture to the sides of your cereal box, pour Cool2Cast one side at a time and squeegee with serrated edge. Let all pieces dry completely overnight.
-
Adhere decorated matboard to front of cereal box with Aleene's Tacky Glue. Let glue dry.
-
Spray all surfaces of box and decorated matboard with white flat spray paint. Let dry.
-
You can color or paint your wall art any color or use black acrylic paint (apply with cosmetic sponge) to highlight the raised surfaces of the texture as Heidi did in her finished project.
-
Glue embellishments in place. Let dry.
- Hang on wall!

Thanks for your comment. Don't forget to share!
Marilyn B
Jun 05, 2017
What a clever and creative way to create art, and I never would have thought of using cereal boxes or similar cardboard cutouts. Adding the three dimensional aspects really creates a high end look. This could be done in various colors and would make a lovely gift for a wedding or housewarming. Thank you for the detailed instructions and creative idea!
Report Inappropriate Comment
Are you sure you would like to report this comment? It will be flagged for our moderators to take action.
Thank you for taking the time to improve the content on our site.