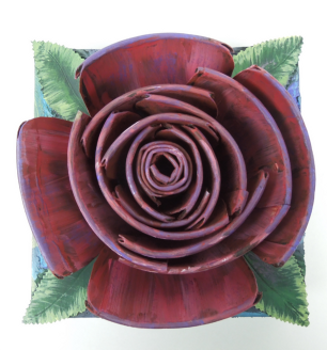
Recycled Rose Canvas Art
Save money and time with recycled crafts for the home. Use plastic coffee cups to construct your own Recycled Rose Canvas Art - it's a pretty project that's sure to brighten your space. The exaggerated floral looks divine on a blank canvas.

Materials:
- Aleene’s Super Thick Tacky Glue (available in the Aleene’s Tacky Pack or full size)
- Aleene’s Hot Glue Gun and Glue Sticks
- Starbucks cardboard coffee cups (approximately 5 cups will be needed per flower)
- Scissors
- Pinking shears (optional)
- Stretched canvas (4″ x 4″)
- Black flat spray paint
- Acrylic paint (several floral colors of choice and two selections of green, plus complementary colors for the canvas)
- Paper towels
- Paint brush
- Scoring tool
Instructions:
-
Measure and cut approximately 2-1/2″ to 3″ wide strip from top of each cup.
-
Leave one strip its full length. This will create the bud of the flower. (Note that you will only be using the rim strips for most of this project so save the remainder of the cups for another project and set one aside for the leaves.) Gently bend the rim edge to soften its rigidity. This will help when you need to roll it into a bud.
-
Cut one strip into approximately 2″ long pieces. Cut the top corners to round them. Repeat to create graduating larger lengths of petals.
-
In this technique, you will use both the Aleene’s Super Thick Tacky Glue and the hot glue to secure the pieces. The hot glue holds the pieces quickly and the Aleene’s Tacky Glue holds the pieces forever. This is a great way to get the quick holding benefits of hot glue but be assured that your project will hold season after season.
-
Apply Tacky glue along one end of strip and apply hot glue along side of wet glue. Begin to roll from end to end adding both glues as you work the length. Glue to secure the end. You should now have a fairly tight bud.
-
Find the center point of your canvas and use both glues to adhere the bud to the canvas.
-
To prepare all petals for gluing, use scoring tool to draw a line approximately 1/4″ up from cut edge (opposite the rim edge). The line should start in one corner, slightly round up to 1/4″ and then go down to the other corner. You will use this score line as a cutting guide to create a bend in the bottom of the petal. This will give you a broader gluing edge. Before cutting, gently bend the rim edge to curve the petal.
-
Use scissors to snip petal up to the score line. Space your snips approximately 1/4″ apart. Gently bend up along the score line. You should now have a slightly curved petal with a snipped and folded edge along the bottom.
-
Apply both glues to the underside of the folded edge and glue the first petal onto the canvas, wrapping gently around the bud. Continue to add petals, gluing in place, until you have the entire flower glued in place.
-
In a well ventilated area, spray paint the entire canvas and flower with black paint. Let dry.
-
To add painted color to the flower, dip brush in first color, brush excess paint onto paper towel and then brush onto flower. This will create a dry brush effect. Continue with all colors until you have the painted effect and coloring you desire.
-
Dry brush paint the canvas top and sides.
-
Cut leaf designs from remainder of one cup. Use pinking shears to cut notched edges. Note: if you cut once and then cut again, slightly offset, you will create smaller notches in the sides of your leaves.
- Paint leaves, let dry and then glue in place. Let dry.