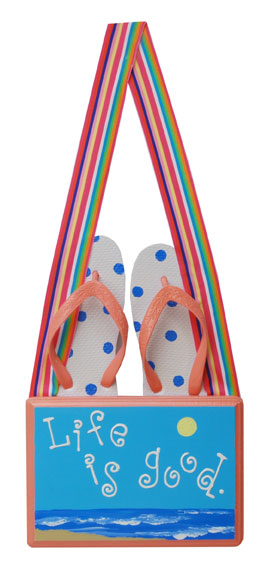
Beach Plaque
Want a wall plaque painting project idea? How about celebrating your trip to the beach with this summery, flip-flop wall beach plaque.
Materials:
- DecoArt Americana Acrylics DAO1 - Snow (Titanium) White
- DecoArt Americana Acrylics DAO6 - Pineapple
- DecoArt Americana Acrylics DAO77 - Desert Sand
- DecoArt Americana Acrylics DAO87 - Indian Turquoise
- DecoArt Americana Acrylics DA251 - Melon
- DecoArt Americana Acrylics DA270 - Ocean Blue
- Americana Writer DAW01 - White
- Americana Brush DBF2575-B - Flat 3/4"
- Americana Brush DBF3504-B - Chisel Blender 4
- Americana Spray Sealer DAS12 - Americana Gloss Spray
- Foam plate
- 1/4" and 3/4" round foam pouncer brushes
- Lo-temp glue gun and glue sticks
- One yard of 1 1/2" coordinating grosgrain ribbon
- One pair of white flip-flops (or coordinating color)
- 6 5/8" x 9 1/2" unfinished wood plaque
Instructions:
Preparation: Remove all stickers or labels from surfaces.
1. Use 3/4" flat brush and Indian Turquoise to paint top center area of plaque; let dry.
2. Use flat brush and Ocean Blue to paint bottom 1 1/2" area of plaque center. While wet, use tip of brush to blend in Snow White waves across Ocean Blue area; stipple Snow White on top of waves with chisel blender brush to form foam. Let dry.
3. Use tip of blender brush and Desert Sand to stipple on sand of beach area; let dry.
4. Use 3/4" pouncer brush and Pineapple to paint sun on plaque and let dry.
5. Use flat brush and Melon to paint sides of plaque; let dry.
6. Use White Americana Acrylic Writer to write words "Life is Good" on plaque; let dry.
7. To paint white flip-flops, use 1/4" pouncer brush and Ocean Blue to dot on base of flip-flop; let dry. Use blender brush and Melon to paint thong; let dry.
8. Spray flip-flop and plaque with Americana Gloss Spray and let dry.
9. Refer to photo for position and glue bottom portions of flip-flops to back of plaque.
10. To hang, fold ribbon length in half and glue 2" of each end to back of plaque with outer edges aligned with edge of plaque.