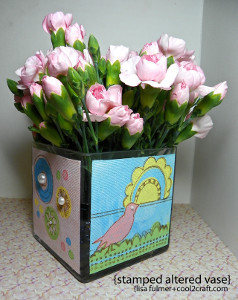
Easily Embellished Glass Vase
Spring craft ideas don't get much more versatile than this Easily Embellished Glass Vase from Lisa Fulmer. Easy spring crafts make the best projects, especially if you're in need of some good homemade gifts. Make this vase to spruce up your or a friend's DIY home decor. You'll love how simple it is to add a mixed media embellishment on the side of this glass box vase. Use this vase to hold flowers, toiletries or odds and ends. When you see how lovely this vase looks, you won't be sorry you made it.

Materials:
- 8.5" x 11" white sticky-back canvas (1 sheet) from the Claudine Hellmuth Studio line
- Creative Layers foam and clear stamps from the Claudine Hellmuth Studio line
- Multi-medium matte finish gel medium from the Claudine Hellmuth Studio line
- Semi-gloss acrylic paints from the Claudine Hellmuth Studio line
- Inkssentials non-stick craft sheet from the Claudine Hellmuth Studio line
- 4" square (cube) glass vase
- Paintbrushes
- Acrylic stamp block
- Brown ink pad
- Cosmetic sponge
- Self-adhesive pearl embellishments
- Paper trimmer
- Iron
- Parchment paper
- Pencil and ruler
Instructions:
-
Choose 4 paint colors, blend a drop of each with a dab of medium to make 4 pale shades, then paint one color on each quadrant of one sheet of sticky-back canvas; allow to dry completely.
-
If the paper liner of the canvas curled as it dried, place the dry painted canvas sheet between 2 layers of parchment paper and press lightly with an iron on medium heat to flatten. Leave the liner in place, it won't get peeled off until the end.
-
Use a pencil and ruler to lightly mark a 4" square on each colored area of the canvas to stamp you design inside before the final trim.
-
Select the foam stamps you like and test-stamp different design combinations on paper with the brown ink pad first.
-
Choose the paint colors you want to stamp with and spread a small dab of each on your craft mat, then use a cosmetic sponge to dab some paint on to a foam stamp. Less is more with paint-stamping - don't overload the stamp with paint.
-
If the stamped image is too light, use it as a guide to paint a little more color within the lines with a small brush.
-
Allow each stamped image to dry a bit before moving on to the next to avoid smearing. Continue stamping your designs with the foam stamps on all 4 quadrants of the canvas sheet; allow to dry completely.
-
Choose the coordinating acrylic stamps and stamp them on top of the paint-stamped areas with a brown ink pad, allow to dry.
-
Trim out each 4" finished square, peel off the liner and apply each square to one side of the vase.
- Accent each square with self adhesive pearl embellishments.
Read NextDecoupaged Paper Mache Vases