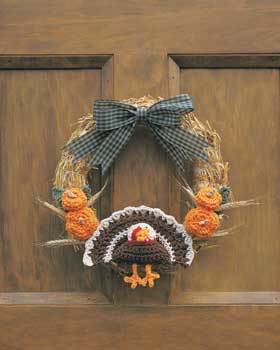
Crochet Turkey Thanksgiving Wreath
There's nothing cuter than this Thanksgiving wreath project that features a little bit of knitted amigurumi!
This Crochet Turkey Thanksgiving Wreath from Lily Sugar n' Cream is a great way to decorate your door for autumn. Welcome friends and family to your home with this cute Thanksgiving wreath, or bring it as a hostess gift if you're traveling for the holidays. Instructions are given on how to make the turkey and the pumpkins... so use one or both to decorate your wreath.
You could also use this adorable crocheted turkey to decorate your table for Thanksgiving! One of the best things about this how to make a wreath tutorial is that it shows you how to make a wreath that will not wilt.

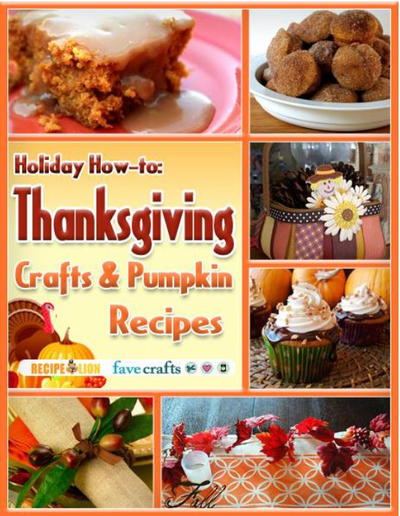
You can find this Thanksgiving craft project and 29 others in our free eBook, Thanksgiving Crafts.
Materials
- 1 ball Lily® Sugar’n Cream (Solids: 70.9 g / 2.5 oz) Yarn in the following colors:
- Ecru (contrast A)
- Red (contrast B)
- Warm Brown (contrast C)
- Hot Orange (contrast D)
- Jute (contrast E)
- Sage Green (contrast F)
- Stuffing
- Size 4 mm (U.S. G or 6) crochet hook or size needed to obtain gauge
- 2 glue-on eyes
- Straw wreath 12 ins [30.5 cm] in diameter
- Hot glue gun and glue sticks
- Dried wheat sheaves for decoration
- 1 yd [.9 m] 1¼ ins [3 cm] wide ribbon for bow
Notes
- 1 ball each of A, B, C and D will make 2 Turkeys
- 1 ball of E will make 14 Small or 10 Large Pumpkins
- 1 ball of E will make 25 Leaves
Gauge: 16 sc and 16 rows = 4 ins [10 cm].
Instructions
Turkey:
- Tail: With C, ch 8. Join with sl st to form ring.
- 1st row: (WS). Ch 2. 8 hdc in ring, changing to A in last hdc. Turn. 8 sts.
- 2nd row: With A, ch 1. (1 sc in next hdc. 2 sc in next hdc) 4 times. Turn. 12 sts.
- 3rd row: Ch 1. 1 sc in back loop only of each sc to end of row, changing to C in last sc. Turn.
- 4th row: With C, ch 2. 2 hdc in each sc to end of row. Turn. 24 sts.
- 5th row: Ch 3 (counts as first dc). Miss first hdc. 1 dc in each hdc to end of row, changing to A in last dc. Turn.
- 6th row: With A, ch 1. 1 sc in each dc to end of row. Turn.
- 7th row: Ch 1. 1 sc in back loop only of each sc to end of row, changing to C in last sc. Turn.
- 8th row: With C, ch 3. 1 dc in first sc. (Ch 1. 1 dc in next sc) 23 times. Turn.
- 9th row: Ch 3. (Miss ch-1. 1 dc in next dc. Ch 1) 23 times. 1 dc in top of turning ch, changing to A in last dc. Turn.
- 10th row: With A, ch 1. 1 sc in first ch-1 sp. [Miss 1 dc. (1 hdc. 1 dc. 1 hdc) in next ch-1 sp. Miss 1 dc. 1 sc in next ch-1 sp] 11 times. Miss next dc. (1 hdc. 1 dc. 1 hdc) in next ch-1 sp. Sl st in top of turning ch. Fasten off.
Body:
(make 2 pieces alike)
With C, ch 15.
- 1st row: 1 sc in 2nd ch from hook. 1 sc in each ch to end of ch. Turn. 14 sts.
- 2nd row: Ch 1. 1 sc in each sc to end of row. Turn.
- 3rd row: Ch 1. Draw up a loop in each of next 2 sc. Yoh and draw a loop through all loops on hook - Sc2tog made. 1 sc in each sc to last 2 sc. Sc2tog. Turn.
- 4th and 5th rows: Rep 3rd row, changing to B at end of 5th row. Turn. 8 sts at end of 5th row.
- 6th row: With B, rep 3rd row, changing to A at end of row. Turn. 6 sts.
- 7th row: With A, ch 1. 2 sc in first sc. 1 sc in each sc to last sc. 2 sc in last sc. Turn. 8 sts.
- 8th row: Ch 1. 1 sc in each sc to end of row. Turn.
- 9th and 10th rows: Ch 1. Sc2tog. 1 sc in each sc to last 2 sc. Sc2tog. Turn. 4 sts after 10th row.
- 11th row: Ch 1. (Sc2tog) twice. Fasten off.
Beak:
With D, ch 5.
- 1st row: 1 sc in 2nd ch from hook. 1 sc in each ch to end of ch. Turn. 4 sts.
- 2nd row: Ch 1. (Sc2tog) twice. Turn. 2 sts.
- 3rd row: Ch 1. Sc2tog. Fasten off.
- Wattle: With B, ch 7. Fasten off.
Legs:
(make 2)
With D, ch 3.
- 1st row: Sl st in 2nd ch from hook. Sl st in last ch. (Ch 3. Sl st in 2nd ch from hook. Sl st in last ch) twice.
- Next row: Ch 1. Draw up a loop at base of each toe. Yoh and draw through all 4 loops on hook. Ch 4. Sl st in 2nd ch from hook. Sl st in each of last 2 ch.
- Fasten off.
- Finishing: Sew Beak to Body as shown in picture. Sew Wattle to base of Beak. Sew the two Body pieces tog, leaving bottom open, and stuff lightly. Sew bottom closed. Sew Legs to bottom of Body. Attach eyes and sew Body to Tail.
Pumpkins (Small):
With D, ch 4. Join with sl st to form ring.
- 1st rnd: Ch 1. 8 sc in ring. Sl st to first sc.
- 2nd rnd: Ch 1. 2 sc in each sc around. Sl st to first sc. 16 sc.
- 3rd and 4th rnds: Ch 1. 1 sc in each sc around. Sl st to first sc.
- 5th rnd: Ch 1. (Sc2tog. 1 sc in each of next 2 sc) 4 times. Sl st in first st. 12 sc.
- Stuff with small amount of stuffing.
- 6th rnd: Ch 1. (Sc2tog) 6 times. Sl st in first st. 6 sc.
- 7th rnd: Ch 1. (Sc2tog) 3 times. Fasten off (bottom of Pumpkin).
- STEM: (make 1 for each Pumpkin): With E, ch 3. Sl st in 2nd ch from hook. Sl st in last ch. Fasten off.
- FINISHING: With D, sew through center of Pumpkin 5 times, each time bringing yarn around the body at evenly spaced intervals. Draw tightly and fasten securely. Sew Stem in place to foundation ch at top of Pumpkin.
Pumpkins (Large):
With D, ch 4. Join with sl st to form ring.
- 1st rnd: Ch 1. 8 sc in ring. Sl st to first sc.
- 2nd rnd: Ch 1. 2 sc in each sc around. Sl st in first sc. 16 sc.
- 3rd rnd: Ch 1. (1 sc in next sc. 2 sc in next sc) 8 times. Sl st in first sc. 24 sc.
- 4th and 5th rnds: Ch 1. 1 sc in each sc around. Sl st in first sc.
- 6th rnd: Ch 1. (Sc2tog. 1 sc in each of next 2 sc) 6 times. Sl st in first st. 18 sc.
- 7th rnd: Ch 1. (Sc2tog. 1 sc in next sc) 6 times.
- Sl st in first st. 12 sc.
- Stuff with small amount of stuffing.
- 8th rnd: Ch 1. (Sc2tog) 6 times. Sl st in first st. 6 sc.
- 9th rnd: Ch 1. (Sc2tog) 3 times.
- Fasten off (bottom of Pumpkin).
- STEM: (make 1 for each Pumpkin): With E, ch 3. Sl st in 2nd ch from hook. Sl st in last ch. Fasten off.
- FINISHING: With D, sew through center of Pumpkin 5 times, each time bringing yarn around the body at evenly spaced intervals. Draw tightly and fasten securely. Sew Stem in place to foundation ch at top of Pumpkin.
Leaves:
(make 4)
With F, ch 12.
- 1st rnd: (RS). 1 sc in 2nd ch from hook. 1 sc in next ch. 1 hdc in next ch. 1 dc in each of next 4 ch. 1 hdc in next ch. 1 sc in each of next 2 ch. 3 sc in last ch.
- Working into other side of ch, proceed as follows: 1 sc in each of next 2 ch. 1 hdc in next ch. 1 dc in each of next 4 ch. 1 hdc in next ch. 1 sc in next ch. 2 sc in next ch. Join with sl st to first sc. Fasten off.
Assembly:
- Using photo as a guide, glue Turkey to base of Wreath. Glue one large and one small Pumpkin to Wreath on either side of Turkey with 2 Leaves under the Pumpkins, as shown in picture. Add wheat sheaves and ribbon bow.
You can find more ways to welcome guests to your home for the Thanksgiving feast or celebrate the harvest season with our free eBook 9 Thanksgiving Decorations to Make.
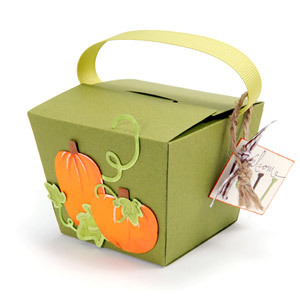
Read NextThanksgiving Menu Tote Bag


Thanks for your comment. Don't forget to share!
elocin1104 2800379
Jul 07, 2018
I love this turkey wreath. It is the perfect size for anyone wanting a short project to work on. It will also make a great door decoration for my new home! A few years ago I made turkey magnets, and I think this will be just as nice as those! Thank you for the great pattern!
Marilyn B
Nov 03, 2017
My friend crochets and this is right up her alley! I could also see making these and displaying them in a cornucopia or pretty basket adorned with fall colors and ribbon! Or you could also make them as place holders at the table and give one to each guest to take home! The nice thing with these is that they don't break! The turkey is cute as can be and will get a lot of attention! So clever and very creative!
BeckySue
Sep 04, 2016
I like to crochet, but I'm not one for undertaking a big project that takes months to complete, so this little turkey is perfect for me! I like wreaths that are more diminutive and not gaudy, like this one because I have a modest house and front entry. It has a little bit of whimsy to it, too, and my grandkids will enjoy that.
yarncrazy102
Jul 27, 2010
I finally made this adding a few more pumpkins and "Indian" corn from another pattern to add "me" to this awesome wreath. I really enjoyed making it and can't wait until November to hang it on our front door.
Melissa Ryan
Oct 25, 2012
We'd love to see a picture of it on our facebook page! (www.facebook.com/favecrafts)
Report Inappropriate Comment
Are you sure you would like to report this comment? It will be flagged for our moderators to take action.
Thank you for taking the time to improve the content on our site.