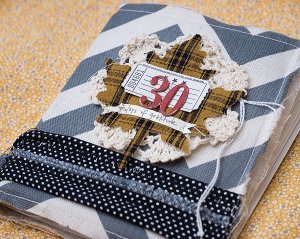
Gratitude Journal
The end of the year is a wonderful time to reflect on all you're thankful for...and what better way to remember all your thoughts, quotes, and stories than with this Gratitude Journal. With plenty of space to record all your thoughts and feelings, this handmade journal is a great way to record and remember a year in your life. You could also gather around the Thanksgiving table and each take turns recording something you're thankful for. Look back on this Gratitude Journal whenever you're feeling down for a little reminder of how wonderful life can be.

Materials:
- Fuse Creativity System® Starter Set
- Medium Design Set 101890 - Curvy Square
- Medium Design Set 100780 - Circle
- Dressmaker Shears (9")
- Apron Lace Border Punch
- Two 7 inch x 13 inch pieces of fabric
- Chipboard
- Thread
- Doily (optional)
- Patterned papers
- Fabric scraps and trims for embellishing
- 4 sheets of cardstock
- Masking tape (optional)
Instructions:
- To begin, cut 2 pieces of chipboard to 5.5 inches x 5.5 inches. Cut 2 pieces of fabric for the cover to 7 inches x 13 inches. You can jump down in the instructions to the steps on embellishing the cover at this point to make it easier on your sewing machine. If you are confident your machine can stitch through chipboard, you can embellish the cover later. Stitch the 2 pieces of fabric together (wrong sides together) using a 1/2 inch seam allowance and leave one end open. Slip the chipboard pieces into the opening of the cover pushing one all the way to the end and leaving the other closer to the opening so there is a gap between them. Stitch the opening closed.

- Using the Fuse and a variety of dies, cut 15 shapes from a variety of patterned papers. In place of a few of the die cuts, I used pieces of book paper.

- Using a Fiskars paper trimmer, cut 4 sheets of cardstock in half. This will leave you with 8 pieces of cardstock that are 12 inches x 6 inches. Fold these in half and stack them and you'll have a book signature. When the sheets are folded in half, the edges will be uneven. Use the paper trimmer to even them up. If you are concerned about your sewing machine stitching through this much paper, separate the cardstock sheets into 2 signatures and work with them separately. Lay the signature(s) opened up, on a flat surface and slip a die cut shape between each of the pages making sure the die cuts extend past the fold. If you are working with 2 signatures instead, the left over shape will be added when the signatures are sewn to the book cover. Stitch the signature(s) to the center of the fabric cover, in the area where there is no chipboard reinforcement. If using 2 signatures, the extra die cut should be added and sewn in between the 2 signatures.

- To create the leaf embellishment for the cover, I've followed the example of Fiskateer Rebecca Peck and pushed my die to do something it wasn't designed to do. This particular die is designed for paper and cardstock. If you flip the cutting plate over so the the rubber side is up and the plastic side instead comes in contact with the die, the hard plastic surface allows the die to now cut through the fabric. But you can see it will also etch the design into the plastic. The etching is permanent so only use this technique if you are OK with this. I also used iron on interfacing to give more body to the fabric and help prevent it from fraying.

- Layer the fabric leaf over a doily or other materials of your choice and further embellish the cover as desired, stitching everything to the front cover.

- I added a quote to my opening page that sums up my purpose for the book.

- You can pre-embellish the pages of the book so adding your thoughts and taking a photo each day is all you'll need to do. I also Googled "gratitude quotes" and compiled a list of them so I can just choose one each day according to the events of my life at the time.

- I have used a variety of chipboard and sticker numbers. I used a date stamp on some pages and made some punched borders from masking tape, a trick I learned some time back from Stephanie Howell.
- To punch masking tape, first adhere it to the edge of a piece of wax paper. Gently remove it and stick it to your project.

- Since the wax paper now had a pretty punched edge, I used it to create a pocket for one of the pages. I'll write out my journaling on a piece of paper and slip it in the envelope.
- At the end of November, the final page can be used to reflect back on how finding something to be grateful for every day, even on the rotten days, has impacted your life.

If you're looking for more unique ways to enjoy Thanksgiving, these 16 Turkey Crafts for Thanksgiving are a great way to celebrate the holiday.