Nautical DIY Organizer
Make this summer craft to store your warm weather crafting supplies.

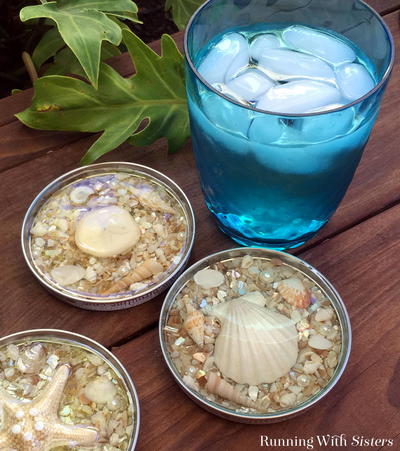
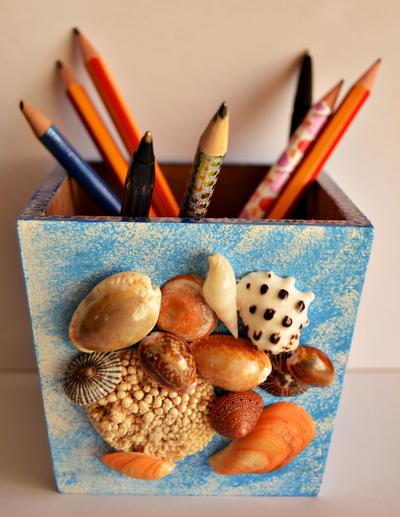
Get your craft room ready for summer with this Nautical DIY Organizer. You can keep this cute container on your desk or work surface and use it to house paintbrushes, crochet hooks, knitting needles, wooden dowel rods, sponges, and more. The gorgeous seashells and coral, as well as the unique painting technique, make beach crafts like this look like they were plucked right from the sand!
The supplies for this one-of-a-kind DIY organizer cost only a few dollars, and you can put it together in an evening. It's so easy that even your kids could make it, with adult supervision.
If you're still feeling inspired, you could make more cute summer crafts like this and place them in your kitchen or throughout your house to store other things like pens, pencils, flowers, candy - the list goes on.
Estimated Cost$11-$20
Time to CompleteIn an evening
Primary TechniqueDIY Craft

SeasonSummer
Project TypeMake a Project
Materials List
- Natural wooden square box with slanted sides, 3.4” high
- A selection of small seashells and a small piece of coral
- Acrylic paint in two colors: white and powder blue
- Giotto décor textile pen in ultramarine blue
- Pilot silver marker pen
- Paintbrush
- A sponge (to save money, use one that was inside a medicine bottle)
- Hot glue gun and glue sticks
- Quick-drying gloss spray varnish
Instructions
-
Paint the outside of the box with an even layer of the white acrylic paint and allow to dry thoroughly. Do not paint the bottom of the box or the inside, but do paint the top edge. Repeat two more times, allowing each layer to dry thoroughly before continuing.
-
Color the top edge of the box with the Giotto pen and allow to dry.
-
Sponge an uneven layer of the powder blue paint over the sides of the box and allow to dry thoroughly.
-
Use the silver pen to add silver squiggles to the top edge of the box and allow to dry.
-
Now you can decorate one side of the box with the seashells. Put the box down so that one of its sides will rest on the table. Decide how the seashells and piece of coral would be arranged. Hot glue the shells and coral in place.
-
Spray the outside and inside of the box with the varnish and allow to dry thoroughly. Do not spray the bottom of the box.
-
Use the box to store your pens, crochet hooks, knitting needles, paintbrushes, and more.


Comment and let us know:
Where have you traveled and collected seashells?
Read Next47 Summer Crafts for Adults
Your Recently Viewed Projects
Thanks for your comment. Don't forget to share!
Weberme
Apr 03, 2017
Do you still have those sea shells from last year laying around because your child or grand kid does not want to part with them. Well then this organizer is for you. A great way to use those shells and you are saving the shells which has those memories. You can find some wood box at a yard sale or thrift store or maybe you have one sitting around. paint it or decoupage it and glue on shells any way you want and then fill it with your pens,crayons or anything you want to organize. Simple and fast and oh so pretty.
Report Inappropriate Comment
Are you sure you would like to report this comment? It will be flagged for our moderators to take action.
Thank you for taking the time to improve the content on our site.