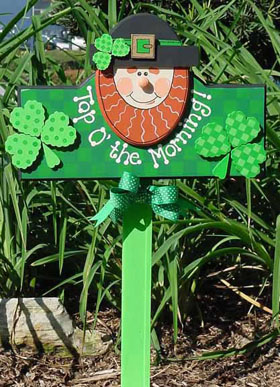
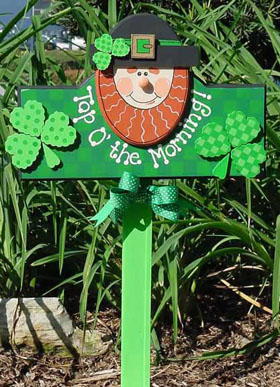
Top O' the Morning Leprechaun Greeting
This adorable smiling Top O' the Morning Leprechaun Greeting sign from Delta Creative is sure to bring your home the luck o' the Irish. Display it outside your front door or in the driveway to celebrate in St. Patrick's Day festivities this March. A great easy painting craft for St Patrick's Day! Find more St. Patrick's Day craft projects, recipes and fun facts in our FREE St. Patrick's Day eBook.
Materials:
-
Delta Ceramcoat® Acrylic Paint:
- Georgia Clay (2097)
- Jubilee Green (2421)
- Christmas Green (2068)
- Lime Green (2489)
- Santa's Flesh (2472)
- White (2505)
- Gleams 14K Gold (2604) Delta Ceramcoat All-Purpose Sealer
- Delta Ceramcoat Satin Exterior/Interior Varnish
- Delta Stencil Magic® - Checkerboard Medley
- Delta Paint & Toss Sponges
- Delta Stencil Adhesive Spray
- Delta Sobo Glue
- Wood Oval - Walnut Hollow - # 0277
- Piece of wood - 5 1/2" x 13" - or desired size
- Wood stake
- Brushes - 3/4" flat, #1 liner, #4 flat
- 1 yard - bright green 1" grosgrain ribbon
- Sharpie Marker
- Tracing paper
- Palette
- Pencil
- Graphite
- Cotton swabs
- Sanding block
- Masking tape
- Cardboard
-
Wood pieces - Lara's Crafts:
- 6 - 2" X 2" scalloped heart - U10763
- 3 - 1" X 1" scalloped heart - U10762
- 2 - 1-1/2" X 3/4" primitive heart - U10751
- 1 - 6" X 1-1/8" ruler - U10307
- 1 - 5/16" birch button - U10715
- 1 - 1-1/4" X 1-1/4" square - U10254
Instructions:
-
Apply a coat of All-Purpose Sealer to all wood pieces. Let dry and sand smooth.
-
Trace patterns onto tracing paper. Position face pattern into place on the oval, slide graphite between and retrace lines with pencil. This will transfer the pattern to the wood.
-
Paint in the following sections. Let the paint dry before adding a second coat if needed. A blow dryer will speed up this step:
Christmas Green - rectangle wood piece
Lime Green - three large scalloped hearts and one primitive heart, band on hat and small square in center of wood square.
Georgia Clay - Beard
14K Gold - Remainder of wood square for buckle
Santa's Flesh - face
Black - hat, ruler, and edge of rectangle piece
-
Spray the adhesive to the back of the stencil following label instructions. Line up the largest stencil squares along the bottom edge of the plaque. Tap the flat end of the Stencil Sponge into Jubilee Green and tap off excess on palette. Pounce onto the stencil. Carefully lift the stencil off and set aside, blow the paint dry. Re-position the stencil and continue stenciling until the whole rectangle is stenciled.
-
Secure the three small and Jubilee Green wood hearts to the cardboard with masking tape - this will make stenciling easier. Stencil the medium size checks on the larger hearts with Lime Green. Use Jubilee Green and the small squares for the small hearts. Add Jubilee Green cotton swab dots to the Lime Green large hearts.
-
Paint the beard and eyebrows with Georgia Clay. Brush mix Georgia Clay and Santa's Flesh and paint in the cheeks and the wood button for the nose.
-
Add Black cotton swab dots for the eyes. Use the Felt pen to draw in the mouth.
-
Use the liner brush and Santa's Flesh for wavy line on the beard, high lights on cheeks, nose and eyes. Use Georgia Clay for the line under mouth.
-
Position the face on the rectangle. Line up the lettering under the face and transfer to wood. Use the liner brush and White paint to paint the lettering. Add cotton swab dots to the ends of the letters.
-
Detail with felt pen - Buckle, around beard, and hat band.
-
Varnish all pieces and glue into place.
-
Paint the stake Lime Green if desired, nail sign to stake and tie a bow around the stake.
Read NextHow to Catch a Leprechaun
Your Recently Viewed Projects
Thanks for your comment. Don't forget to share!
Cheryl Sherry
Mar 15, 2010
Hi. Direction 2 says to trace patterns onto tracing paper. Where are the patterns that you need to trace??
Report Inappropriate Comment
Are you sure you would like to report this comment? It will be flagged for our moderators to take action.
Thank you for taking the time to improve the content on our site.