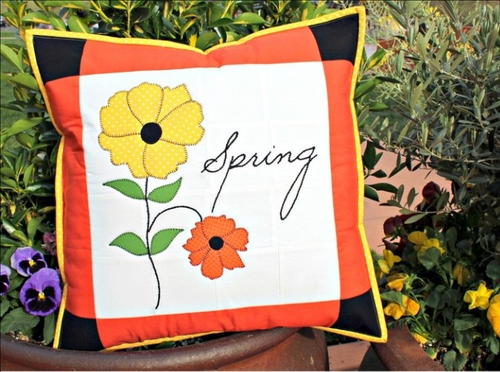
Bring on Spring DIY Throw Pillow Cover
Spring sewing patterns like this one are the perfect way to say goodbye to winter and hello to flowers!

Welcome spring with a DIY throw pillow cover fit for any living room. This gorgeous "bring on spring" project from Therm O Web features beautiful blooms and bright colors. Orange, yellow, and green go together so well when it comes to projects celebrating the world coming to life again after a long winter. The black accents are perfect for highlighting the centers of the flowers and ensuring the elegant script stands out. The contrast is lovely! This would be a lovely addition to the furniture in a three seasons room, a window seat, or any area where guests gather. Celebrate spring with this beautiful sewing project.
NotesFinished Size: 18”x18”
Project TypeMake a Project
Time to CompleteIn an evening
Sewn byBoth Hand and Machine

Materials List
- 18”x18” pillow form
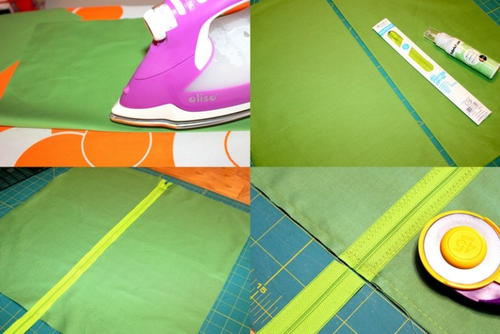
- 18” green zipper
- Cotton fabrics (see Cutting Instructions for sizes): white, yellow, orange, green, black
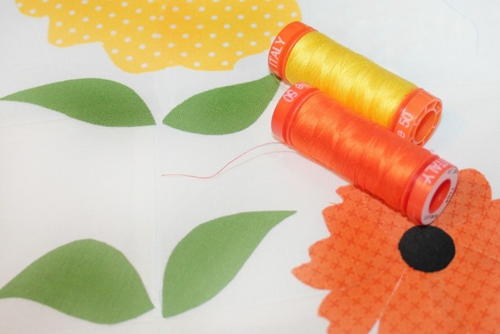
- Thread: yellow, orange, black, green
- Black embroidery floss and embroidery needle
- Small embroidery hoop
- Washable fabric marker
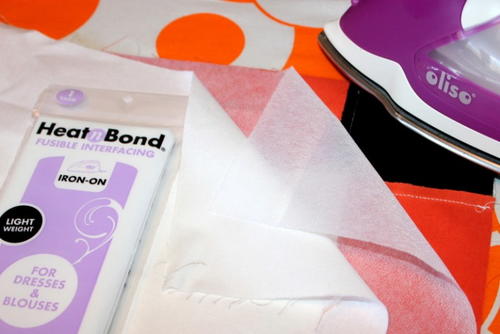
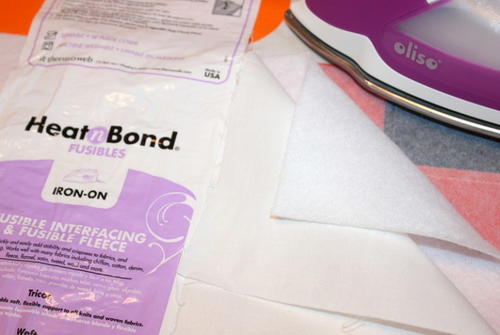
- HeatnBond Fusible Light Weight Interfacing
- HeatnBond Fusible Fleece High Loft Interfacing
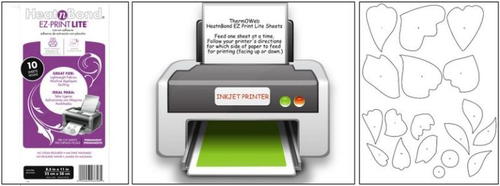
- HeatnBond EZ·Print Lite Iron-On Adhesive Sheets
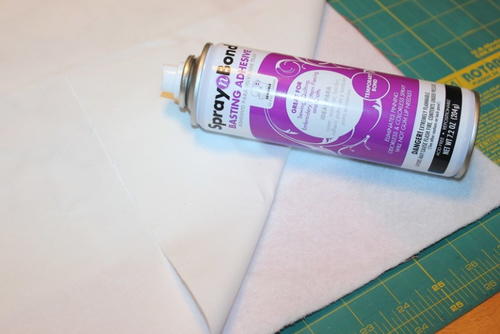
- SpraynBond Basting Adhesive
- Therm O Web Pressing Paper
- Fabric Fuse Liquid Adhesive
- Tools: iron, sewing machine, sharp scissors, inkjet printer, basic sewing supplies
- Pattern – Download HERE
From the Designer: After a long winter and freezing temperatures, everyone is ready for some beautiful spring weather. If the flowers aren’t blooming in your neighborhood yet, let them bloom indoors on a bright, cheerful pillow. For even easier applique, use printer-friendly HeatnBond® EZ·Print Lite Iron-On Adhesive Sheets to print the flower and leaf patterns. No tracing required – just print, cut and go!
Cutting Instructions
Please read complete instructions before beginning project. Prewash fabrics without fabric softener.
Cut from HeatnBond interfacing:
1 – 18.5”x18.5” square Light Weight
1 – 18.5”x18.5” square Fleece
Cut from fabrics:
16 – 3.5”x3.5” white cotton squares (center blocks)
4 – 3.5”x12.5” orange cotton strips (borders)
4 – 3.5”x3.5” black cotton squares (border corners)
3 – 2.5”x42” yellow cotton strips (binding)
2 – 19”x19” green cotton squares (backing/pocket)
1 – 18.5”x18.5” white cotton square (pillow front lining)
Sewing Instructions (1/4" Seams)
-
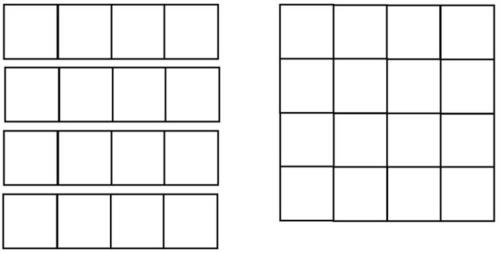
Sew center squares together in four rows as shown. Press seams to sides. Sew rows together, matching seams.
Note: click on any images to make larger. -
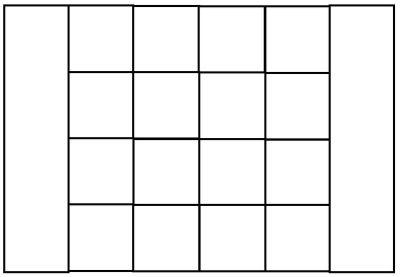
Sew two 3.5”x12.5” border strips to sides of center block. Press seams toward borders.
-
Sew two 3.5”x3.5” border corners to ends of each remaining 3.5”x12.5” border strip. Press seams toward corners. Sew strips to top and bottom of center block, matching seams. Press seams toward borders.
-
Prepare the applique patterns using printable HeatnBond EZ·Print Lite Iron-On Adhesive Sheets, or trace patterns by hand onto paper side of traditional HeatnBond Lite. If using EZ·Print Sheets, load one sheet at a time into your inkjet printer’s paper tray. Sheet should be placed so printing is on the smooth side of the paper; follow your printer’s instructions for which side of paper to feed for printing (facing up or down). Set print quality to normal/plain paper. Print flower/leaf patterns; let dry 5-10 seconds before handling.
-
Cut applique patterns into four sections: larger petals; smaller petals; round flower centers; leaves. Follow package directions to fuse pattern pieces to the wrong side of the appropriate fabrics, larger petals to yellow, smaller to orange, centers to black, and leaves to green. Set iron to medium heat/no steam and press for 2 seconds. Repeat until all patterns have been bonded to fabrics. Let cool.
-
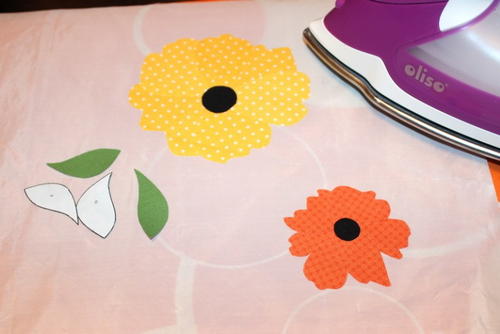
Cut out individual applique pieces on printed lines. Peel off paper liner from pattern pieces. Using placement diagram as a guide, place flower applique shapes, adhesive side down, on top of a sheet of non-stick Pressing Paper. Lightly iron to hold all of the pieces together for each flower. Let cool. Gently remove flowers from non-stick sheet and position on pillow front as shown, adhesive side down. Press and hold iron for 6 seconds on each section until entire piece is bonded. Let cool.
-
Follow package directions to fuse the 18.5” Light Weight Interfacing square, rough side down, to the wrong side of the pillow front. Cover with pressing cloth and press in place. Note: Adding Light Weight Interfacing helps stabilize fabric for sewing appliques, keeps threads from showing through from embroidery, and helps maintain fabric size.
-
Sew around applique edges using a straight, zig-zag or blanket stitch.
-
Trace lettering and stems from diagram onto pillow front using washable marker. Embroider flower stems using your favorite stitch.
-
Place 18.5” Fusible Fleece square, adhesive side down, on top of interfaced fabric. Cover with pressing cloth and press in place following package directions.
-
Spray fleece with SpraynBond Basting Adhesive and lay 18.5” lining fabric square on top, wrong side down. Smooth to remove wrinkles. Let dry. Quilt pillow top, if desired.
-
Fold each 19” fabric square in half, wrong sides together, and press folds. Lay folded edges side-by-side, right side up, with a ½” gap between them. Squeeze small line of Fabric Fuse Adhesive along each fabric fold and lay wrong side of zipper over adhesive, keeping zipper teeth centered and away from adhesive. Let dry. Using straight or zig-zag stitch, sew along outside edges of zipper. Sew a basting stitch around edges of pillow backing.
-
Place pillow top and zippered back with wrong sides together; backing will be slightly larger than pillow front. Trim edges and square up pillow and backing to same size. Sew basting stitch around edges to keep front and back together for binding. Add binding using your favorite method; there are many tutorials available online.
-
Insert pillow form and zip pillow closed. You’re ready for spring!


What are your favorite colors to decorate with in the spring?
Read Next47 DIY Spring Wreath Ideas