Daisy Duck Spring Centerpiece
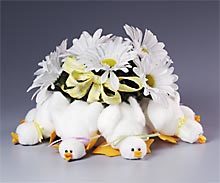
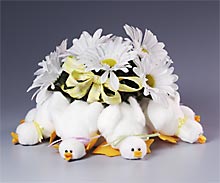
This adorable spring centerpiece craft can be used all season long. It's fun and easy to make and it's perfect for an Easter table or as a fresh table decorating theme.
Materials:
- STYROFOAM Brand Foam:
- One 3" Ball, Seven 1-1/2" Balls
- Seven 3" eggs
- 6" x 1-1/4" x 1-1/4" Wreath
- Felt: 45" white plush, 1/3 yd.; gold, white, 9" x 12" sheet each
- Satin ribbon, 1/8" x 1-1/3 yds. each: pink; lilac; pale green; yellow
- Plaid paper-twist ribbon, 1" x 2 yds.
- Silk daisy bush
- Black beads, 5mm, 14
- Fine-gauge floral wire, 18" length
- Serrated knife
- Low-temp glue gun and glue sticks
- Powdered cosmetic blush (optional)
- Cotton-tipped swab (optional)
- Candle stub or paraffin
- Pencil
- Ruler
- Compass
- Scissors
- Extra-long straight pins
- Wire cutters
Instructions:
- Wax serrated knife with candle stub or paraffin. Cut and discard 1/4"-thick lengthwise slice from each foam egg. Cut and discard thin slice from one side of each foam ball.
- Use compass to draw seven each of following circles on wrong side of plush felt: 4"; 3"; 1". Cut circles and patterns from felt as indicated. For wings, cut 4" circles in half. In addition, cut two 1-1/2" x 12" strips and one 6" circle from white craft felt.
- To make base, glue 1-1/2"-wide felt strips to edges of foam wreath. Glue 6" circle to bottom of wreath. Glue 3" foam ball, flat side down, inside center of wreath. Set aside.
- Place eggs, flat side down, on wrong side of remaining plush felt. Draw a line around each egg, 2" larger than foam. Trace second set of eggs, drawing line at foam edge. Cut out pieces, cutting smaller eggs just inside traced lines.
- To cover eggs (bodies), center eggs, rounded side down, on larger plush pieces cut in Step 4. Bring felt up to flat side. Pin felt at four opposite points; gather excess between pins. Glue felt to foam; let dry. Remove pins. Trim excess felt. Glue smaller plush pieces to flat sides of eggs.
- Repeat Step 5, using 3" plush circles to cover small foam balls (heads). Glue 1" plush circles to flat bottoms of heads.
- With flat side of head at bottom, use scissors point to make two small holes, 1/4" apart, in each head for eyes. Glue beads into holes.
- Glue bill pieces together in pairs, making 14 upper/lower bills. Glue one upper and one lower bill to each duck, curving slightly to meet at outer edges. Note: When gluing bottom bills to face, pinch some tight in center for a different expression. Use cotton-tipped swab to blush cheeks, if desired.
- For wings, glue each 4" half-circle in half, with right side out. With rounded edge of wing toward narrow end (tail) and shorter straight edge of wing toward wide end (shoulders) of body, glue wings 1-1/2" apart to bodies. Wings will stand out slightly; glue tips to body.
- Tip body so tail end is slightly raised from work surface. Using photo as guide, glue head to body. Glue feet to bottom of body, angled slightly outward. Note: If duck tips backward, wreath will keep it in place. Repeat for all ducks. Glue duck bottoms side-by-side to top edge of wreath.
- Use wire cutters to cut apart daisy bush. Insert stems into ball at center of wreath. Fill in arrangement with extra leaves.
- Cut satin ribbon into 12" lengths. Tie two lengths of same color into bow around each duck's neck, alternating colors.
- Tie paper ribbon into bow. Wrap bow center with wire and insert into flowers.
®™ Trademark of The Dow Chemical Company ("Dow") or an affiliated company of Dow.
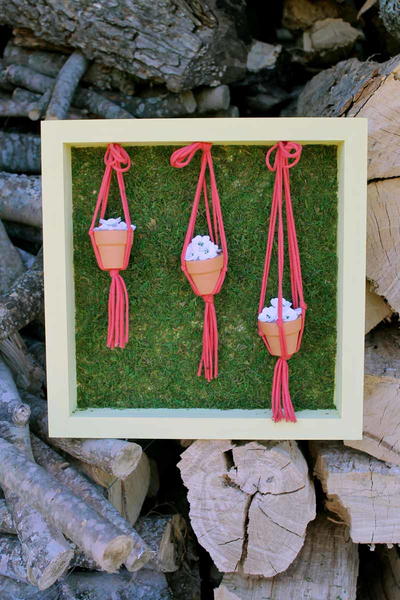
Read NextSpring Mini Flower Pot Moss Decor
Your Recently Viewed Projects
HRHCraftQueenie
Mar 24, 2011
This is adorable and ducky which seems to be a theme of mine lately.
Report Inappropriate Comment
Are you sure you would like to report this comment? It will be flagged for our moderators to take action.
Thank you for taking the time to improve the content on our site.

