Jewelry Pouch or Sachet
Sew up a scalloped pouch in shiny lame fabric for keeping jewelry or holding potpourri or dried herbs as a sachet. Decorative thread creates a contrast on the pretty scalloped edge. Find this bag sewing pattern from Sulky of America with 19 other great sewing patterns in the Sewing for Beginners eBook.

Materials:
- 1 - 7" x 18" Lame
- 1 - 7" x 18" Woven Fusible Interfacing
- 1 - 7" x 18" Fleece or Batting
- 1 - 7" x 18" Trigger Fabric for lining
- Sulky Rayon Thread in color to match fabrics
- 2 - 7" x 18" Sulky Softn Sheerª Permanent Stabilizer
- Permanent Fine-Line Marker
- JHB Round Button
- Hand Needle and Thread
- Zig-Zag Sewing Machine
- Size 14/90 Machine Needle
- Open-toed Applique Foot
- Steam Iron and Press Cloth
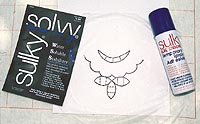
- 2 - 10" sqs. Sulky Solvyª or Sulky Super Solvyª Water Soluble Stabilizer
- Sulky KK 2000ª Temporary Spray Adhesive
- 8" Wooden Machine Embroidery Hoop
- White Chalk Marker
- Pattern
Prepare Fabrics for Cut-Work & Scallops
- Using a press cloth, iron the woven fusible interfacing onto the back of the Lame' to keep it from fraying.
- Layer --- "Make a sandwich" Spray each layer with KK 2000 to hold the "sandwich" together without pins. Layer as follows:
Interfaced Lame, right side down
Fleece or Batting
2 layers of Soft n Sheer
Trigger Fabric for lining of bag, right side up
- Working from the right side of the Trigger, measure 3/4" down from one 7" end and, with a white chalk marker, draw a 4 3/4" centered line that will be 1 1/8" from both sides. Draw two 11" parallel lines connecting to the ends of the 4 3/4" line. Measure from one end of each 11" line and make a hash mark every 1" across each line to the end. Then make a gently curved line of scallops at 1" intervals to connect the two parallel lines, or use the pattern of the curve scallops (see Prepare the Cut-Work Design) to stitch the scallops.
- If your machine has a built-in or programmable scallop stitch, adjust the stitch length to make 1" scallops. Otherwise, you will need to make your own scallops by tapering your zig-zag satin stitch to form a scallop. Attach an open-toed applique foot to your machine for easy viewing. Thread both the top and bobbin with Sulky 40 wt. Rayon to match your Trigger or Lame. Stitch the scallops from the Trigger side, following your chalk markings. Stitch a satin stitch across the 4 3/4" straight line of the design. Flip to Lame side.
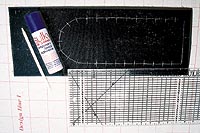
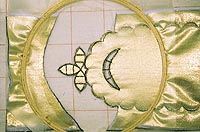
Prepare the Cut-Work Design
- Lightly spray KK 2000 onto the cut-work design pattern. Smooth one of the 10" squares of Sulky Solvy or Super Solvy over it and trace the design onto the Solvy using a fine-line, permanent- ink marker. Carefully peel off the traced Solvy from the pattern.
- Spray KK 2000 onto both sides of the curved end of the "sandwich". Smooth the Solvy Pattern in place over the Lame layer of the "sandwich". Smooth another layer of Solvy under the "sandwich". Secure all in an 8" wooden machine embroidery hoop.
- Continue using the Sulky Rayon Thread in the needle and bobbin as you straight stitch 3 times (laying one row of stitching right next to another) over the cut-work lines on the Solvy. Stitching can be done "free-motion" with feed-teeth down using a darning foot, or with the feed-teeth up along with an open-toed applique foot.
- Use small, sharp-pointed scissors to carefully cut away all layers, except the bottom Solvy layer, up to the straight stitching. Or, you can cut through all layers, spray another 10" square of Solvy, and smooth it under the "sandwich". Rehoop all.
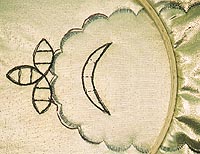
- Stitch free-motion Richelieu Bars across crescent shaped cut-work area by straight stitching three times almost on top of each other, being sure to anchor ends in previous straight stitching.
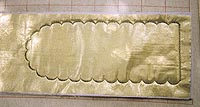
Finish the Bag
- Cut away the excess fabric from scallops; remove all Solvy. To finish edges, use a slightly larger width setting than original stitching and make a tapered satin stitch over the scallops and cut-work areas; do not use a built-in scallop stitch since its almost impossible to match previous stitching.
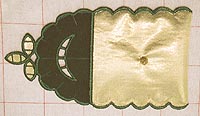
- Fold the bag, matching 5 scallops together. Stitch in the ditch of the scallops or satin stitching to sew the sides together. Sew the button on. The bottom loop of the cut-work becomes the buttonhole closure.
- Fill with candy, a perfumed cotton, or use as a travel bag for jewelry. Makes a wonderful holiday gift that anyone would love to receive. Project Image
Read NextSew Powerful Purse Project
Your Recently Viewed Projects

Thanks for your comment. Don't forget to share!
Report Inappropriate Comment
Are you sure you would like to report this comment? It will be flagged for our moderators to take action.
Thank you for taking the time to improve the content on our site.