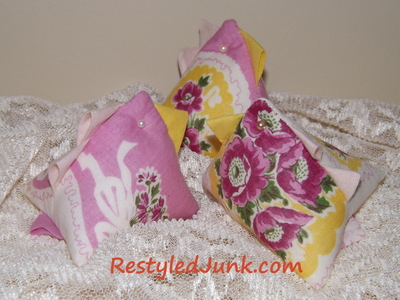
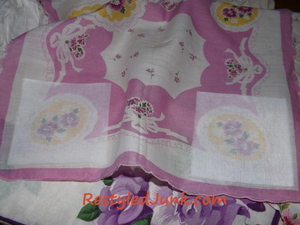
Vintage Hanker-Chicks Easy Sewing Pattern

Use your old hankies for something other than wiping away tears. This Vintage Hanker-Chicks Easy Sewing Pattern is a fun and unique project that no one will expect. Sewing ideas for beginners should be fun, playful and quick to make. You can use these cute chicks as decorations all around your home or give them as gifts. Free vintage sewing patterns aren't just meant for grandma - they can be translated into cool ideas for any age group. Spring is the perfect time to make this project, but you can work on it any time of year. Be sure to make a bunch at one and save them for a special gathering or dinner.
Primary TechniqueSewing

Sewn byMachine
Materials:
- Vintage hankie
- Lightweight fusible interfacing
- Cotton fabric scraps-pink and yellow
- Ruler
- Scissors
- Iron
- Straight pins
- Sewing machine
- Stuffing
- Hand-sewing needle and thread
- 2 pearl beads
Instructions:
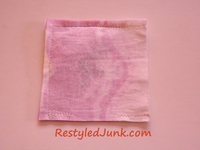
- Iron the hankie. Cut two 3 1/2-inch squares from the hankie and two 3 1/2-inch squares from lightweight fusible interfacing. These are the body pieces. Cut two 1 1/2-inch squares from pink fabric for the chick's comb, one 1 1/2-inch square from yellow fabric for the chick's beak and one 1 1/2-inch square from the hankie for the chick's tail.

- Note: I used a 13-inch hankie and was able to cut three chicks. I could have gotten four, but I didn't need the crocheted edge and I cut the body pieces from the best parts of the printed design.
- Iron the interfacing squares to the back of each hankie square for the body.
- Note: Not all hankies will have a right and wrong side. In those cases, choose a wrong side for the interfacing.
- Fold one comb square in half diagonally and iron. You now have a triangle. Fold the triangle in half again and iron. Repeat with each of the remaining 1 1/2-inch squares. Each finished triangle will have a side with two folded edges, a side with one folded edge and a raw edge.

- Lay one body square on your work surface with the right side facing up. Working on the left-hand edge, place the yellow triangle on the body 1/2 inch below the top left-hand corner with the one folded edge facing the corner and the raw edge on the edge of the square. Place one pink triangle on the top edge, 1/2 inch from the top left-hand corner. The one folded edge is facing the corner. Overlap the remaining pink triangle halfway over the first. All triangle points are facing to the inside of the body.

- Lay the remaining body square on top of everything with the wrong side facing up. The triangles will be sandwiched in between. Pin the left-hand edge, the top edge and the bottom edge. Do not pin the right-hand edge.
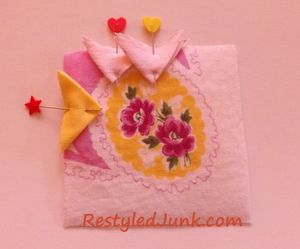
- Sew the left-hand edge, top edge and the bottom edge using a 1/4-inch seam allowance. Leave a 2-inch opening in the center of the bottom edge. Do not sew the right-hand edge.
- Open the right-hand edge of the square. Bring the seams of the top and bottom together and squeeze the edges together. This twists the body. The seams are now in the center, and the folds are on the ends. Slip the tail triangle between the edges and centered over the seam. Align the edges with the triangle pointing inside the body. Pin the edge closed. Sew the edge using a 1/4-inch seam allowance. This is the back of the chick.
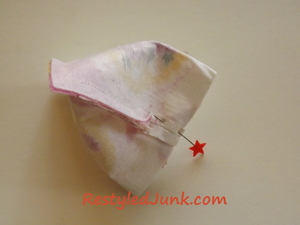
- Clip the corners to remove bulk. Turn the chick body right side out through the opening on the bottom edge.
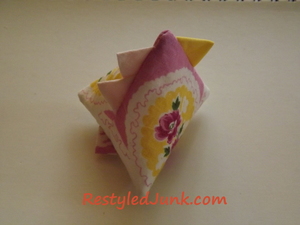
- Stuff the chick and hand-sew the opening closed.
- Hand sew a small bead on each side of the head corner, 1/2 inch from the top and side edge, for the chick's eyes.
- Note: I used 1/8-inch pearl beads from my bead stash. Choose type, color and the size of beads that best complement your hankie.
Read NextBible Cover With Handles And Zipper