Sassy Apron Sewing Tutorial
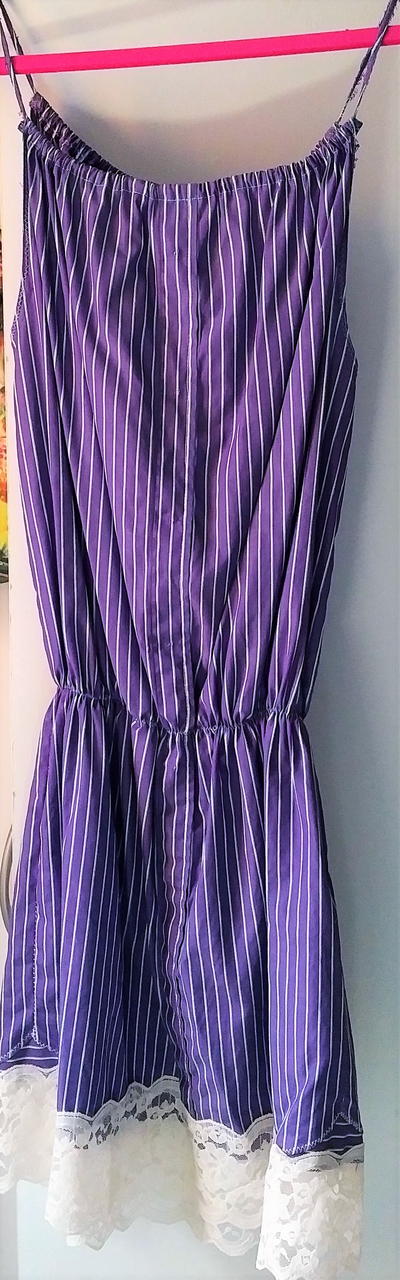
Sew up a sassy accessory for the kitchen with this free apron sewing tutorial. A ruffle and pockets in coordinating fabrics are cute finishing touches. Project excerpted from C&T Publishing's Oh Sew Easy Lifestyle by Valori Wells and Carolyn Spencer.

Materials:
- Cotton print 1 3⁄4 yard- Main body
- Cotton print 2 1⁄ 4 yard- Top band and pockets
- Cotton print 3 1⁄ 2 yard- Waistband
- Thread- Topstitching
- Buttons, rickrack, ribbon, or beads Accents
- Stitching and knitting gauge (optional)
Instructions:
Cutting:
Cotton print 1
- 1 1 @ 301⁄ 2? × 201⁄ 2? Main body (kitchen apron)
- 1 @ 301⁄ 2? × 151⁄ 2? Main body (cocktail apron)
Cotton print 2
- 1 @ 51⁄ 2? × 181⁄ 2? Top band
- 4 @ 51⁄ 2? × 51⁄ 2? Pockets
Cotton print 3
- 2 @ 6? ×width Waistband
Assembly:
Waist Band
-
Cut off the selvage edges from the 2 strips of waistband fabric. Use a 1⁄2? seam allowance to stitch together the short ends of the waistband strips to make one long strip. Press the seam open.
- Measure and press under 1⁄4? on the short edges of the waistband strip. Make the waistband as a Clean Edge Band.
Pockets
-
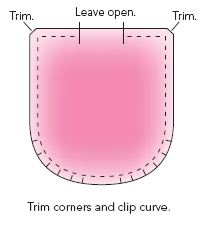
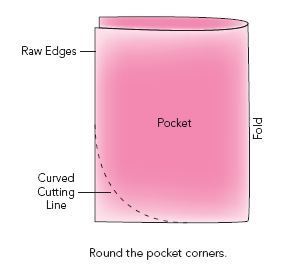
To round the bottom corners of each pocket, place pocket squares right sides together, and fold in half. Use a chalk pencil to draw a quarter circle in the corner of the raw edges. Cut on the chalk line through all layers.

-
For each pocket, open the fold, and stitch the pieces together, using a 1⁄4? seam allowance. Leave a 3? opening in the center of the top edge.
-
Trim the points from each corner. Be sure not to cut so close that you cut the stitching. Make 1⁄8?-deep clips along the curved edge so the seam will be smooth when the pocket is turned right side out. Trim corners and clip curve.
- Turn each pocket right side out and press, pressing under the seam allowance of the opening. Whipstitch the opening closed.
Top Band
- Make a Clean Finished-Edge Hem on the short edges of the rectangle.
Main Body
-
Make a Clean Finished-Edge Hem around the entire main body of the apron.
-
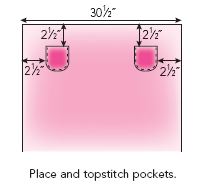
Pin the pockets to the main body 21⁄2? from the sides and 21⁄2? from the top edge.
-
Topstitch each pocket to the main body, stitching 1⁄8? from the edges of the pocket. Leave the top edge open.
Tip- When choosing a thread for the topstitching, you can choose a color that blends perfectly with the fabric or a contrasting color so that the topstitching becomes a decorative touch.
-
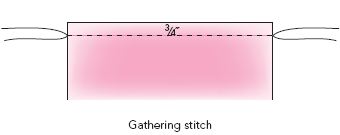
To make a gathering stitch, set the machine stitch length to the longest stitch (usually 5). Stitch across the top edge of the main body piece, 3⁄4? from the edge.
-
Remove the fabric from the machine, and cut the threads, leaving long tails. Knot the thread tails together at one end of the stitching. At the opposite end, gently pull the bobbin thread (the bottom thread) to gather the main body until it is the same length as the top band (181⁄2?). Even out the gathers. Knot the thread tails together to secure.

- Set the sewing machine back to a normal stitch length.
Put the Apron Together:
-
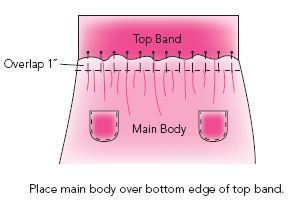
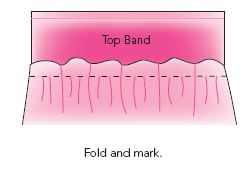
Fold the top band in half crosswise, and mark the bottom edge of the fold with a pin. Fold the top edge of the gathered main body in half, and mark the fold with a pin.
-
Place the top edge of the main body on the bottom edge of the top band, with right sides up. Overlap the edges 1?, and match the center pins. Pin the overlapped edges together.
-
Topstitch the main body to the top band along the gathering stitch line.
-
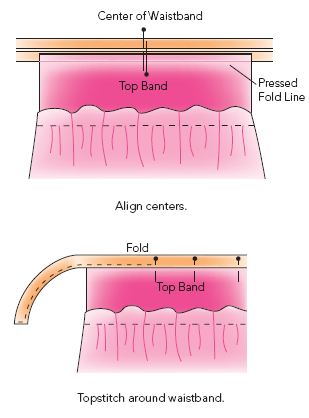
Press under 1⁄2? on the top edge of the top band, and then open the fold. The pressed line will be your guide as you insert the edge into the waistband.
-
Fold the top band and the main body in half crosswise and mark the center of the top edge with a pin. Fold the waistband in half crosswise and mark the center of the bottom (open) edge with a pin.
-
Place the top edge of the top band in the open edges of the waistband. Match the center pins, and align the pressed line on the top band with the bottom edges of the waistband. Pin the layers together. Topstitch along the bottom edge of the waistband.
-
Add trims and embellishments as desired to match your fabrics.

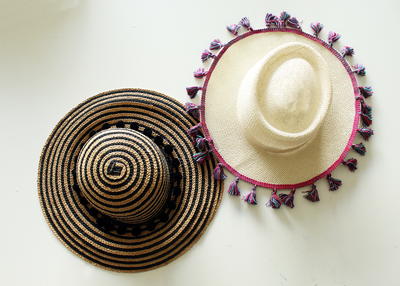
Read NextMake A No Sew Tassel Beach Hat
![Knitting Cast On and Knitting Bind Off Techniques [Infographic]](http://irepo.primecp.com/2016/10/303675/Knitting-Cast-Ons-and-Bind-Offs_Large400_ID-1921152.jpg?v=1921152)
Thanks for your comment. Don't forget to share!
GW
Jan 09, 2014
What is with all the typing errors? a beginner would no more want to try this than the man in the moon. Get some cutting instructions that make sense.
jenag1996 9579905
Jan 11, 2013
hello ..great for first CUT.. & Pockets. but the last part.. the Gathered edge exposed is a bit much.. perhaps in solid colors ?
rtapia11 6417149
Nov 21, 2010
At first glance of this apron pattern I thought ugly but even reading the instruction which was a little confusing until I figure out the typing mistakes. I decided to modified this to look more like a broom skirt so I even use fabric with tones of the Southwest. This is how I cut the fabric: 1-26 1/2"x 11 1/2" for the cocktail apron 1-32 1/2" x 12 1/2" and 1-38 1/2" x 13 1/2" for the Kitchen apron 1-5 1/2" x 18 1/2" Top Band 2-5 1/2" x 30" Ties 4-5 1/2" x 7 1/2" Pockets I cut cocktail apron and pockets out of same color, bottom kitchen ruffle, band & ties out of the same color and the middle ruffle out of a different color. I must say my modification turn out very nice. The fabric colors I used was turquoise,and 2 turquoise prints.
Gretnaaolcom
Jun 09, 2010
I'm sorry, but this is the ugliest anything I've ever seen. However, if the fabric pattern was different, or it was a solid color, it might be nice.
Report Inappropriate Comment
Are you sure you would like to report this comment? It will be flagged for our moderators to take action.
Thank you for taking the time to improve the content on our site.