This project was submitted by one of our readers, just like you.
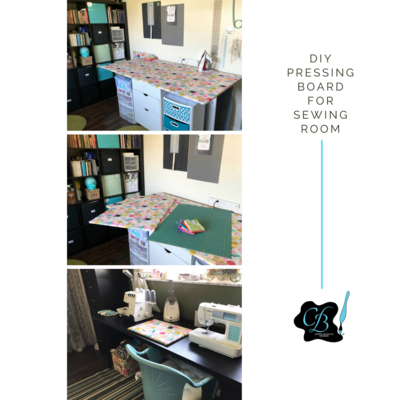
Easy DIY Pressing Board for Sewing Room

Easy DIY Pressing Board for Sewing Room
"Do you struggle with stable seams when quilting? Do you find them warping when pressing on your ironing board? This step by step tutorial shows how you can make your own Easy DIY Pressing Board. As a bonus, I share how to actually get 3 different Pressing Boards to match your cutting mats all from one sheet of OSB. This Easy DIY Pressing Board is not only very functional but is also an easy way to add color and design to your sewing room."
NotesCreate more than one to match your cutting mats. I keep a small one right next to my sewing machine for easy pressing while sewing. It's also the perfect size to fit in a travel bag if attending a class.
Project TypeMake a Project
Time to CompleteWeekend project
Sewn byEither Hand or Machine

Materials List
- Board cut to desired size(s) – I used OSB board, but you can also use plywood. (OSB was cheaper)
- 100% cotton batting (thin, not fluffy)
-
100% cotton fabric cut 4-6 inches larger than board size. You can use good muslin or I used printed Cotton Duck Canvas
(it is important to note that batting and fabric cover needs to be cotton so they don’t melt) - Heavy-Duty Staple Gun
- 3/8″ staples for your Heavy-Duty Staple Gun
- Hammer – for hammering in stubborn staples
- Pliers – for pulling out those defiant staples that don’t go in smoothly
- Sanding tools are optional but recommended.
Instructions
-
Cut OSB board to size to match your cutting mat or desired surface. (Most hardware stores will cut boards for you too)
-
Sand to round corners of cut boards.
-
Cut fabric at least 8" longer and wider than board (4" each side).
-
Cut batting at least 6" longer and wider than boards (3" each side).
-
Lay fabric on flat surface wrong side up.
-
Center batting on fabric. Make sure both fabric and batting are smooth with no wrinkles.
-
Center cut and sanded board onto batting/fabric layer.
-
Smooth excess fabric around edges of board folding fabric over to create neat seam and staple to back of board. Start on center of long edge and continue towards ends creating even spacing of staples.
-
Pull opposite side very taught and repeat step 8.
-
Trim corners to remove excess bulk and fold down corner edges to wrap tight and staple.
-
Repeat stapling edges with short sides and all corners.
-
Use hammer to ensure all staples are flush with no sharp edges.
-
Flip finished Easy DIY Pressing Board over and enjoy.

Read Next10 Minutes Sew Cat Bed