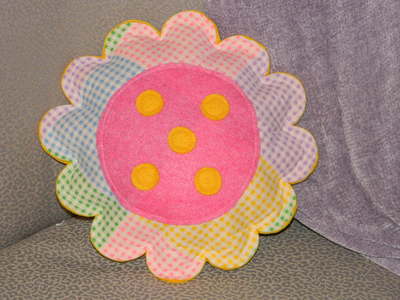
DIY Gingham Flower Pillow

Make something absolutely adorable with this sewing pattern called the DIY Gingham Flower Pillow. This set of instructions will show you how to make a pillow out of gingham pattern fabric in a flower shape. Sewing tutorials like this DIY pillow do not have any buttons attached, which makes them perfect to use as baby shower gifts. The pastel color scheme and flower shape of this pillow is such a cute present for a baby and mommy-to-be. You can sew one of these pillows in an hour, too.
Project TypeMake a Project
Time to CompleteUnder an hour
Sewn byMachine

Materials:
- Cricut, compass or round objects
- Pen
- Cardstock
- Scissors
- Ruler
- Masking tape
- Fusible web
- 1/4-yard pastel gingham fabric
- Iron
- 1/4-yard yellow felt
- 1 craft sheet pink felt
- Straight pins
- Sewing machine
- Quarter
- Stuffing
Instructions:
- Make your pattern pieces. I used my Cricut die cutter, but a compass or round objects of similar sizes will also work. Cut one 8-inch circle, one 6-inch circle and twelve 2 1/2-inch circles from cardstock.
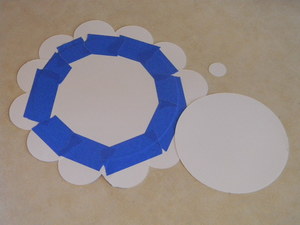
- Place one 2 1/2-inch circle on the edge of the 8-inch circle. Overlap the edges approximately a 1/2 inch. Place the remaining 2 1/2-inch circles around the 8-inch circle, equally overlapping around the entire circumference. Tape the circles to secure. This is the base pattern of your flower.
- Cut two 12 1/2-inch squares from lightweight fusible web. Place the flower base on the paper side of one web square. Trace around the shape. Do not trace on the other square.
- Lay the gingham fabric on your ironing surface with the wrong side facing up. Place the flower traced fusible web square on the gingham with the glue side facing down. Iron the web to adhere. Cut out the flower along the traced line. Peel the paper backing from the remaining web square. Iron the square to gingham in the same way as the flower.
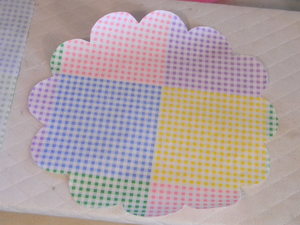
- Place the yellow felt on your ironing surface. Peel the backing from the fused flower shape. Place the flower on the felt with the glue side facing down. Iron the flower to adhere. Peel the backing from the fused fabric square. Place the square on the felt with the glue side down. Iron the square to adhere.
- Cut around the fused flower shape and the square shape.
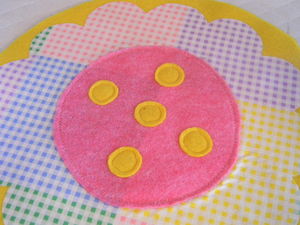
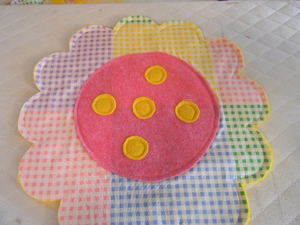
- Trace the 6-inch circle pattern on pink felt and cut out. Center the circle on the front of the gingham flower shape. Pin to secure. Sew around the circle, 1/4 inch from the edge.
- Trace a quarter on yellow felt five times. Cut out the circles. These are the flower's center buttons. Randomly arrange the felt buttons on the pink circle. Sew around the edges of the buttons to attach.
- Lay the gingham/felt square on your work surface with the felt side facing up. Center the flower on the felt with the gingham side facing up. Pin the flower shape to the square. Sew around the flower 1/4 inch from the edge. Leave a 4-inch opening.
- Following the shape of the pillow's flower front, cut the backing.
- Fill the pillow with stuffing. Continue stitching around the flower to close the opening.
- Add real buttons or other embellishments if desired.
Read NextDiy Microwave Popcorn Bag