Shannon's Tips for Harvest Blocks
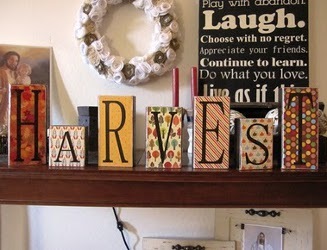
Shannon Staker offers some fall decorating ideas with a tutorial on harvest blocks. She offers a step by step guide to her fall decor project.

Materials:
- 2X4 blocks, measuring 8in, 4in, 7in, 6in, 7in, 5in, 8in in length
- Spray paint
- Mod podge--matte suggested
- Scrapbook paper
- Piece of sandpaper
Instructions:
- Take your blocks, which are all 2X4's. You need them measuring (this is just the length) 8in, 4in, 7in, 6in, 7in, 5in, 8in. and head outside and give them a light coat of spray paint. You don't want them completely covered. It looks rustic if it's uneven and in some spots you can see the actual wood through the paint.

- Cover the front of each piece with a thin layer of mod podge, I prefer matte.

- Place the coordinating piece of scrapbook paper on top of the wood pieces.

- Then turn the pieces of wood onto the scrapbook paper to give them a little weight as they dry. It helps hold down the sides.

- Once it's dry take the piece of sandpaper and lightly sand around all of the edges. This means the front where the paper is and the back and the corners.

- It gives it a nice soft edge instead of a hard crisp cut paper edge. The feel of the wood showing through is fabulous!

- And then give the top a nice thin coat of mod podge. Go right over the vinyl and the paper.
.jpg "Shannons Tips for Harvest Blocks")
- You want to go down over the edges onto the side as well. This seals the edge of the paper in. Once that is dry, flip the blocks over and give the back a coat of mod podge too! Why? It makes it so the paint doesn't rub off onto the surface you are setting it on.

- And display proudly!

- The fall colors are fabulous to keep up from September through November!

- And, the blocks are sturdy enough that little hands can play with them and re-arrange them as they please.
Your Recently Viewed Projects
Thanks for your comment. Don't forget to share!
len10pin
Apr 26, 2017
This is a very cute fall craft. I like the fact that I can use the colors and designs I like. As for the letters, I would just use stencils and paint them on. I love this idea.
cynthiahunt 222194 1
Oct 03, 2012
I like the look of the project, but you completely left out how to get the letters onto the blocks. Are they printed on the card stock? Bought at a store? Cut with a die cut machine?
snow4jc 3930135
Oct 19, 2011
Great idea! She did leave out completely any mention of the vinyl letters.
JennyBee1
Oct 06, 2011
@cherylstepp 5235168, Our sister site www.cutratecrafts.com sells a complete line and we discount too! With over 70,000 items including supplies for crafting, knitting, crochet, sewing, and more, www.cutratecrafts.com is your one-stop shop. --Editor of FaveCrafts
Report Inappropriate Comment
Are you sure you would like to report this comment? It will be flagged for our moderators to take action.
Thank you for taking the time to improve the content on our site.