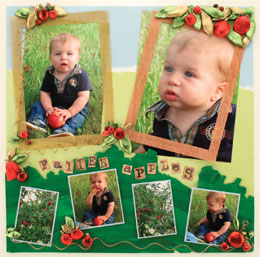
Fallen Apples Scrapbook Page
Clay apple embellishments really jump off the page in this fall scrapbook idea from AMACO.
Materials:
- FIMO® SOFT - Tropical Green, Emerald, Lime Green, Sahara
- Friendly Plastic® - Metallic Avocado, Metallic Gold, Metallic Red, Metallic Deep Rose
- PolyCutters - Set #4, Set #5, Set #6
- Amaco® Fun Wire™ - Light Green, Copper - 24 gauge
- Amaco® Wire Mesh® Brass and Copper (Keepsakes & Cards set 50125P)
- Amaco® Pasta Machine
- Amaco® PolyBlade
- Photos - (one) 5" x 7", (one) 4" x 6" and (four) small photos
- Paper Adventures® Paper sheets - one 12" x 12" light blue two-tone; one 12" x 12" light green
- Letter stickers of your choice
- Pop Dots
- Kokuyo Adhesive
- X-acto® Blade
- Straight Edge
- Large Cutting mat
Steps:
- BASE: Begin with 1 light blue 12" x 12" paper as your base. Take the 12" x 12" light green paper and slowly tear approximately 4" from the top. You can tear straight across to the other side, or on an angle, depending upon how you want your background to look. Adhere your torn green paper to the light blue. Align the straight edges to the bottom and sides, leaving the light blue background exposed on top.
- CLAY GRASS: Begin with FIMO® Tropical Green for your grass. You will probably use about 1/2 a block. Run the clay through the AMACO® Pasta Machine to soften and flatten. Begin with a higher number setting (6 or 7). After you have the green base nice and flat, set it aside. Using the Emerald FIMO®, cut off a small slice using the PolyBlade. Run this through the pasta machine until it is also soft and flat. Continue doing this with the remaining colors (you only need a small slice of each).
- After all colors are set, take the base green and lay it down on your work area. Take the first of your supporting colors and tear off chunks and place randomly onto the base. Repeat this with your other colors as well. Don't use too much that you won't be able to see your base green.
- Lightly press down, just enough so that when you pick up the base green, all the other colors do not fall off. Run it through the pasta machine again. Take your flattened piece of the multi-green base and fold it in half, with the multiple colors on the outside. Repeat this over and over until you receive your desired design. The more you run it through the pasta machine, the more the colors will mix together. Do not roll it too much or you will end up with a solid color again. You need this piece to be longer than 12" long. You will be cutting it to 12" x 3" to 5" high (depending upon how high you want the grass background to be). One edge of the flattened clay should be uneven which will create a wonderful top to your grass.
- Once you have the desired marbled look for the grass, lay it flat on a cookie sheet. Bake at 230 F (110 C) for 30 minutes. Do not over bake. After the 30 minutes, take the clay out of the oven, set aside to cool.
- Trim to 12" x 4.5", leaving one 12" (long) edge untrimmed, thus creating 3 straight edges and 1 irregular one. You can use an X-acto knife and straight edge to cut through the baked clay. The 4.5" height may vary slightly. Using Kokuyo adhesive, adhere clay to the bottom edge of the page. This completes your background.
- PHOTOS: Take a 4 3/4" x 6 1/2" piece of Copper WireMesh® and cut out the center leaving a 1/2" wide frame. Repeat this with the Brass. Adhere one of the frames on top of the 5" x 7" photo on an angle. Repeat with the 4"x 6" photo. Adhere the 5" x 7" photo to the page approximately 1/2" from top and 1/2" from the right edge of the paper. Do the same for the 4" x 6" photo on the left edge of the paper.
- Using a light blue sheet of paper, cut two 2" x 2.25" pieces. Trim 2 photos to 1.75" x 2". Adhere each photo to the center of the blue pieces of paper. Cut two 1.5" x 2.25" pieces from the light blue paper. Trim the remaining two photos to 1.25" x 2". Adhere these photos to the center of the 2" x 2.25" blue piece of paper. Adhere the 4 matted photos to the bottom half of the page, each on a slight angle.
- TITLE: Using the letter stickers you've selected, create your title: "Fallen Apples" in the middle of the page.
- EMBELLISHMENT (APPLES): Create the apples and leaves using Friendly Plastic® and the PolyCutters. Begin with the red colors and cut one piece of the Red Friendly Plastic® to slightly larger than one of the circle PolyCutters. Place that piece of Friendly Plastic® into hot water color side up for about 30 seconds. Carefully remove and immediately use the circle cutters, making sure they go all the way through. Repeat this for all the different size circles with the different color reds. You can do as many or as few circles as you want, depending upon how many you want on your page. Set those aside.
- Cut out leaves using the different leaf PolyCutters and the Green and Gold Friendly Plastic®. Shape as many as you desire. Once you cut out each set of leaves with the Poly Cutter, cut the sets of 3 apart. Set those aside.
- To create the stems of the apples, use very small rectangles. Soften in the hot water as above, shape as you desire. You will need to adhere these behind the apples when you place them on your paper.
- After you have all your apples and leaves created, lay them out as you desire on your page. Before adhering them, you will need to add the Fun Wire™. Take a 12" piece of Bronze Fun Wire and wrap it around a pencil or something similar. Then carefully pull it off the pencil so that you do not lose the coil you created. Using a glue dot, center it in the upper left hand corner of the Metal Mesh frame on the 4" x 6" photo. Adhere the Fun Wire™ in the lower left corner with another glue dot. Curve the remaining coiled wire to the bottom right corner, again adhering with another glue dot. Cover the glue dots with the apples that you created.
- Cut 2" strips of Light Green & Bronze Fun Wire™. Curl around something thin, such as round pliers. These will be used for small accents off the stem of the apples. You do not want to do this for every apple; maybe just 4 or 5 on the entire paper.
- Using Glue dots, take the green leaves, apples, stems and wire accents you created with the Friendly Plastic® and Fun Wire™, and carefully arrange around the page to finish off your "Fallen Apples" page.
Read NextMom Scrapbook Layout